Recently on this blog we saw how to set up a VPS server by configuring everything by hand, from the reverse proxy with Nginx, certificates, deploying a .NET app, systemd, and so on. Everything needed to have full control. People really liked the content and there were quite a few requests to continue this series.
So I have collaborated with Hostinger again to answer several of the questions you left in the previous video. In this post we will see how to deploy an application on a VPS using Dokploy and GitHub, automating the deploy, SSL certificates, and domain configuration without having to set up the entire infrastructure manually.
Table of contents
NOTE: 10% discount code with the coupon NETMENTOR.
1 - Why Dokploy?
I already mentioned in the first video that one of the usual limitations for many developers appears when it is time to deploy applications: we build a lot of them, but we feel incredibly lazy about preparing everything needed to put them into production. In that first post we saw that doing it manually does not require that much work, but there is still some setup to prepare.
In this post we are going to look at Dokploy, an open source piece of software that you can install on your server and that acts as an orchestrator. It offers a visual interface from which, among other things, you can connect GitHub or GitLab repositories, configure domains, and deploy containers automatically.
What Dokploy lets you achieve is having on your own VPS a deployment experience that may feel similar to platforms like Vercel or Heroku, but running on your own server and with greater control over the infrastructure. On top of that, for personal projects or small services, a VPS offers a much more predictable cost. On managed or serverless platforms, a traffic spike, a DDoS attack, or a bad configuration can turn into a very high bill, as we saw some time ago. On a VPS, on the other hand, the limit is more likely to come from the machine's capacity rather than from an unexpected escalation in costs.
Dokploy greatly simplifies all of this, since it automates reverse proxy management, certificates, and a large part of the required configuration.
It simplifies it so much that you can configure automatic deployment so that, for example, every push to main triggers a new deploy.
Before continuing, I want to mention that Dokploy has many more options and settings than what we are going to see in this post. Here we will focus on a practical example to quickly deploy a hobby project on a VPS. Dokploy fits especially well in simple deployment scenarios or single-server setups, where scaling means increasing the resources of a single machine, in other words, using vertical scaling. If you need horizontal scaling or a more complex distributed architecture, you will need to consider other options
Learn more about horizontal and vertical scaling with my book Building Distributed Systems.
1.1 - Install Dokploy on Hostinger
To install Dokploy on Hostinger we have several options. The first and most basic is selecting it from the operating system options on Hostinger's own page, since due to its popularity they have a default option, and with one click it gets installed.
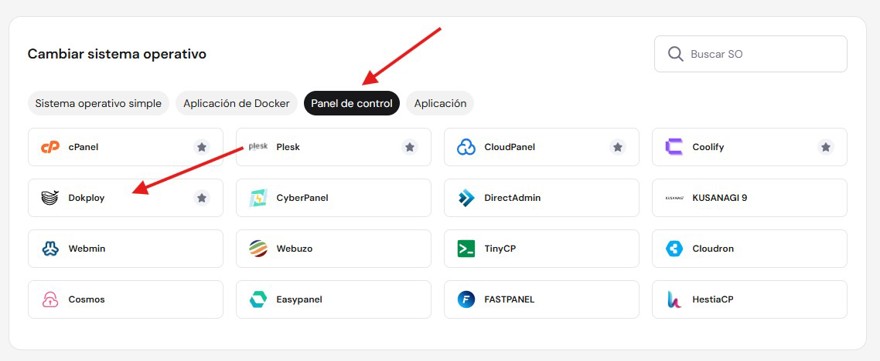
To access it, we can do so through our server's IP and port 3000. If you want to access it through a domain, you must make sure that domain points to your VPS IP.
Or if you prefer, you can create the VPS with any Linux distro and install Dokploy inside it, so you will be able to install any other service you may want in the future.
2 - Deploy an application from GitHub to our VPS with Dokploy
Before touching Dokploy, we need to prepare our app and make sure we have our Dockerfile so we can build our app into a container. I am going to use the test app I created for the previous post, and this is the Dockerfile code:
FROM mcr.microsoft.com/dotnet/aspnet:10.0 AS base
USER $APP_UID
WORKDIR /app
EXPOSE 8080
EXPOSE 8081

FROM mcr.microsoft.com/dotnet/sdk:10.0 AS build
ARG BUILD_CONFIGURATION=Release
WORKDIR /src
COPY ["BlazorApp1/BlazorApp1.csproj", "BlazorApp1/"]
RUN dotnet restore "BlazorApp1/BlazorApp1.csproj"
COPY . .
WORKDIR "/src/BlazorApp1"
RUN dotnet build "./BlazorApp1.csproj" -c $BUILD_CONFIGURATION -o /app/build

FROM build AS publish
ARG BUILD_CONFIGURATION=Release
RUN dotnet publish "./BlazorApp1.csproj" -c $BUILD_CONFIGURATION -o /app/publish /p:UseAppHost=false

FROM base AS final
WORKDIR /app
COPY --from=publish /app/publish .
ENTRYPOINT ["dotnet", "BlazorApp1.dll"]
With this, Dokploy will read the file, build the image, and run the container.
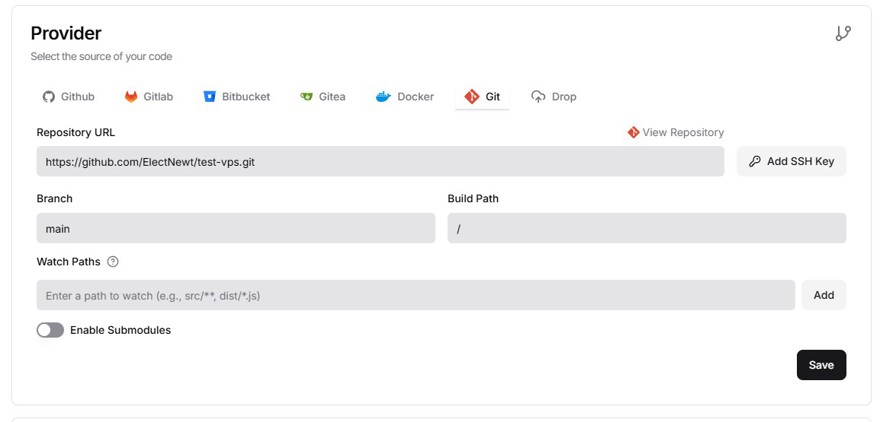
2.1 - Connect Dokploy to GitHub
Now we are going to connect our GitHub repository. If your repository is public, as it is in my case, it is as simple as taking the GitHub URL and entering the branch you want to select:
If your repository is private, what you need to do is configure a PAT (personal access token) with read permissions and put it into Dokploy's settings.
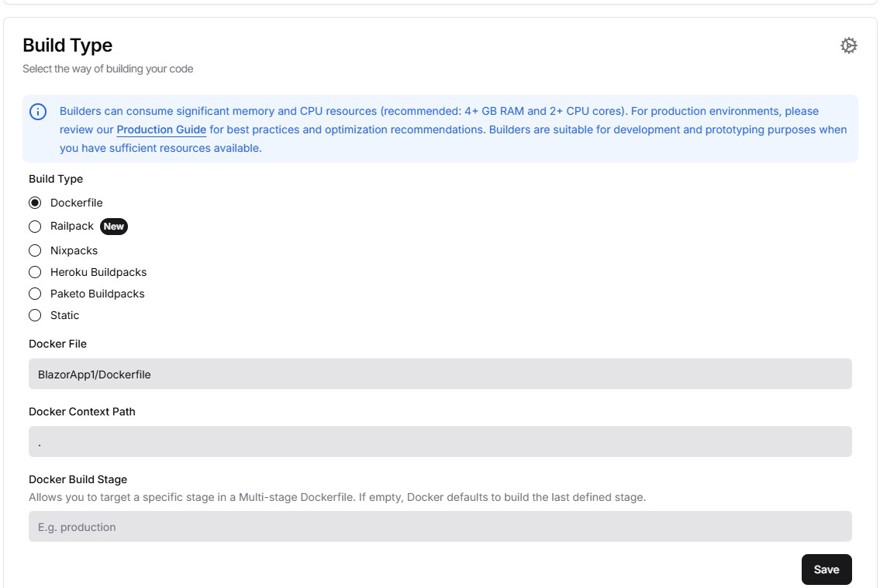
2.2 - Configure deployment with Dokploy
At this point the real reason why we created the Dockerfile inside the project appears. It is very simple: in Dokploy's settings we can indicate that the application will use a Dockerfile and specify the port it will expose inside the container. In the case of ASP.NET, it will normally be port 8080.
Dokploy will automatically route traffic coming from ports 80 and 443, which are HTTP and HTTPS, to our image with the content we want to show.
Dokploy is not monitoring the repository continuously, since that would not make much sense. To automate deployment, what we will do is go to GitHub and add a webhook.
A webhook is nothing more than an HTTP call that GitHub makes to our server. Here we simply need to copy and paste the exact URL provided by Dokploy. That way, every time you push to the main branch, GitHub will send a notification to the VPS and Dokploy will react by building the new container and replacing the previous one. All of this happens automatically and, in most cases, with minimal service interruption.
Be careful, this webhook is triggered on push, it does not wait for the build or the CI/CD pipeline to finish, in case you have something like that in GitHub. If you want content that includes this process, feel free to leave it in the comments so Hostinger keeps us in mind to create more content!
But for your weekend projects where you do not have many users and you work alone, it is more than enough.
2.3 - Certificate configuration when using Dokploy
So far we have already deployed the application, but it will still appear as not secure. Just like we saw in the previous VPS video, we need to generate SSL certificates with Let’s Encrypt. The advantage here is that Dokploy can do it for us automatically. Also, within Dokploy's own settings we can specify as many subdomains as we want, and it will generate a certificate for each one of them.
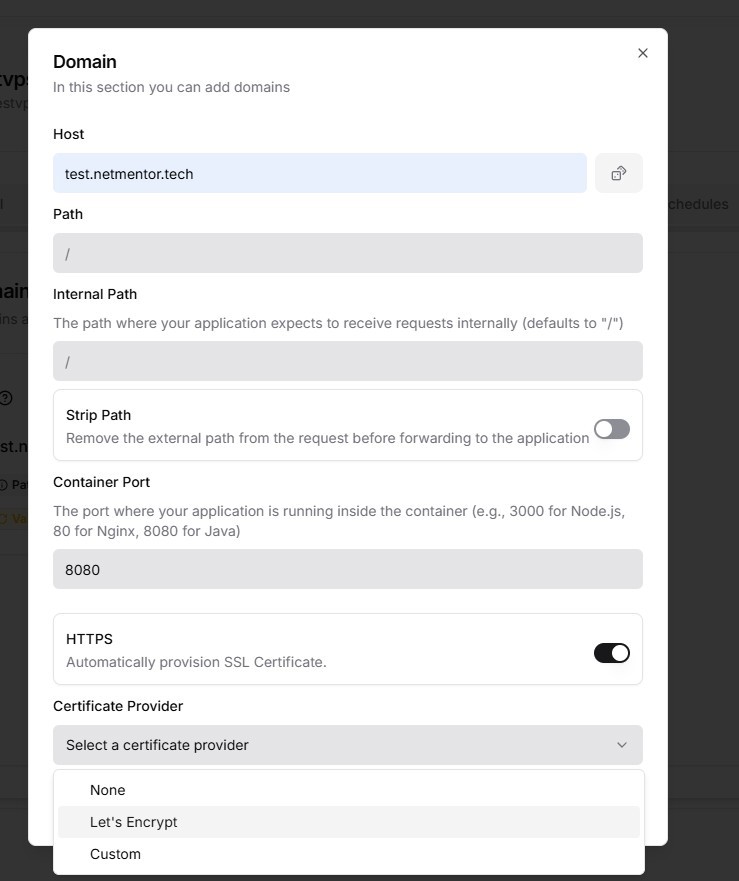
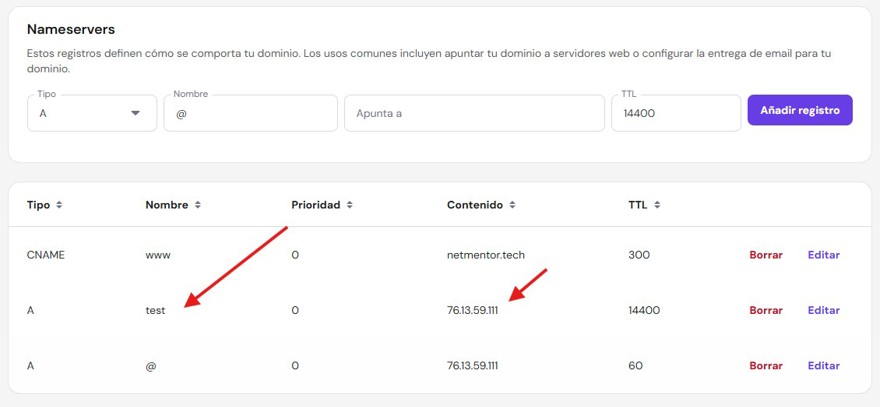
Of course, for the subdomains to work, we must configure the A records in the Hostinger panel so the domain or subdomain points correctly to our VPS and the changes propagate through DNS:
2.4 - Deploy with Dokploy
Finally, all that is left is to launch the deployment by clicking the Deploy button inside the General tab.
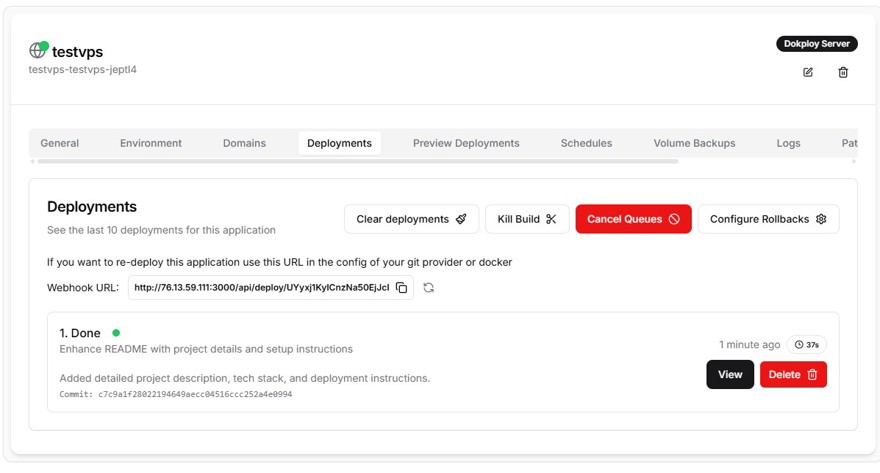
If everything is set up correctly, in the Deployments section we will be able to see that the deployment has completed successfully:
And we can access the website through the browser without any problem at test.netmentor.tech.
If there is any error during deployment, Dokploy shows us the errors.
As we can see, the process is very simple, we barely have to do anything, and we can have as many apps as we want, which is ideal for hobby projects.
3 - Is Dokploy worth it?
As you have seen, Dokploy represents a very interesting middle ground: it saves us a good part of the manual work of configuring proxies, certificates, and deployments, but without giving up the control that comes with having our own infrastructure. For personal projects, tests, MVPs, or small services, it can be a very practical option to give useful life to those applications we have piled up on GitHub without making things too complicated. If you are looking for a balance between control, simplicity, and predictable cost, setting it up on a VPS can be a very interesting alternative.
Remember: 10% discount code with the coupon NETMENTOR.
