Today I want to talk about a library that I absolutely love, but is rarely used, at least not publicly, we're talking about the Spectre library.
Table of Contents
1 - What is the Spectre library?
The Spectre library allows us to modify our console applications to make them more interactive, a functionality that is greatly appreciated.
This library allows, among other things, colors, tables, trees, single and multiple item selections, etc.
You can find all the information about its features on the official page:
Website link: https://spectreconsole.net/quick-start
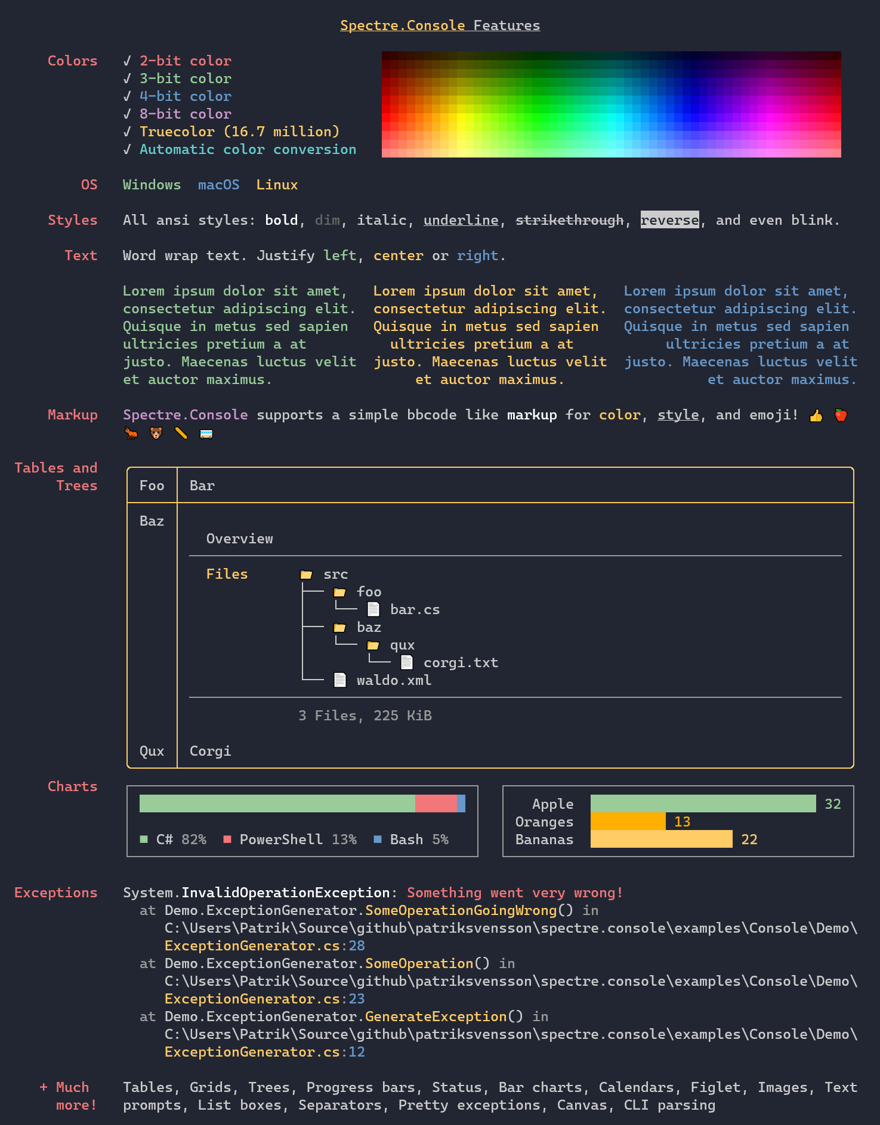
In this blog, we are not going to review the entire library because the website does a great job explaining everything clearly.
Instead, we are going to simulate a use case for a real application you might find in companies.
2 - Implementing Spectre Console with C#
As I said, let’s look at an example where you can see the features I use the most. The code is available on GitHub.
As is well known, a console application or script is the go-to CI/CD solution for those deploying hobby apps.
Today, we’re going to see several features that will help us work with Spectre.
First, create a new console project and include the following NuGet packages:
Spectre.Console
Spectre.Console.Cli
With this, you can start coding. But pay attention, you won’t be using the Console class, but instead will use AnsiConsole.
2.1 - Keyboard Input with Spectre
As an entry point, we'll ask for a username and password, so the app knows it's us. This scenario is very common for any type of software like this, whether it's a hobby project or for a company, to get temporary access to certain features, username and password at a minimum.
For that, we create the following code:
public record UserInfo(string Username, string Role);


UserInfo LoginUser()
{
    string username = AnsiConsole.Prompt(new TextPrompt<string>("Username:")
        .Validate(username =>
        {
            if (!username.Equals("netmentor", StringComparison.OrdinalIgnoreCase))
            {
                return ValidationResult.Error("[red]user not found[/]");
            }

            return ValidationResult.Success();
        }));

    string role = string.Empty;
    AnsiConsole.Prompt(new TextPrompt<string>("Password:")
        .Secret()
        .Validate(password =>
        {
            if (!password.Equals("pass", StringComparison.OrdinalIgnoreCase))
            {
                return ValidationResult.Error("[orange1]Wrong password[/], try again");
            }

            // logic to validate user and password
            role = "invented-role-1";
            return ValidationResult.Success();
        }));

    return new UserInfo(username, role);
}
In this code, you can see several things. First, we're using AnsiConsole with the prompt method, where we ask the user for their username. Once the user hits enter, we validate the input, and if valid, continue.
If it's not valid, we show a message, and you can see that we're returning this message in a different color.
In the second prompt, we have a very important method, Secret, which ensures that instead of displaying the characters entered, we see asterisks, just like entering passwords on a website.
Here, we evaluate the password, simulate user validation, and that the service returns a role for the user, a pretty normal feature in authentication systems.
This is what the result looks like:

2.2 - Selecting an Item from a List in a Console App
Now, the usual thing is that we’d get several options on what we want to do. In a business environment, that could be things like deploying an app to a specific environment, logging into AWS/Azure to access k8s, checking the state of some apps, etc.
First, we'll select the environment where we want to deploy the application:
public enum Environment
{
    CodeSpaces,
    Development,
    Staging,
    Production
}

Environment environment = AnsiConsole.Prompt(
    new SelectionPrompt<Environment>()
        .Title("in which environment?")
        .AddChoices(
            Environment.CodeSpaces,
            Environment.Development,
            Environment.Staging,
            Environment.Production));

AnsiConsole.MarkupLine($"Selected Environment:[blue] >[/] {environment}");
And we’ll do the same to show a list of applications and select one, which will be deployed in the selected environment:
string application = AnsiConsole.Prompt(
    new SelectionPrompt<string>()
        .Title("Which application?")
        .AddChoices(
            "Test app 1",
            "test app 2",
            "test app 3"));

AnsiConsole.Markup($"[blue]Application: >[/] {application}");
This is what the result looks like:

2.3 - Confirmation in a Console App
Once we have all the necessary elements, we’ll ask the user to confirm (or not) that everything is correct.
Unfortunately, there isn't a specific confirmation type, but we can use the prompt to force the user to enter yes or no, also allowing a default selection:
string shouldDeployString = AnsiConsole.Prompt(new TextPrompt<string>($"deploy {application} in {environment} [[y/n]] (y):")
    .DefaultValue("y")
    .AddChoice("y")
    .AddChoice("n")
    .AllowEmpty());

if (shouldDeployString.Equals("y", StringComparison.OrdinalIgnoreCase))
{
    AnsiConsole.MarkupLine($"[yellow]deploying...[/]");
}
This is the image:
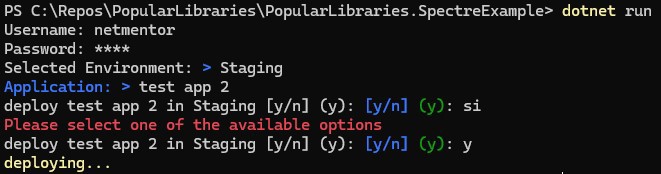
If you hit enter without entering a value, the default will be used.
2.4 - Progress Indicator
Letting the user know something is happening is very important. We can’t just show a static message because, usually, people will think the program is stuck. That’s the main reason spinners exist on websites.
In our console application, we can do exactly the same:
if (shouldDeployString.Equals("y", StringComparison.OrdinalIgnoreCase))
{

    AnsiConsole.Status()
        .Spinner(Spinner.Known.Dots)
        .Start("[yellow]Deploying... [/]", ctx => {
            //This simulates the deployment process
            Thread.Sleep(5000);

            AnsiConsole.MarkupLine("[green]deployment completed![/]");
        });
}
In this example, instead of just printing "deploying" we do it with a spinner.
Note: here’s the complete list of spinners.
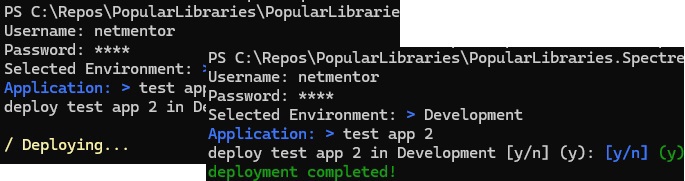
With this, the experience will be much more intuitive for the user.
2.5 - Displaying a Table in a Console App in C#
As a final feature that I find most important is the ability to have tables, and with these tables you have full control: you can have nested tables, colored borders, different border types, etc.
For a simple example, we’ll display a table summarizing what we've deployed:
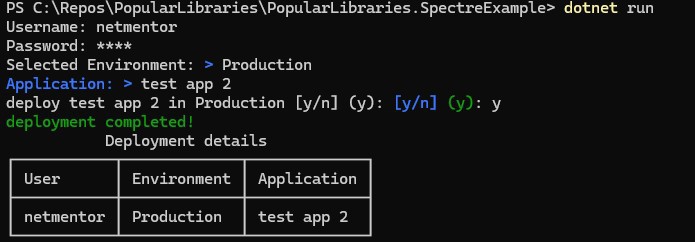
To get this table, you need code like the following:
if (shouldDeployString.Equals("y", StringComparison.OrdinalIgnoreCase))
{

    ...

    Table table = new Table();
    table.Title = new TableTitle("Deployment details");
    table.AddColumn(new TableColumn("User"));
    table.AddColumn(new TableColumn("Environment"));
    table.AddColumn(new TableColumn("Application"));
    table.AddRow([
        user.Username,
        environment.ToString(),
        application
    ]);

    AnsiConsole.Write(table);
}
3 - Should We Use Spectre?
Strictly speaking, you don't have to, but the reality is that using this library drastically improves the user experience. If you’re building an app only for yourself, it’s up to you. But if your console app will be used by many more users, I strongly recommend you use Spectre, as it provides a considerable upgrade over the default C# console class.
