This post is the first in a complete and free course about Stripe, which is available both on this same website as well as on YouTube.
Both the course and its code are available openly and for free. If you like the content, you know you can support the website by becoming a premium member, or buying my book.
In the YouTube video, the content of this post appears at the beginning, so you don't have to skip ahead.
Table of Contents
0 - Introduction
Most of you watching this video are developers, people who have a daily job that pays the bills, but many of you have ideas that could potentially become products that generate income.
One of the main reasons many of us don't start monetizing personal projects is because of how hard it is to manage user payments. It's not just about implementing a payment gateway, but also legally we have to meet a ton of regulations that are different in every country, making selling products online very complex and, let's be honest, impossible to manage for just one person.
That's where Stripe comes in. It's a third-party application that handles everything related to payments, is totally secure, and is one of the highest-rated companies out there. This is thanks to how easy it is to integrate into practically any system using its API.
And this is the part I want to focus on, because thanks to this ease of implementation, we can start monetizing our own content in a very simple way, with a very low fee (2.5% + 30c per transaction). I use Stripe to sell books on my personal website, to collect premium subscriptions, and in fact, it's the platform I have set up on BuymeaCoffee.
In this course we will explore the most common payment models, which are:
- A one-time payment for a user
- A recurring payment like a subscription
- A payment with an offer/coupon.
Any payment model you can imagine is possible with Stripe, and to get started with the course, I recommend creating an account with them.
I'm not the only one using Stripe, major companies like Shopify or DigitalOcean also use it behind the scenes, and this is because Stripe is ideal for developers who don't want to deal with regulations or fraud verifications.
1 - What does Stripe offer?
When we register with Stripe, we get access to the Dashboard. Before continuing, there's an important and unique feature: Stripe has both a Production mode and a Test mode. When you activate Test mode, everything you do will happen in a test environment, so you won't be charged real money and you can test as many times as you want.

This feature doesn't exist in other gateways, or at least it didn't when I worked with them, you always had to make real payments and then cancel them to test.
I'm talking almost 10 years ago, so hopefully they've improved since then.
And what definitely didn't exist was the ability to simply create an account and start billing almost instantly.
But where I think Stripe stands above the rest and really stands out is with its website, or rather, not so much the website, which is just a user interface in front of the most powerful part of Stripe, the API. Everything you can do in the interface, you can do yourself with the API.
And not just that, Stripe has a "developers" button that contains logs, statistics, and records of every action you perform in the interface, including both the request and the response bodies.
If you aren't familiar with APIs, I recommend you first check out my course on Web API on this website.
2 - How do we communicate with Stripe
The way we communicate with Stripe is through the API. In this API we need to provide our API key.
Within Stripe, in the developer tab, there's a menu for API Keys. There you'll find your keys, which allow both the front end and the back end to make calls to Stripe's API.
NOTE: This API Key is different for Test mode and Production mode.
Within the standard keys, we have two different options: the publishable key and the secret key.
By default, one is hidden and the other is not:
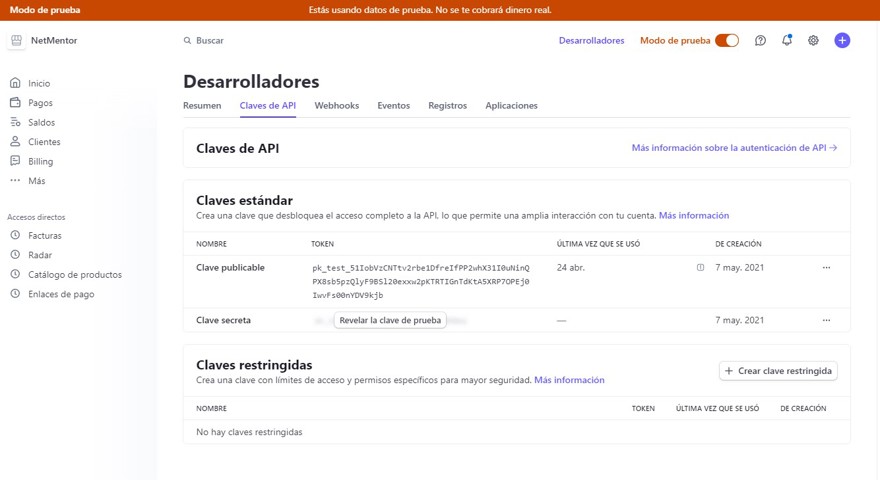
This is because the publishable key is made for your front end. Imagine you have an app with clients representing your users, and these users enter their credit card or address to make a payment.
This information is encrypted with the public key and Stripe can decrypt it on their end. This allows you to handle sensitive information in your app without that info ever passing through your application, saving you a lot of potential legal headaches.
The second is our secret or private key. This key is more important than the first, because while the publishable one can be seen by users, it's crucial to keep the private key secure.
This is the key we'll use to communicate with Stripe's API, only from our backend. You can use it to create payments, create customers, add credit cards, or even charge directly, so you need to be very careful and never expose it.
Ideally, we'll put it in a secure credentials management system or as an environment variable. NEVER, and I repeat, NEVER, commit your code if it contains a private key, because if someone gets that key, they can do whatever they want with your Stripe account (including sending themselves your money).
Finally, Stripe lets us create restricted keys, which are like the private key but with limited permissions. This is highly recommended because if, for whatever reason, someone gets your key, they'll only be able to do what the API allows for that key.
2.1 - Interacting with the Stripe API
Before going into code, I want to make sure everything works and that everyone's familiar with the Stripe API.
A very useful resource will be the API documentation, available at: https://docs.stripe.com/api and my recommendation is to keep it open while following along this course.
For an example, let's create a product via the API. We go to the documentation, to the create product section https://docs.stripe.com/api/products/create, where we'll see something like this:
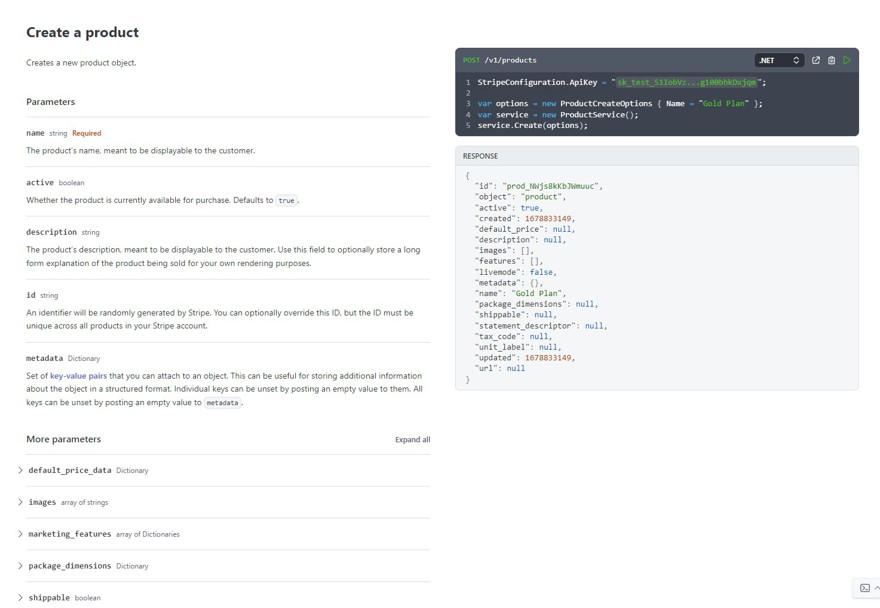
Here we can identify three sections:
The first is the section on the left, which shows the parameters of the request body. As we see, the name is specified as required, the rest are optional parameters.
On the right are two sections: the top dark area is a terminal or code block showing us how to make that call using the Stripe SDK in the language we select , in our case, .NET. If you click the play button, a terminal opens where you can make those calls.
Finally, at the lower right, we have the API response.
What we will do now is go to our own machine and try out this API ourselves.
Personally, I’ll use Postman, but you can use any app that lets you make HTTP calls. For example, you can use http files or create a console app to test it, in my case, Postman.
If you want to use Postman, here’s a link with all the API endpoints already set up in Postman so you can import them to your machine: https://www.postman.com/stripedev/workspace/stripe-developers/overview
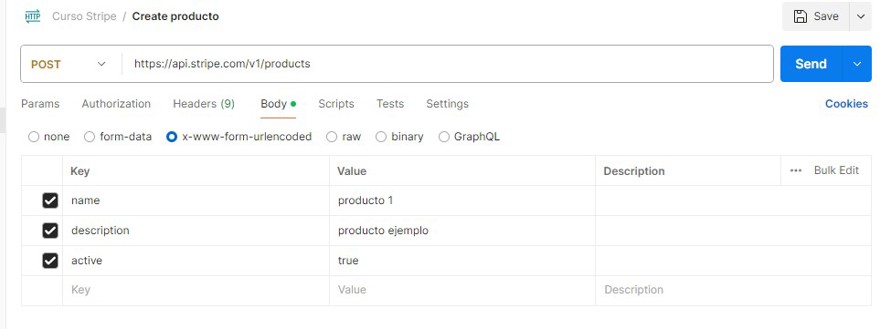
Let’s create a product, and before making the actual call, we need to do two things: specify the Postman API https://api.stripe.com/v1/products (v1/products is the part we change each time).
And in the authorization tab, we select Bearer Token, and as value we’ll use our private key.
Note: Alternatively, we can use an Authorization header and specify Bearer {{Key}}, whichever you prefer.
Since this is a creation, we make sure the HTTP method is POST and then go to the body of the message to create the product. For the example, let’s call it product 1 and set an example price:
When we execute the request with the send button, we see a message body similar to this:
{
    "id": "prod_Q2U3YlkZEjvNjk",
    "object": "product",
    "active": true,
    "attributes": [],
    "created": 1714754130,
    "default_price": null,
    "description": "producto ejemplo",
    "features": [],
    "images": [],
    "livemode": false,
    "marketing_features": [],
    "metadata": {},
    "name": "producto 1",
    "package_dimensions": null,
    "shippable": null,
    "statement_descriptor": null,
    "tax_code": null,
    "type": "service",
    "unit_label": null,
    "updated": 1714754130,
    "url": null
}
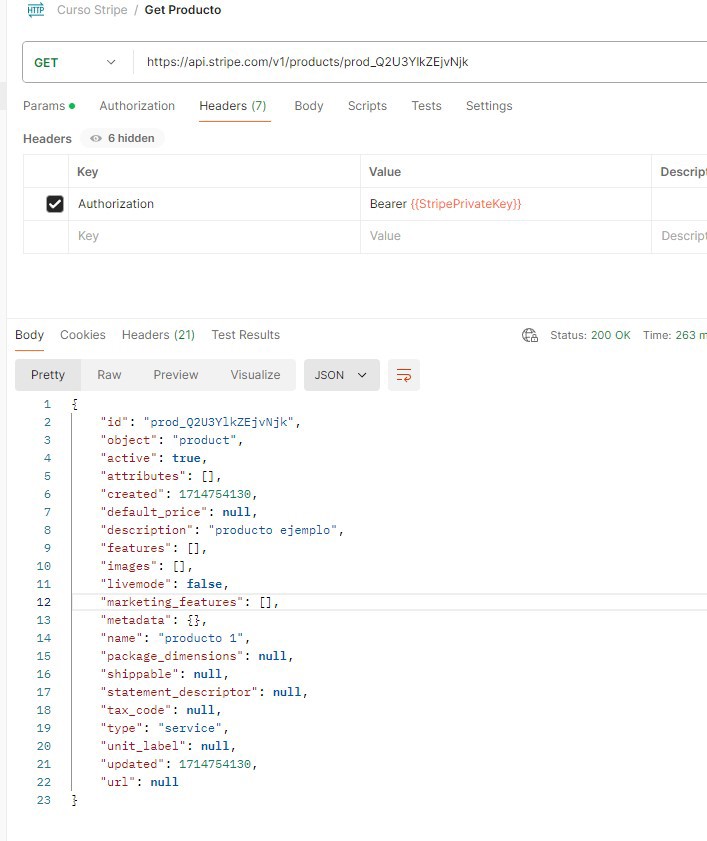
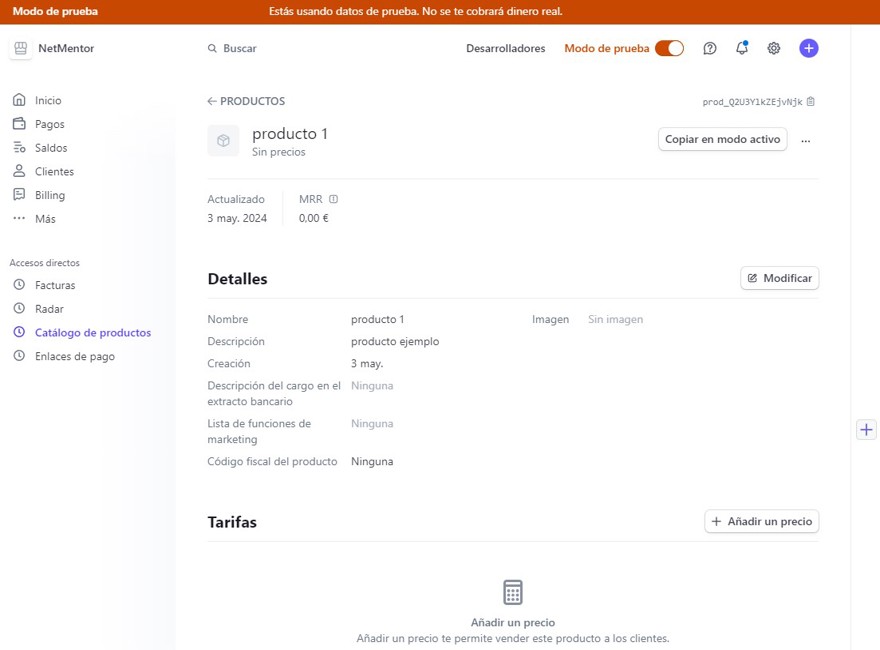
In that response we have a key property: the product ID prod_Q2U3YlkZEjvNjk. We’ll copy it and do a GET where just calling https://api.stripe.com/v1/products/prod_Q2U3YlkZEjvNjk will return the product:
And we can go to the interface and see how it's included:
The action we just performed with the API can be done in the interface very simply. When to use the interface versus the API depends on your use case: if you only sell 3 products, it's faster to do it manually in the interface, but if you'll have dozens or thousands new each week, it's better to do it with an API , the same goes for customers or any other element.
