When we start building distributed systems and search for information online, a lot of new terms start to appear. One of them is CQRS, which we’ll discuss today.
Index
1 - What is the CQRS pattern?
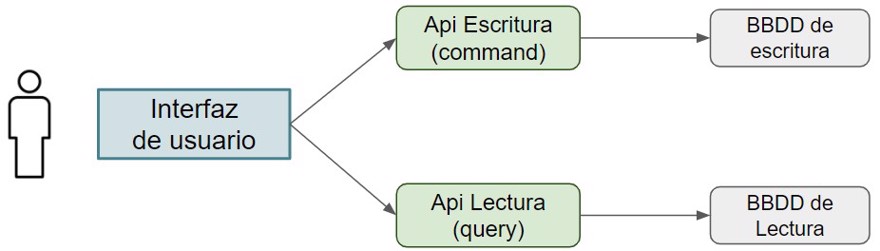
CQRS is a software design pattern that shows us how to split our application’s logic to separate reads from writes.
And this applies both to code or program execution as well as data location.
CQRS stands for “Command query responsibility segregation”; This means separating the responsibility for reads and commands (writes/updates).
The CQRS pattern wasn't commonly seen before the arrival of microservices since the usual practice was to have a monolith doing everything, including connecting to a single database. But nowadays, distributed architectures are growing in popularity.
1.1 - CQRS Advantages
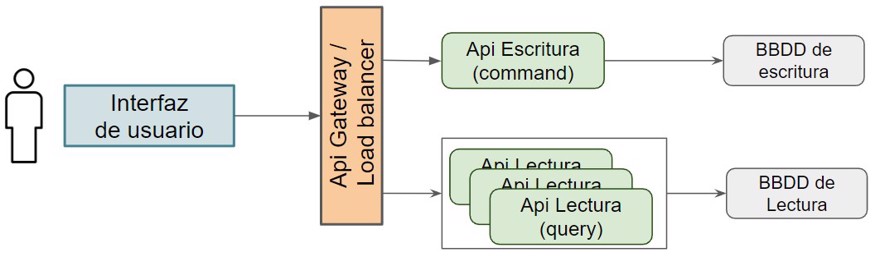
Using the CQRS pattern brings us many advantages, but we can mainly focus on scalability in an independent manner.
This means we can scale a specific part of the application. Let’s see an example.
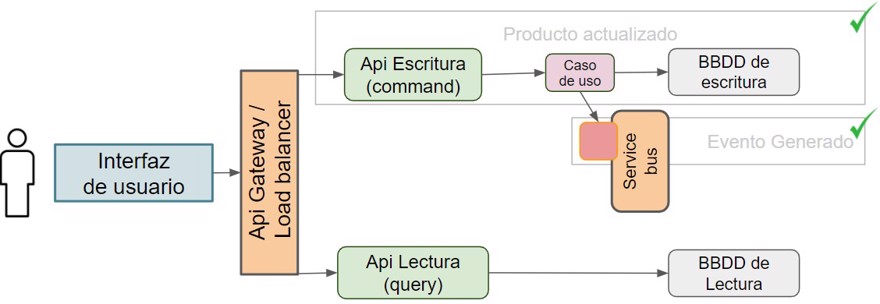
If we have products, commands will be to create and update the product, while queries will be to read that product.
If you think about it, when we browse web pages, we’re constantly entering and leaving product pages: you enter a store and view 45 products, rule out half, and then review them all again to continue your search.
And so on, until you finally purchase your product.
During this selection process, we perform a ton of reads, while only making a single modification , and that’s if we actually end up buying the product.
If we scale this scenario to thousands or even millions of users accessing our online store, we can easily see the benefits of implementing CQRS.
So if we see the website becoming slow, we can always increase the resources of the machine handling the reads or scale the number of pods in kubernetes behind an api gateway, etc.
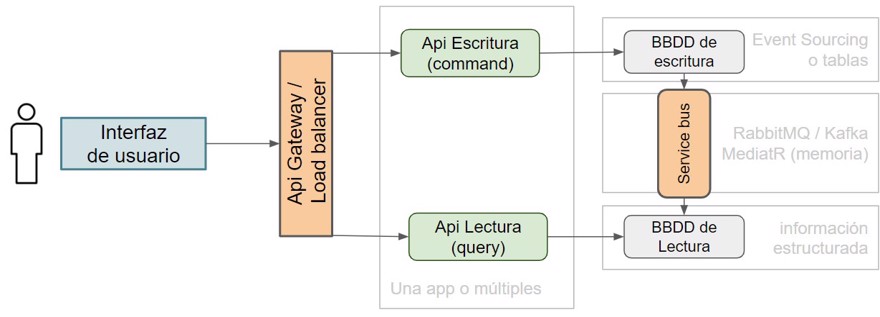
It’s important to highlight four key points that will determine how we implement the pattern.
- Using CQRS is often tightly linked with
Event Sourcingin the write database. But we’ll look at whatEvent Sourcingis in another post, since they are different patterns, though they’re often explained together (along with DDD)- Note: write/read databases can be physically separated or not, depending on the use case/load.
- We must synchronize the write database with the read database so there’s no inconsistent information. For this we’ll need a service bus.
- If the project isn't big, or reads and writes are expected to be balanced, you often do everything in the same code with
MediatR(in c#) as an in-memory service bus, since managing multiple microservices is more complex and not always worthwhile. - On the read side, we have two options: keep table copies or have the data pre-built to meet user needs, so when you do a “get”, it’s almost instant queries by ID.
Choosing between options like getting for the view, or splitting into two apps depends exclusively on your use case and company needs, both solutions have pros and cons.
My personal recommendation is to write clean, structured code. That way, whichever you choose, migrating later if the company grows (or things don’t go as expected) will be very easy.
2 - Implementing CQRS
When we implement CQRS and have separated apps, there’s no reason they must use the same type of databases. Is it possible? Sure, but nothing binds us to it.
In fact, as explained in the product example, it’s quite common to have the write database as relational while the read database is non-relational (NoSQL).
Another common example if you work only with MongoDb is having the write database in “master” and reading from the “replicas” (replica set).
For example, if we have products with descriptions, price, and stock, we’re relating three elements that have "nothing to do" with each other.
To explain: the product description won’t change if we update the price, and updating the price won’t change the product.
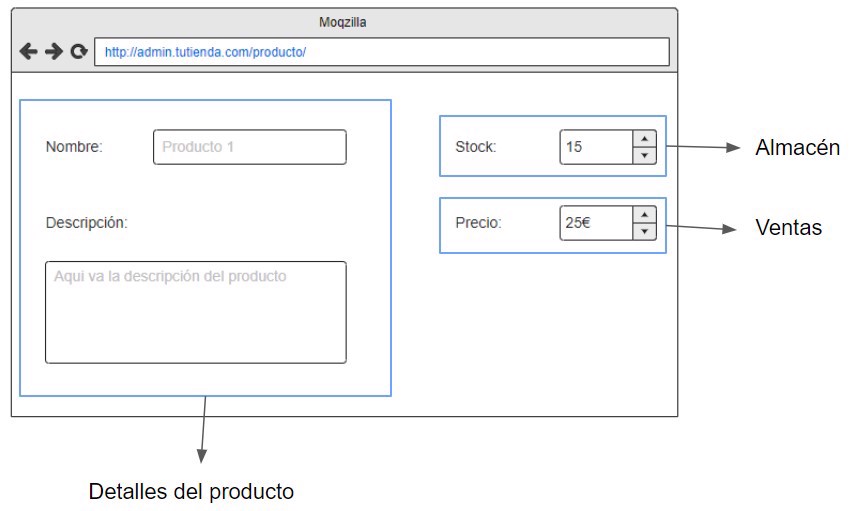
These are clearly different entities (not to mention if we have to keep history), so they shouldn’t be in the same table. And they probably should be in different services too.
But when querying the product, we want to see all that info, so we’ll aggregate the info into a single row in the NoSQL database.
- Note: I’ll do a post/video about SQL and NoSQL differences in the future.
If we didn’t do it this way, we’d have two options to get all the data: a query with many inner joins (or a lot of api calls inside the backend), or several queries to different APIs from the front end.
Again, there isn’t a “better” or “worse” option , for some use cases a "view" table aggregating info is better, for others, multiple API calls work best.
Before closing this point: if you look at the previous image, there’s no save button; that’s because commands represent unique actions a user can take. In all modern websites, when you change info you no longer have to scroll down to save; instead, things update at once, either automatically or via a modal.
The idea is the same: we update only the piece of information we actually need.
This way, your API serves as an intermediary layer between the front end or client and the action to perform.
2.1 - Infrastructure Creation
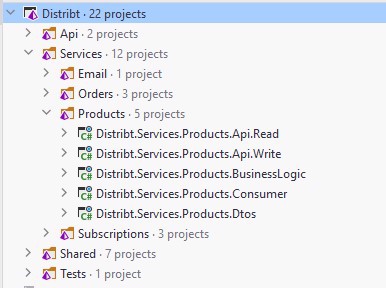
As always, this code is available on GitHub in the Distribt project.
- Note: To simplify, only the product microservice is created in the example , if there’s confusion or questions, I’ll create the other two.
To simulate a real-world app, I’ll split the write API from the read API. So, I’ll create two new projects, plus a consumer that will process the events we generate and send to the Service bus.
Additionally, there’s an extra layer that will hold business logic, which could be split into several projects, but for this example, it’s not worth it.
And as always, all this configuration has to be set up in the services we’ve seen so far , in our case, we just need to add the info to Consul:
docker exec -it consul consul services register -name=ProductsApiWrite -address=http://localhost -port=50320

docker exec -it consul consul services register -name=ProductsApiRead -address=http://localhost -port=50321
Now I’m going to add both MySql and MongoDb to our docker-compose file. MySql for the write version and MongoDb for reads.
mongodb:
  image: mongo:latest
  container_name: MongoDb
  ports:
    - 27017:27017
  environment:
    - MONGO_INITDB_ROOT_USERNAME=distribtUser
    - MONGO_INITDB_ROOT_PASSWORD=distribtPassword
    - MONGO_INITDB_DATABASE=distribt
  volumes:
    - ./tools/mongodb/mongo-init.js:/docker-entrypoint-initdb.d/mongo-init.js:ro
mysql:
  image: mysql:8.0
  container_name: MySql
  environment:
    MYSQL_DATABASE: 'distribt'
    MYSQL_USER: 'distribtUser'
    MYSQL_PASSWORD: 'distribtPassword'
    MYSQL_ROOT_PASSWORD: 'distribtRootPassword'
  ports:
    - 3306:3306
  volumes:
    - ./tools/mysql/init.sql:/docker-entrypoint-initdb.d/init.sql
And here’s the mongo (mongo-init.js) content:
db.createUser({
    user: "distribtUser",
    pwd: "distribtPassword",
    roles: [{
        role: "readWrite",
        db: "distribt"
    }
    ],
    mechanisms: ["SCRAM-SHA-1"]
});

db.createCollection("Products");
db.Products.insertOne({"Id": 1, "Details": {"Name": "Producto 1", "Description": "La descripción dice qu es el primer producto"}, "Stock": 32, "Price": 10 });
db.Products.insertOne({"Id": 2, "Details": {"Name": "Segundo producto", "Description": "Este es el producto numero 2"}, "Stock": 3, "Price": 120 });
db.Products.insertOne({"Id": 3, "Details": {"Name": "Tercer", "Description": "Terceras Partes nunca fueron buenas"}, "Stock": 10, "Price": 15 });
And for MySql (init.sql):
USE `distribt`;

CREATE TABLE `Products` (
            `Id` int NOT NULL AUTO_INCREMENT,
            `Name` VARCHAR(150) NOT NULL,
            `Description` VARCHAR(150) NOT NULL,
            PRIMARY KEY (`Id`)
) AUTO_INCREMENT = 1;

INSERT INTO `distribt`.`Products` (`Id`, `Name`, `Description`) VALUES ('1', 'Producto 1', 'La descripción dice qu es el primer producto');
INSERT INTO `distribt`.`Products` (`Id`, `Name`, `Description`) VALUES ('2', 'Segundo producto', 'Este es el producto numero 2');
INSERT INTO `distribt`.`Products` (`Id`, `Name`, `Description`) VALUES ('2', 'Tercer', 'Terceras Partes nunca fueron buenas');
As seen, both already have some data set for this example.
So the configuration of both databases go to Vault and consul:
# VAULT
## User&Pass for mongoDb
docker exec -it vault vault kv put secret/mongodb username=distribtUser password=distribtPassword

##User&Pass for MySql
docker exec -it vault vault kv put secret/mysql username=distribtUser password=distribtPassword

# CONSUL
docker exec -it consul consul services register -name=MySql -address=localhost -port=3307
docker exec -it consul consul services register -name=MongoDb -address=localhost -port=27017
In the case of Vault, we can add it as an engine.
Now we’ve created all the infrastructure needed to store our information.
And if you remember the post on the producer-consumer pattern, when inserting into the write database, we'll create a domain message for the handler to process.
To create such domain message, we need to create a service bus in RabbitMQ, both the internal queue (for domain messages) and the external one for other services to access the updated data.
"queues": [
  {"name":"product-queue","vhost":"/","durable":true,"auto_delete":false,"arguments":{}},
  {"name":"product-queue.dead-letter","vhost":"/","durable":true,"auto_delete":false,"arguments":{}},
  {"name":"product-domain-queue","vhost":"/","durable":true,"auto_delete":false,"arguments":{}},
  {"name":"product-domain-queue.dead-letter","vhost":"/","durable":true,"auto_delete":false,"arguments":{}}
],
"exchanges": [
  {"name":"products.exchange","vhost":"/","type":"topic","durable":true,"auto_delete":false,"internal":false,"arguments":{}},
],
"bindings": [
  {"source":"products.exchange","vhost":"/","destination":"product-queue","destination_type":"queue","routing_key":"external","arguments":{}},
  {"source":"products.exchange","vhost":"/","destination":"product-domain-queue","destination_type":"queue","routing_key":"internal","arguments":{}}
]
In the code, there's also a product-queue queue, but we won’t use it in this example.
- Note: this is the point where you would use
MediatR, if everything is inside the same application.
3 - CQRS Implementation in C#
The code is quite simple: we create the APIs and their endpoints.
One endpoint to create and another to update in the Write API:
[HttpPost(Name = "addproduct")]
public Task<IActionResult> AddProduct(CreateProductRequest createProductRequest)
{
    throw new NotImplementedException();
}


[HttpPut("updateproductdetails/{id}")]
public Task<IActionResult> UpdateProductDetails(int id, ProductDetails productDetails)
{
    throw new NotImplementedException();
}
As we can see, create includes CreateProductRequest with all stock and price data, while update only takes details , name and description.
public record CreateProductRequest(ProductDetails Details, int Stock, decimal Price);

public record ProductDetails(string Name, string Description);

public record FullProductResponse(int Id, ProductDetails Details, int Stock, decimal Price);

public record ProductUpdated(int ProductId, ProductDetails Details);

public record ProductCreated(int Id, CreateProductRequest ProductRequest);
- As referenced before about orchestration, you’ll have to configure your application accordingly.
There’s also a read endpoint to query products in the Read API:
[HttpGet("{productId}")]
public Task<IActionResult> GetProduct(int productId)
{
    throw new NotImplementedException();
}
Command/Query in the type name
One of the endless debates in CQRS is whether to include command or query in the type name. For instance: if we're querying a product, should we name the type ProductQuery? Or when inserting a product, CreateProductCommand?
This discussion often leads to many team arguments, so here’s my opinion: I really don’t care if it’s Query, Command, or nothing, as long as the name is clear and understandable.
And back to the code…
We modify the write controllers and create a use case:
[ApiController]
[Route("[controller]")]
public class ProductController
{
    private readonly IUpdateProductDetails _updateProductDetails;
    private readonly ICreateProductDetails _createProductDetails;

    public ProductController(IUpdateProductDetails updateProductDetails, ICreateProductDetails createProductDetails)
    {
        _updateProductDetails = updateProductDetails;
        _createProductDetails = createProductDetails;
    }

    [HttpPost(Name = "addproduct")]
    public async Task<IActionResult> AddProduct(CreateProductRequest createProductRequest)
    {
        CreateProductResponse result = await _createProductDetails.Execute(createProductRequest);

        return new CreatedResult(new Uri(result.Url), null);
    }


    [HttpPut("updateproductdetails/{id}")]
    public async Task<IActionResult> UpdateProductDetails(int id, ProductDetails productDetails)
    {
        bool result = await _updateProductDetails.Execute(id, productDetails);

        return new OkResult();
    }
}- Note: Only the update product use case is shown; for the rest, see github for the full code.
public interface IUpdateProductDetails
{
Task<bool> Execute(int id, ProductDetails productDetails);
}
public class UpdateProductDetails : IUpdateProductDetails
{
private readonly IProductsWriteStore _writeStore;
private readonly IDomainMessagePublisher _domainMessagePublisher;
public UpdateProductDetails(IProductsWriteStore writeStore, IDomainMessagePublisher domainMessagePublisher)
{
_writeStore = writeStore;
_domainMessagePublisher = domainMessagePublisher;
}
public async Task<bool> Execute(int id, ProductDetails productDetails)
{
await _writeStore.UpdateProduct(id, productDetails);
await _domainMessagePublisher.Publish(new ProductUpdated(id, productDetails), routingKey: "internal");
return true;
}
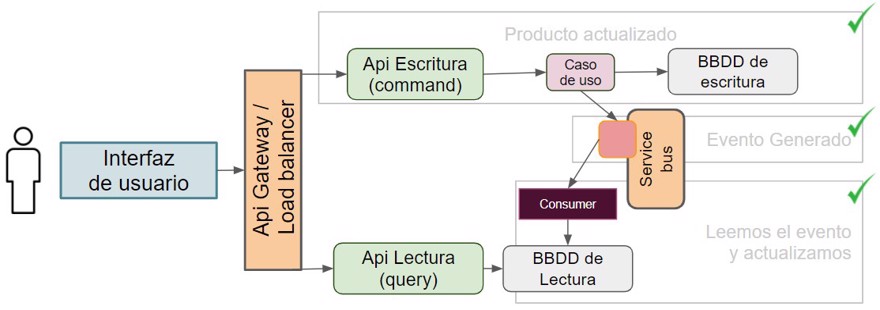
}At this point, we already have our message in the service bus.
With this code, we have completed half of the implementation. Now we just need to consume the event to update the read database so we can read the information.
We’ll now create the handler to update the info, which in our case also creates an integration message.
public class ProductUpdatedHandler : IDomainMessageHandler<ProductUpdated>
{
    private readonly IProductsReadStore _readStore;
    private readonly IIntegrationMessagePublisher _integrationMessagePublisher;

    public ProductUpdatedHandler(IProductsReadStore readStore, IIntegrationMessagePublisher integrationMessagePublisher)
    {
        _readStore = readStore;
        _integrationMessagePublisher = integrationMessagePublisher;
    }

    public async Task Handle(DomainMessage<ProductUpdated> message, CancellationToken cancelToken = default(CancellationToken))
    {

        await _readStore.UpsertProductViewDetails(message.Content.ProductId, message.Content.Details, cancelToken);

        await _integrationMessagePublisher.Publish(
            new ProductUpdated(message.Content.ProductId, message.Content.Details), routingKey:"external", cancellationToken: cancelToken);
    }
}
The logic here is the same: the event triggers command execution.
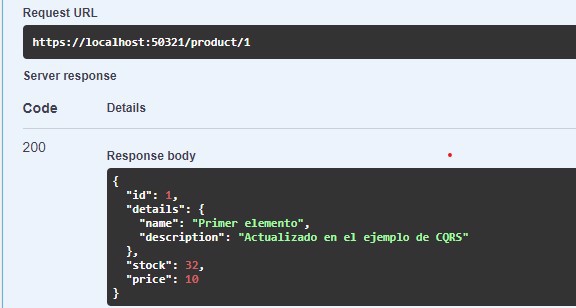
So now the updated value is in the read database:
And finally, we need to create the simple get, which can even be done with a minimal API as there’s no logic as such.
app.MapGet("product/{productId}", async ( int productId, IProductsReadStore readStore)
    => await readStore.GetFullProduct(productId));

And we can see that the item has been updated
Conclusion
In this post, we’ve seen quickly and clearly what CQRS is.
What the main features of CQRS are.
How to implement CRQS in C#
