Table of Contents
This is the third post in the Git and GitHub series where we'll address conflicts when pushing our code to the main codebase, or master.
For this post, I'll use the same branch as the previous examples, which is available on GitHub.
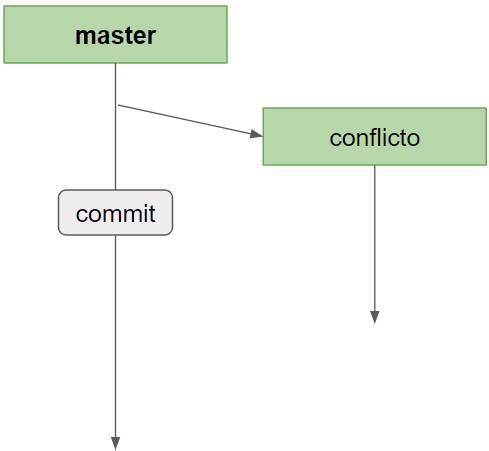
To demonstrate what I want to show, I've created a branch called Conflicto which starts from the current state of our main branch.
In this branch, what we'll do is modify the vehicle class and call it from the main method.
Afterwards, I made a change in the main branch and committed it, changing the main method; the change is the following:
static void Main(string[] args)
{
    Console.WriteLine("Hello World!");
    Console.ReadKey();
}
//Changed to
static void Main(string[] args)
{
    Console.WriteLine("Introudce tu nombre:");
    string nombre = Console.ReadLine();
    Console.WriteLine($"El nombre es {nombre}");
}
As you can see, it’s a very simple change and the current structure is as follows:
For this example, I only made one commit, but there could be as many as you want.
To continue, we switch to our new branch by running the command git checkout conflicto.
In this branch, we’re going to make our code change, just adding a new property to the class, which will contain the car’s cv. Later we print it in our main method.
class Vehiculo
{
    public decimal VelocidadMaxima { get; set; }
    public int NumeroPuertas { get; set; }
    public int Cv { get; set; }

    public Vehiculo(decimal velocidadMaxima, int numeroPuertas, int cv)
    {
        VelocidadMaxima = velocidadMaxima;
        NumeroPuertas = numeroPuertas;
        Cv = cv;
    }
}

var coche = new Vehiculo(200, 5, 90);
Console.WriteLine($"El coche tiene {coche.Cv}");
Console.ReadKey();
As you can see, we changed the same part of the code in both versions within our main method. This will inevitably result in a conflict.
We’ll see later how to edit the file to address the conflict. First, we must understand that we will always have conflicts.
Note: Remember that all commands are run in the terminal within your repository folder.
1 - Merge with Git
We already saw in the previous chapter what a merge is in git and how to do it.
When we create the pull request, GitHub will automatically perform a merge into the main branch, but the topic we’ll discuss today happens before the pull request.
The reason the pull request does the merge is so that the history is maintained.
If we did a merge from our branch into the main branch in this case, we would cause conflicts, and these conflicts would be in master, which means if we have CI/CD, the code would go to production and not work correctly.
1.1 - Avoid conflicts in main
To avoid this situation (deploying with errors), we must make sure our branch has no conflicts when merged.
There are two options: the first is called merge, and the second is a new feature called rebase.
2 - What is Rebase in git
To understand how git rebase works, let’s go back to our previous scenario. We have a branch called conflicto and knowing another developer made a commit on the main branch, we’ll run the command
git rebase master
What git rebase does is rewrite all the changes from the branch we indicate onto our current branch.
And once the branch has been rebased, we can make our code change and merge it through the pull request.
3 - Conflicts in GIT
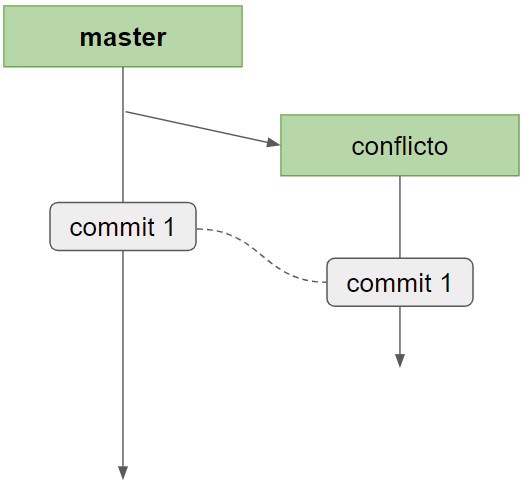
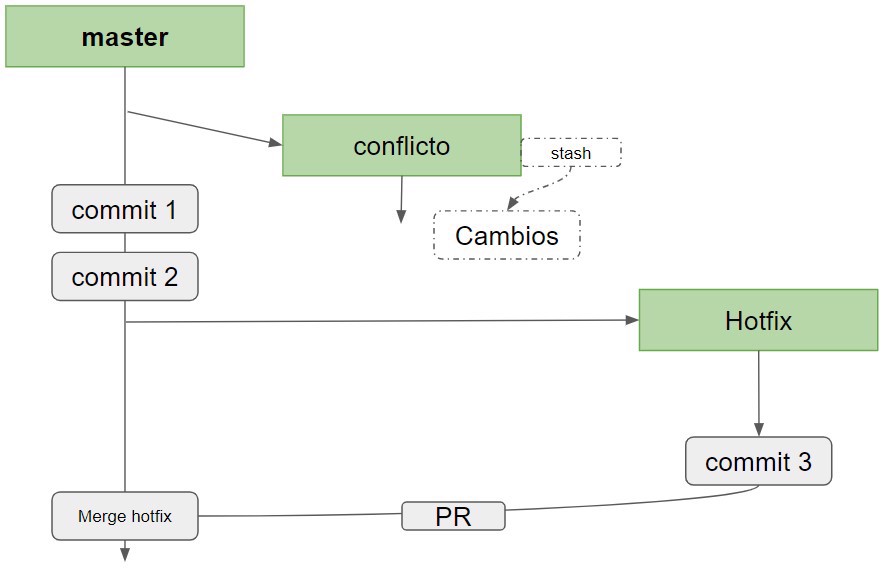
But, this is an ideal scenario that rarely happens. Most commonly, we develop our functionality and other developers have changed something before, so the scenario looks like this:
At this point, we should stop and think as we have several options. The one I personally recommend and find easiest to work with is, before executing the commit command, perform the rebase.
This is because if there are conflicts, we'll handle all of them at once. Rebase, by default, addresses conflicts one commit at a time.
However, if we try, we'll see that git doesn't allow it because we have pending changes
PS C:\repos\ejemploGithub> git rebase master
error: cannot rebase: You have unstaged changes.
error: Please commit or stash them.
It tells us we can either merge or stash;
But what does the stash command do in git?
3.1 - What is stash in git
Let's put ourselves in a different scenario, not just the current one, but a simpler one to view it from another perspective.
When working on a branch, we don’t always stick with it until we make the pull request and the merge. Sometimes we need to switch to fix a bug in production or perhaps a functionality with higher priority.
Obviously, we're not going to discard all the changes we've made in our current branch, but we're also not going to commit, as the code is at a point where it doesn’t even compile.
To solve this situation, we have the stash command which allows us to "set aside" changes to work on another branch.
To do this, we need to run the command git shash.
And that's it, with this simple change Git stores the changes and returns the branch to its previous state.
We can run git status to check the state of the branch.
PS C:\repos\ejemploGithub> git stash
Saved working directory and index state WIP on conflicto: 1fc0d6c Merge pull request #3 from ElectNewt/Tarea002
PS C:\repos\ejemploGithub> git status
On branch conflicto
nothing to commit, working tree clean
PS C:\repos\ejemploGithub>
And we see that we have no changes pending.
Now we can checkout the hotfix and make the necessary changes. Once done, we return to the example branch.
3.1.1 - Recover changes from git stash
Of course, when we come back we want to recover all the files we modified.
First, we can see the list of all stashes by running git stash list
PS C:\repos\ejemploGithub> git stash list
stash@{0}: WIP on conflicto: 1fc0d6c Merge pull request #3 from ElectNewt/Tarea002
And to recover the changes we’ll use git stash pop
PS C:\repos\ejemploGithub> git stash pop
On branch conflicto
Changes not staged for commit:
  (use "git add <file>..." to update what will be committed)
  (use "git restore <file>..." to discard changes in working directory)
        modified:   ConsoleApp/ConsoleApp/Program.cs
        modified:   ConsoleApp/ConsoleApp/Vehiculo.cs

no changes added to commit (use "git add" and/or "git commit -a")
Dropped refs/stash@{0} (93ae3f2082d0db5c02e58ebbd7309cd525df755a)
And we can see the files we've recovered from our temporary “stash” so we can work with them again.
3.2 - Resolve conflicts in Git
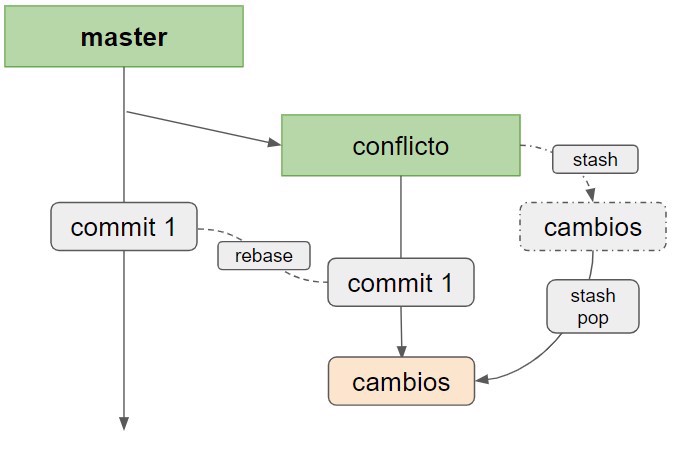
Once we understand the term stash, we see why it’s useful when doing a rebase, as before our commit we run git stash to store changes in our temporary space, then git rebase master and finally git stash pop to get the changes back.
PS C:\repos\ejemploGithub> git stash
Saved working directory and index state WIP on conflicto: 1fc0d6c Merge pull request #3 from ElectNewt/Tarea002
PS C:\repos\ejemploGithub> git rebase master
First, rewinding head to replay your work on top of it...
Fast-forwarded conflicto to master.
PS C:\repos\ejemploGithub> git stash pop
Auto-merging ConsoleApp/ConsoleApp/Program.cs
CONFLICT (content): Merge conflict in ConsoleApp/ConsoleApp/Program.cs
The stash entry is kept in case you need it again.
PS C:\repos\ejemploGithub>
At this point, the changes CANNOT be committed because, as we can see in the message, we have a conflict.
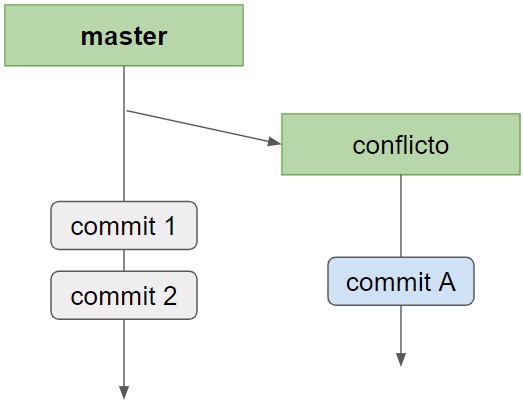
Our structure at this moment is as follows:
The way git shows the conflict is with the characters <<<<<<<<, ======= >>>>>>> as in the example:
static void Main(string[] args)
{
<<<<<<< Updated upstream
    Console.WriteLine("Introudce tu nombre:");
    string nombre = Console.ReadLine();
    Console.WriteLine($"El Tu nombre es {nombre}");
=======
    Console.WriteLine("Hello World!");
    var coche = new Vehiculo(200, 5, 90);
    Console.WriteLine($"El coche tiene {coche.Cv}");
    Console.ReadKey();
>>>>>>> Stashed changes
}
What we have to do is fix this conflict.
3.2.1 - Tool to fix conflicts.
There are tons of tools to resolve conflicts; you can even do it manually with Notepad, but my preferred tool is Visual Studio Code because it provides a simple visual way to see the conflicts.
You just need to go to that file and open it with Visual Studio Code.
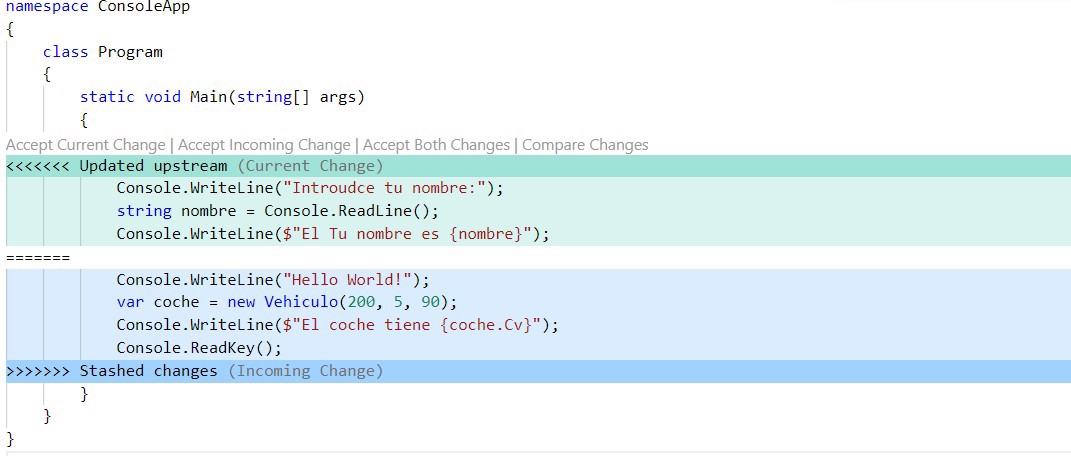
As you can see, there are the following sections:
- In green: The changes already in the main branch
- In blue: Our changes
- Top menu with several options:
- Accept the changes from the main branch (green part)
- Accept our changes (blue part)
- Accept Both
- Compare them; this opens another tab and shows only those differences.
In our particular case, we’ll accept both changes (and delete hello world) but this part depends 100% on the logic of the changes made, and each case is different.
Once we've resolved our conflicts, we need to add the files that had conflicts using git add [file]
Now all we have to do is commit, and push to the remote branch to open our pull request
PS C:\repos\ejemploGithub> git add ConsoleApp\ConsoleApp\Program.cs
PS C:\repos\ejemploGithub> git commit -m "add cv en el vehiculo"
[conflicto 0b6540f] add cv en el vehiculo
2 files changed, 6 insertions(+), 1 deletion(-)
PS C:\repos\ejemploGithub> git push
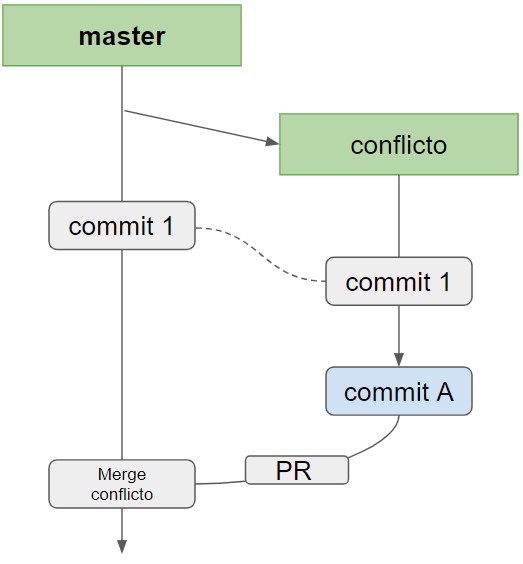
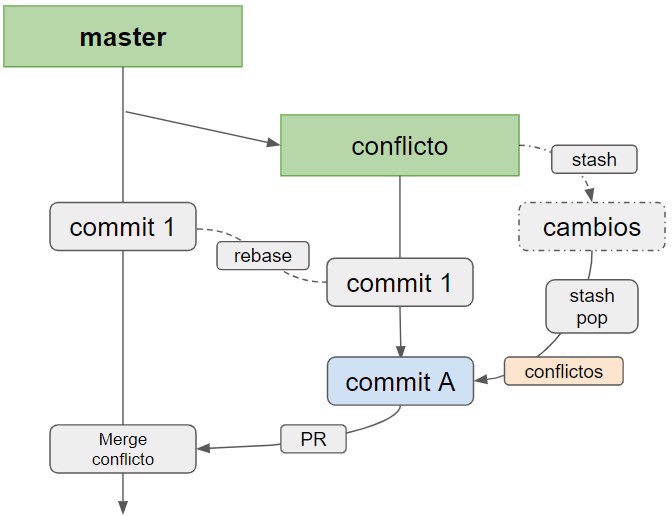
Finally, we’ll have a structure like the following:
Note: If you commit before the rebase (without stash), you’ll have to deal with the conflicts for each commit individually and you'll need to run git rebase --continue every time you finish with the conflicts for that commit.
Conclusion
In this post, we have seen a case of how to deal with conflicts. But, first, we must anticipate them.
- We have seen what the git stash command is
- We have seen when to run git stash
- We have seen how to use rebase
- And what application to use to solve our conflicts.
In the next post, we’ll probably look at the differences between git merge and git rebase.
