This post is the second in a complete and free course about Stripe, which is available both on this very website and on YouTube.
Both the course and its code are openly and freely available; if you like the content, you know that you can support the website by becoming a premium member, or buying my book.
In the YouTube video, the content of this post starts at minute 110:15.
Now we're going to look at one of the most important parts, as it lets us attract customers more easily: discounts.
In a moment, we'll move on to see how it's done in Stripe, but first, let’s talk about the change in the application.
1 - Creating a Shopping Cart
What I did was modify the app so that it contains a shopping cart. This cart is in memory and has no logic to check if the product is already there, etc. The reason is because this course is about Stripe and not about full stack applications. If you want to see the code process, it's on YouTube or in the GitHub repo.
In production, I recommend that the cart be stored in the database.
In any case, the diagram is as follows:
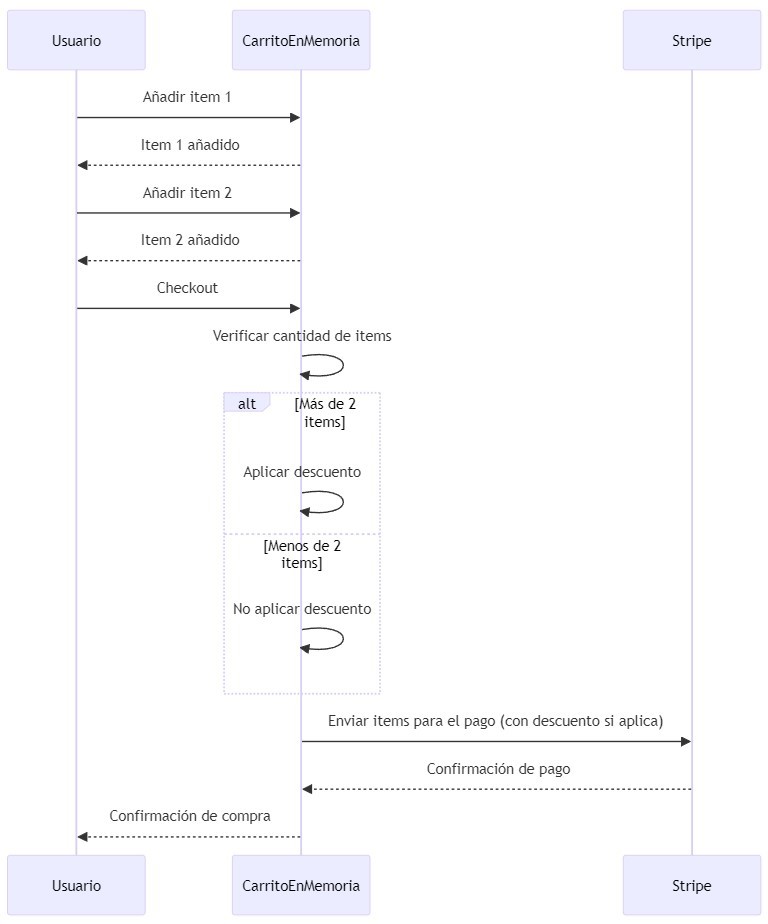
The cart functionality is available only to registered users.
It's not too complicated: each item has a button that uses JS to send the item you're adding to the API, and when you click the checkout button, you'll be taken to Stripe.
This would be the main code (remember that you have all the code on GitHub):
//js
$(".addBookToCart").on("click", function () {
    var priceId = $(this).data("priceid");

    $.ajax({
        url: '/api/shoppingcart',
        type: 'POST',
        contentType: 'application/json',
        data: JSON.stringify({ stripePriceId: priceId }),
        success: function (response) {
            console.log("Item added to cart successfully.");
            // OShow the message to the user
        },
        error: function (xhr, status, error) {
            console.error("Error, this should be visible to the user");
            // show the error to the user
        }
    });
});

//Csharp
[Route("api/[controller]")]
[ApiController]
[Authorize]

public class ShoppingCartController(AddToShoppingCart addToShopping) : ControllerBase
{
	[HttpPost]
	public async Task<IActionResult> Post(AddItemRequest request)
	{
		if (addToShopping.Execute(request.StripePriceId))
		{
			return Ok();
		}
		return UnprocessableEntity();
	}

}

public record AddItemRequest(string StripePriceId);

///
[HttpGet]
[Authorize]
public async Task<IActionResult> CheckoutShoppingCart()
{

    ShoppingCartDto items = getShoppingCart.Execute();

    SessionCreateOptions options = new SessionCreateOptions
    {
        SuccessUrl = "https://localhost:7265/payment-completed",
        CustomerEmail = User?.FindFirstValue(ClaimTypes.Email) ?? null,
        LineItems = items.ProductPricesIds.Select(a => new SessionLineItemOptions()
        {
            Price = a,
            Quantity = 1
        }).ToList(),
        Mode = "payment",
    };

    SessionService service = new SessionService();
    Session stripeSession = await service.CreateAsync(options);

    return Redirect(stripeSession.Url);
}
As you can see, it's very simple. In fact, for now, there is nothing "new." You just read the list of the cart in memory, and that's what we'll use for discounts.
2 - Applying Discounts with Stripe
I'm not going to give a marketing lesson, because I don't know anything about that, but a very common strategy is to say that if you buy more than one item, you get a 10% discount.
Another would be to add a discount during certain periods, such as holidays or Black Friday.
In this example, we are going to apply discounts if we have more than one item in the cart. If you buy two or more, you get a 10% discount on the total price.
As always, we have a couple of ways of making this change: through the API or via the Stripe interface.
In my opinion, choosing one option or the other mainly depends on how many times you have to do it. In our particular case, it's just once.
The way we create discounts in Stripe is through coupons. These coupons have several features:
- They can be for either percentage or fixed discounts.
- For specific products or any product.
- Indefinite duration or within a date range.
- Coupon usage limit, you can set it to "First 100" or no limit.
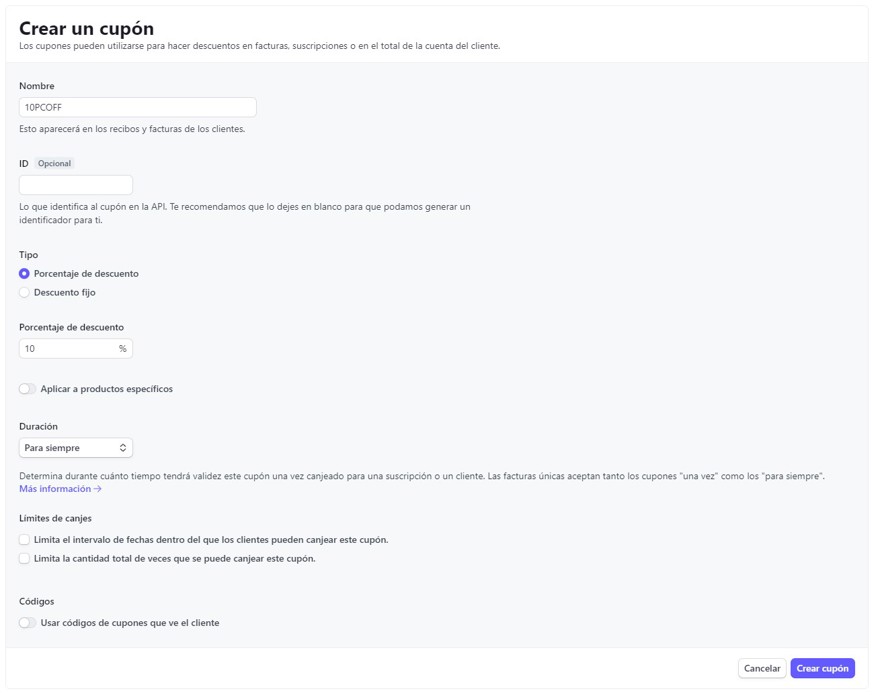
When you click create, it will generate the coupon, and from there you need to save the ID, as that’s the identifier you’ll need in the code:
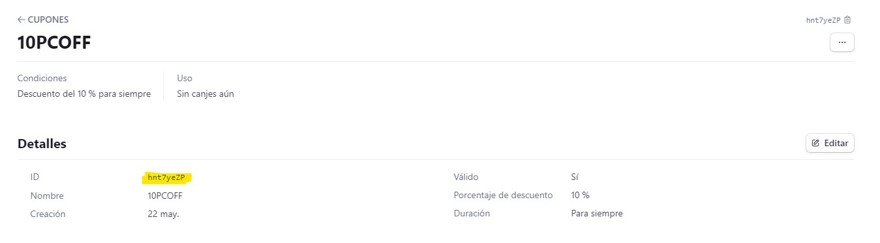
Now what we need to do is modify the previous code to use our discount coupons, but only when we have more than two items in the list:
[HttpGet]
[Authorize]
public async Task<IActionResult> CheckoutShoppingCart()
{

    ShoppingCartDto items = getShoppingCart.Execute();

    SessionCreateOptions options = new SessionCreateOptions
    {
        SuccessUrl = "https://localhost:7265/payment-completed",
        CustomerEmail = User?.FindFirstValue(ClaimTypes.Email) ?? null,
        LineItems = items.ProductPricesIds.Select(a => new SessionLineItemOptions()
        {
            Price = a,
            Quantity = 1
        }).ToList(),
        Mode = "payment",
        Discounts = items.ProductPricesIds.Count < 2 ? null : 👈
                new List<SessionDiscountOptions>
                {
                    new SessionDiscountOptions { Coupon = "hnt7yeZP" }, 👈
                }
    };

    SessionService service = new SessionService();
    Session stripeSession = await service.CreateAsync(options);

    return Redirect(stripeSession.Url);
}Note: In production, don't hardcode that value, put it in the database if you have several or in the appsettings file.
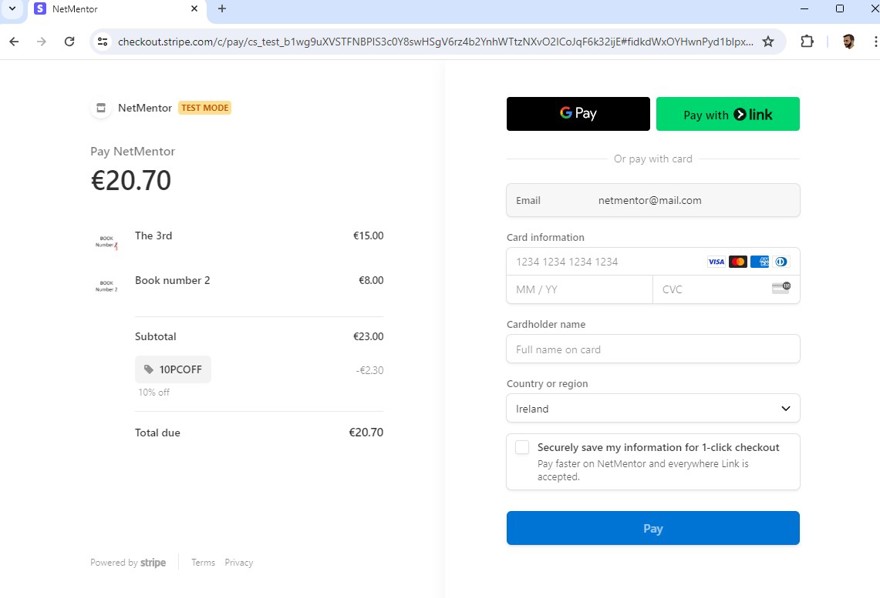
There we see how we are applying the discount to the purchase, and if we add two items to the cart and proceed to buy, we can see the coupon being applied:
3 - Promotion Codes
Just as we're using discount codes in the code itself, we can allow the user to manually include what are called promotion codes. To do this, when creating the checkout session you must enable AllowPromotionCodes:
SessionCreateOptions options = new SessionCreateOptions
{
    SuccessUrl = "https://localhost:7265/payment-completed",
    CustomerEmail = User?.FindFirstValue(ClaimTypes.Email) ?? null,
    LineItems = items.ProductPricesIds.Select(a => new SessionLineItemOptions()
    {
        Price = a,
        Quantity = 1
    }).ToList(),
    Mode = "payment",
    AllowPromotionCodes = true 👈
};
The difference here is that the user will be able to specify any code that is available for that (or those) products.
For example, for Christmas you create a coupon with a 30% discount and indefinite duration.
To this coupon you add a promotion code:
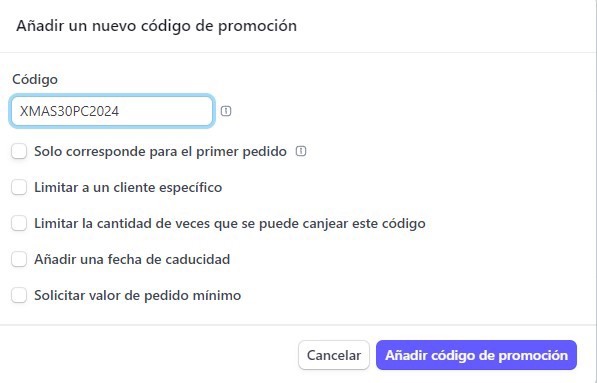
After Christmas you should remove the AllowPromotionCodes parameter from the code, otherwise users can keep using it.
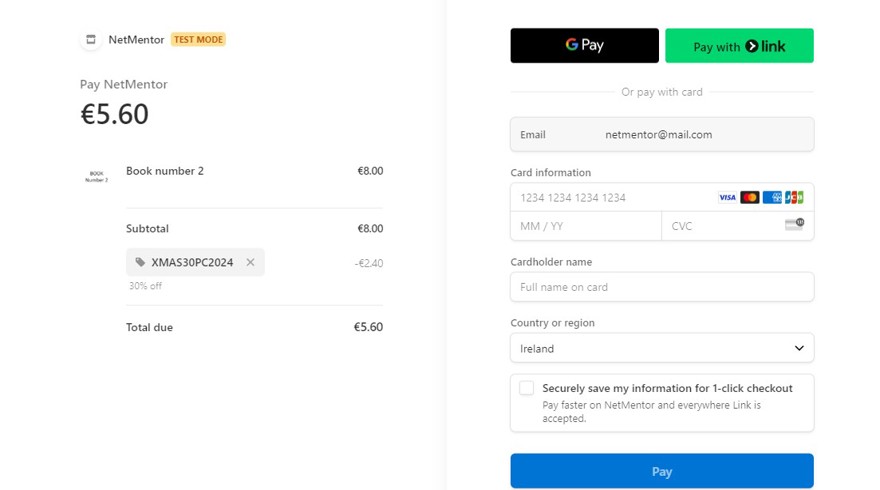
What's more, in this example we have now, even if we only have one item, the user could still use the 30% discount:
Before ending this section, two important nuances should be mentioned:
- You can't have coupons and promotion codes applied at the same time; the API doesn't allow it.
- Personally, I always use discounts. Coupons are fine when you have a single item or you don't usually offer discounts, and you think: "For this period, I’m going to give a discount to my most loyal followers," and you announce the coupon on Twitter/email or similar instead of applying it to everyone.
