In this post, we are going to see how to send or share information between different components in Blazor. To do this, we’ll explore the three available methods.
Index
1 - Cascading values in Blazor
As we saw in the post about creating components, we can pass values from a parent component to a child. For this, we have two options: use the <cascadingValue> tag or send it as a parameter.
<!-- Elemento padre -->
<div class="main">
    <div class="content px-4">
        <CascadingValue Value="Bordercolor">
            @Body
        </CascadingValue>
    </div>
</div>
@code{
    private readonly string Bordercolor="red";
}
In the previous example, we are sending the BorderColor parameter from the parent element, which we receive in the child element and apply it to the css rule.
<!-- Elemento hijo -->
<div class="row">
...
    <div class="col-sm-3" style="border: 1px solid @BorderColor">
        <b>Email:</b> @PersonalProfile.Email
    </div>
   ...
</div>

@code {
    [Parameter]
    public PersonalProfileDto PersonalProfile { get; set; }

    [CascadingParameter]
    public string BorderColor { get; set; }
}
- To see this feature in more detail, please check out this post.
2 - EventCallbacks in Blazor
Before continuing, it’s worth noting that both EventCallback and EventCallback<T> were features added to Blazor starting with net core 3 preview 3.
Previously, to make a callback, we used an Action or Func delegate, and the theory is the same. The only difference was that before, we had to call the StateHasChanged method to notify the component to render again.
With EventCallback, this call to StateHashChanged happens automatically.
These types of events are especially useful when a child component needs to trigger a change in the parent component.
As we can see, in the parent element, we send a method to the child as a parameter:
<!-- Parent Component -->
<div>@Mensaje</div>
<PerfilPersonal Profile="@Name" OnClick="ClickCallback"></PerfilPersonal>
<Contacto />
@code{
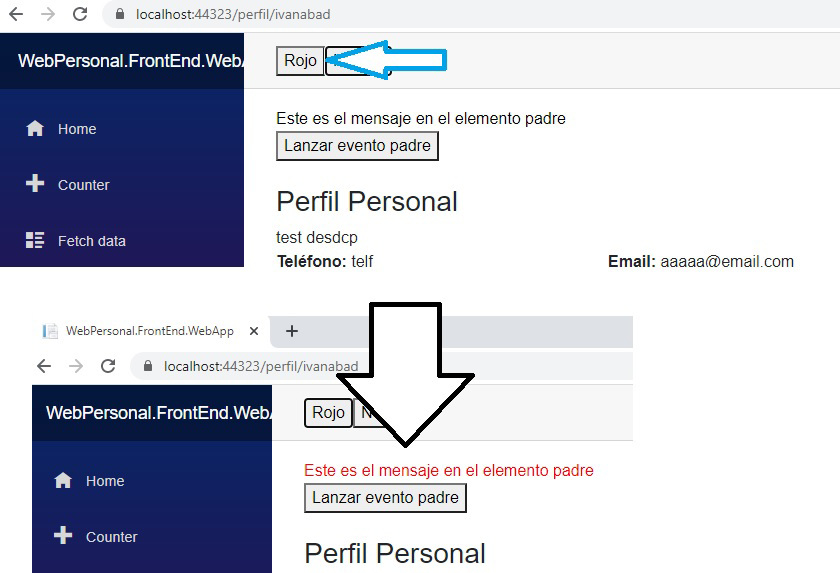
public string Mensaje = "Este es el mensaje en el elemento padre";
void ClickCallback(string mensajeNuevo)
{
Mensaje = mensajeNuevo;
}
}We then receive it in the child as a parameter, using the type EventCallback<string>. We use string because that’s the parameter type our method receives.
[Parameter]
public EventCallback<string> OnClick { get; set; }
To execute it, in the child component, we need to include it as an event on one of our items, in my case, as the onclick of a button.
<button @onclick="@(() => OnClick.InvokeAsync($"Perfil del usuario {PersonalProfile.FirstName} {PersonalProfile.LastName} (enviado desde el hijo)."))">Lanzar evento padre</button>Result:

3 - State container in Blazor
Finally, let's take a look at the state container, which allows us to manage multiple components of our application simultaneously without them being directly related to each other.
To do this, we need to create a class and inject it into the components where we want to use it. When we define it in our dependency container, we must declare it as singleton if the app is web assembly, or as scoped if it’s server side.
For this example, we’ll create the logic to change the color of the titles in our application. However, a professional version could be something like night mode, the logic is the same, just applied to the whole app.
public class StateContainer
{
    public string SelectedCssClass { get; private set; }

    public event Action CambiarColor;

    public void AsignarColorCss(string newCssClass)
    {
        SelectedCssClass = newCssClass;
        ExecuteAction();
    }

    private void ExecuteAction() => CambiarColor?.Invoke();
}
As you can see, our StateContainer class is just a regular class. It has a property that stores the CSS class value, a public method where we can change that value, and finally, an event CambiarColor that allows us to subscribe from other components.
In every component where we want access to the value that will change, we must subscribe to the CambiarColor event exposed by our StateContainer class.
@page "/perfil/{Name}"
@using WebPersonal.FrontEnd.WebApp.Componentes
@inject StateContainer stateContainer
@implements IDisposable

<div class="@stateContainer.SelectedCssClass">@Mensaje</div>

@code{
    protected override void OnInitialized()
    {
        stateContainer.CambiarColor += StateHasChanged;
    }

    public void Dispose()
    {
        stateContainer.CambiarColor -= StateHasChanged;
    }
}
By doing this, we ensure that when the class changes, the StateHasChanged method is invoked so the component gets re-rendered with the new class applied.
Don’t forget to implement IDisposable, so that when you’re not using the component it unsubscribes from the CambiarColor event. Otherwise, it could cause a memory leak.
Finally, let’s just create the two buttons to switch between night mode and normal mode.
For this, all we need to do is call the AsignarColorCss method via the onclick event, passing the desired value as a parameter.
<!-- Boton modo "normal" -->
@inject StateContainer stateContainer

<button @onclick="SetCssNormal">Normal</button>

@code {

    void SetCssNormal()
    {
        stateContainer.AsignarColorCss("negro");
    }
}

<!-- Boton modo "nocturno" (rojo) -->
@inject StateContainer stateContainer

<button @onclick="SetCssNormal">Rojo</button>

@code {

    void SetCssNormal()
    {
        stateContainer.AsignarColorCss("rojo");
    }
}
And here is the result: when we click the link, we can see the color change.
Conclusion
- Today we've seen three different ways to keep communication between different components in Blazor.
- We've seen how to send information from parent to child using cascading values.
- We've seen how to send information from child to parent using EventCallback.
- Finally, we saw how to share information across any number of components, even if they aren't directly related, using State Container.
