If you have followed this series, you already know how to set up your server, and not only that, you also know how to set up your application so it deploys itself using the VPS together with Dokploy. We configure everything once and, without any more manual setup, we will have clean deployments using Docker containers.
In that post, we saw that we have two options: either we press a button to deploy every time we make a change, or we use the webhook that is triggered automatically when we push to the branch. Neither option is ideal on its own.
Today we are going to set up a real workflow with a continuous integration (CI) and continuous deployment (CD) pipeline using GitHub Actions.
Table of contents
1 - Preparation
The first thing we need to do before starting is to be clear about what we need.
1.1 - Preparing the server side
On the server side, we need to obtain our webhook URL, in addition to having a Hostinger VPS running Dokploy.
As we saw in the previous post, once the app is configured, we need to copy our webhook URL from within the Deployment tab.
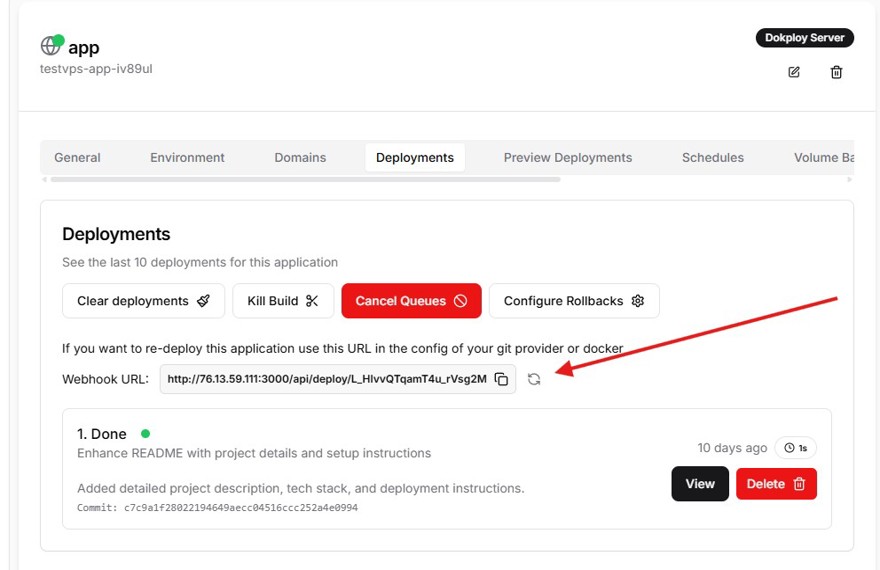
In my case, it is something like:
http://76.13.59.111:3000/api/deploy/L_HlvvQTqamT4u_rVsg2MWARNING, do not share this URL with anyone, because if you do, anyone could trigger a new deployment of your application. NOTE: Where you see the IP, you can use your own domain.
1.2 - Preparing the application side
Just as we saw in the previous post, we need a working Dockerfile that builds the application. Since we are using .NET 10, we make sure to use the correct images:
FROM mcr.microsoft.com/dotnet/aspnet:10.0 AS base
USER $APP_UID
WORKDIR /app
EXPOSE 8080
EXPOSE 8081

FROM mcr.microsoft.com/dotnet/sdk:10.0 AS build
ARG BUILD_CONFIGURATION=Release
WORKDIR /src
COPY ["BlazorApp1/BlazorApp1.csproj", "BlazorApp1/"]
RUN dotnet restore "BlazorApp1/BlazorApp1.csproj"
COPY . .
WORKDIR "/src/BlazorApp1"
RUN dotnet build "./BlazorApp1.csproj" -c $BUILD_CONFIGURATION -o /app/build

FROM build AS publish
ARG BUILD_CONFIGURATION=Release
RUN dotnet publish "./BlazorApp1.csproj" -c $BUILD_CONFIGURATION -o /app/publish /p:UseAppHost=false

FROM base AS final
WORKDIR /app
COPY --from=publish /app/publish .
ENTRYPOINT ["dotnet", "BlazorApp1.dll"]
To make the Continuous Integration process much more realistic, we are going to add an automated test. In Blazor, the industry standard is to use the bUnit library. We are going to test that our Counter.razor component adds numbers correctly when clicking the button in the web interface.
Inside our BlazorApp1.Tests test project, we would have a test like this:
public class CounterTests : BunitContext
{
    [Fact]
    public void WhenButtonIsClicked_ThenCounterShouldIncrement()
    {
        var cut = Render<Counter>();
        cut.Find("button").Click();
        cut.Find("p").MarkupMatches("<p role=\"status\">Current count: 1</p>");
    }
}
If someone breaks the counter in the future, for example by subtracting instead of adding, this test will fail and stop the deployment, saving our production application.
1.3 - Preparing GitHub
In our case, we use GitHub, but you can use any version control platform since they all work in a similar way.
Here, what we need to do is include the webhook URL we saw earlier inside the GitHub Secrets. To do this, inside your repository go to Settings -> Secrets and variables -> Actions and add a new one with the name DOKPLOY_WEBHOOK and the URL as the value.
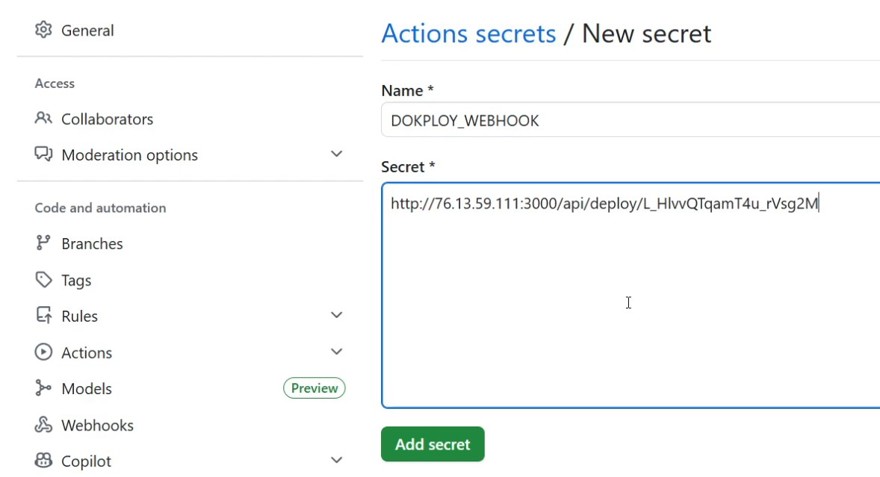
This means your secret is stored in GitHub and will be used by the pipeline, but nobody can see it.
2 - Creating a pipeline to deploy to Dokploy from GitHub
Once the preparation is done, the only thing left is to create the file that will tell GitHub exactly what to do when we push the code. And we will do it the right way: first the Blazor tests run and, only if everything goes well, we deploy.
This file can be created either on your machine or directly on GitHub, in the path .github/workflows/deploy.yml, and this is the final result:
name: CI/CD Pipeline

on:
  push:
    branches:
      - '**'

jobs:
  test:
    name: test-execution
    runs-on: ubuntu-latest
    steps:
      - name: get code
        uses: actions/checkout@v4

      - name: Setup .NET
        uses: actions/setup-dotnet@v1
        with:
            dotnet-version: 10.0.x

      - name: Restore dependencies
        run: dotnet restore

      - name: Build
        run: dotnet build --no-restore

      - name: Test
        run: dotnet test --no-build --verbosity normal


  deploy:
    name: Dockploy Deploy
    needs: test
    if: github.ref == 'refs/heads/main'
    runs-on: ubuntu-latest
    steps:
      - name: ping Dockploy webhook
        run: |
          curl -X POST "${{ secrets.DOKPLOY_WEBHOOK }}" \
          --header 'Content-type: application/json' \
          --header 'X-Github-Event: Deploy-from-gihtub' \
--data '{"ref":"refs/heads/main"}' \- The
onsection means when we are going to run this file. In our case, on every push, on any branch (**). - Next come the
jobs. We have two.- The first one is to run the tests for C# with .NET 10 and, as we can see, it has several steps: downloading the code, setting up .NET, and running the tests.
- The second one is the deployment, which has a bit more to it:
- First we have the
needs: test instruction. This means it needs the test job to finish, and finish successfully, before it starts running. If you do not specify this, both would run at the same time. - Then we have an
if: github.ref == 'refs/heads/main'. This if makes the deployment run only on the main branch.
- First we have the
This way, every push to any branch runs the tests, but Dokploy only receives what we push to main when the tests pass. Now the only thing left is to try it out and see that everything works correctly!
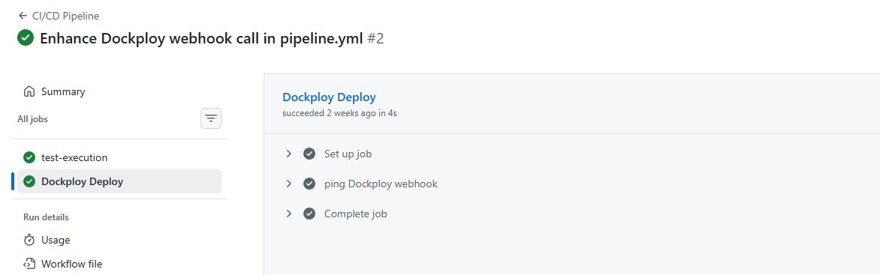
If you check Dokploy, you will see that your VPS has launched another deployment, with the whole process fully automated.
You might think that deploying every commit to main is very risky, but the truth is that it is a completely normal practice in many leading companies.
10% discount on your HOSTINGER VPS with the NETMENTOR discount coupon.
