Those of you who follow me on this channel know I have always been very critical of Microsoft regarding auth in C#, and that's because auth is very complex, difficult to manage, and a headache to maintain.
But, even though all that is still true, .NET 8 introduced a change that mitigates much of this problem.
Contents
1 - Identity API in ASP.NET CORE
Starting with .NET 8, every time we create a new project with Visual Studio we can check a box to specify that we want to use Identity:
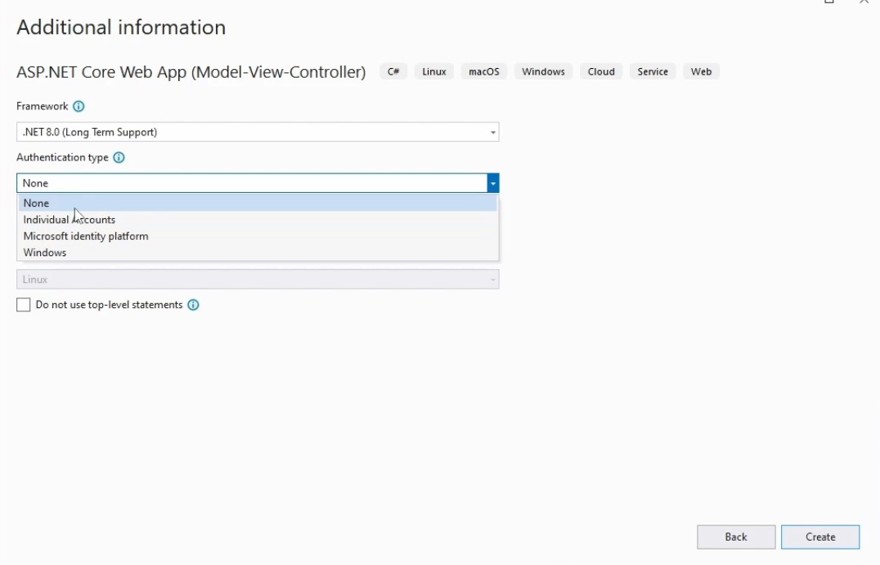
What this checkbox does behind the scenes is to give us an abstraction to manage users in our application, and if we want we can include other Auth providers or even two-factor authentication.
When we check the box, the default template gives us the data models IdentityUser and IdentityRole, which can be stored in a database through Entity Framework, plus classes to facilitate registration, management, etc. of these users.
But that's not all. On the front end it generates a user interface for us, and on the backend, along with the data model, we can include an API. We’ll see these features in a moment.
2 - Why do we need the identity API?
My personal opinion is that this functionality comes 20 years late, but better late than never, right?
But let's get to the real reasons. When working with C#, dealing with users, permissions, etc. has always been a pain; the simplest thing—what I do on my own website—is to use a third-party service where everything can be managed in their own API or interface.
Those of you who have been programming longer may remember that Microsoft had its own open source version of Identity called IdentityServer, which was sold to Duende Software. Companies wanting to manage everything on their servers would fork that service and change the code. Personally, I’ve worked at several companies that did this, and I’m grateful I don’t have to do it anymore.
With this new library, Microsoft makes it easier to use users directly in our own application instead of relying on external services, allowing ASP.NET Core to have crucial functionality that other web frameworks like Rails or Laravel provide by default. Thanks to this library, we can now use a single backend written in .NET and a frontend in any language, if we want to separate the back from the front, of course.

And if we want to have everything in one app, such as MVC, it lets us have everything in one app without much complexity.
Or even if we want to have an external service where we validate users, that’s also possible.
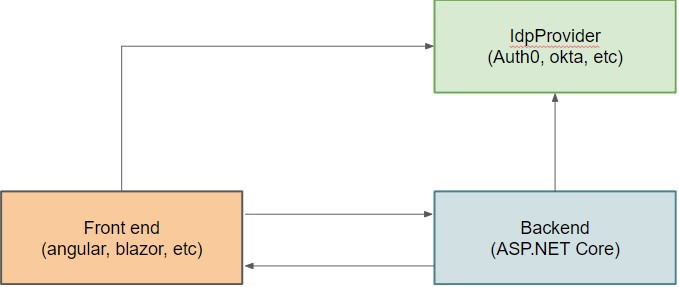
The idea of the .NET identity API is to allow the front end and the back end to communicate with each other, and as I say, the main goal is simplicity for the user or company that is just starting out—and I want to emphasize "just starting out," because for reasons we’ll discuss later, I don’t see it as a 100% complete solution for companies with hundreds or thousands of clients.
Even so, for many scenarios it’s more than enough; for example, this blog. I implemented users before this functionality existed, but if I had to do it now, I’d implement it this way.
3 - How Identity works in .NET
The new library works in a very simple way with very little code. By default, the project comes with a DBcontext from Entity Framework that implements IdentityDbContext:
public class ApplicationDbContext : IdentityDbContext{ public ApplicationDbContext(DbContextOptions<ApplicationDbContext> options) : base(options) { }}This configuration is what allows us to have users, roles, etc.
Now in our Program class is where we'll include most of the code.
builder.Services.AddDefaultIdentity<IdentityUser>(options => options.SignIn.RequireConfirmedAccount = false) .AddEntityFrameworkStores<ApplicationDbContext>(
NOTE: The template uses `options => options.SignIn.RequireConfirmedAccount = true` to validate email—since this is a test/local scenario we set it to false, but for production leave it enabled.
Plus, we can use a different object from IdentityUser if we want to add custom properties.
Of course, you cannot forget to include AddAuthorization in your dependency container.
Like the authorization middleware.
builder.Services.AddAuthorization();app.UseAuthorization();
NOTE: If you’re building a new project from scratch, you will need to run migrations, don’t forget.
3.1 - The Identity interface in .NET
By checking the Identity box, a front end is created for you. This front end is pretty basic but gets the job done, with forms to create accounts, log in, log out, etc.—the basics:

And that's pretty much it. When you log in, a cookie with your Bearer token is included in your browser. This is used for identity.
There are a few considerations for this interface. The first is that it comes by default and is located in what’s known as an Area in ASP.NET Core; although it can be changed, I personally don't recommend it.
All the code regarding this functionality is in the Microsoft-provided library, and to give you an idea, there are over 30 different pages, including registration, login, password reset, basic user admin—but to that you must add everything related to user management, two-factor auth, external logins, errors, etc.
In the end, it’s quite a number of pages and, in my opinion, if you use this functionality it’s because your company is not at the point where you want/need to manually manage all the functionality. For example, if you’re just acquiring clients, how registration is implemented may not be that important at first, but later you’ll need to have a better-designed interface, which means you’ll have to build your own UI.
In a blog, in my opinion, it’s fine and acceptable, although not ideal as the style of the UI cannot be changed.
3.2 - Identity API in .NET
Regardless of whether the provided user interface is usable or not, you may need your UI and API to be separate, with the API in a secure area of your architecture where users can't access it directly—so you’ll need to use the API.
By default, in the project type we chose, the API is not set up, so we need to add it. For that, add the following:
app.MapGroup("/identity").MapIdentityApi<IdentityUser>();
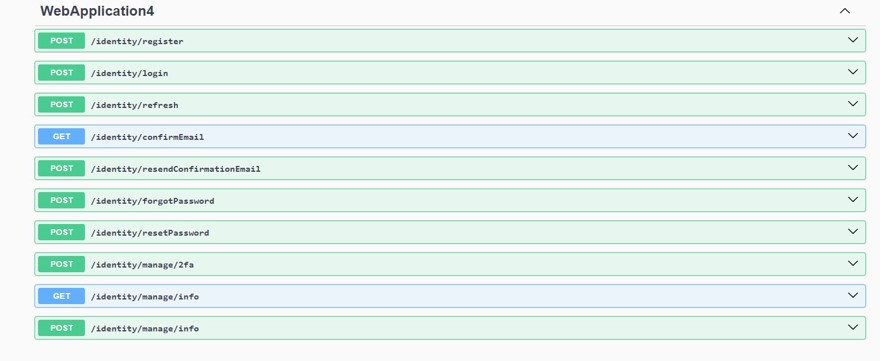
With this code, we create a set of endpoints that are mapped under /identity. Although they're already accessible, I'm going to install and configure Swagger to see them in the browser:
builder.Services.AddEndpointsApiExplorer();builder.Services.AddSwaggerGen(ctx => ctx.AddSecurityDefinition("token", new OpenApiSecurityScheme{ Type = SecuritySchemeType.Http, In = ParameterLocation.Header, Name = HeaderNames.Authorization, Scheme = "Bearer"})); app.UseSwagger(); app.UseSwaggerUI();
And now if we try it, we can access the Swagger UI:
Now we just need to do the login. Go to the login area and make the API call. If it works, you’ll get a 200 response, but you won’t see anything—that’s because the token is sent in the response header.
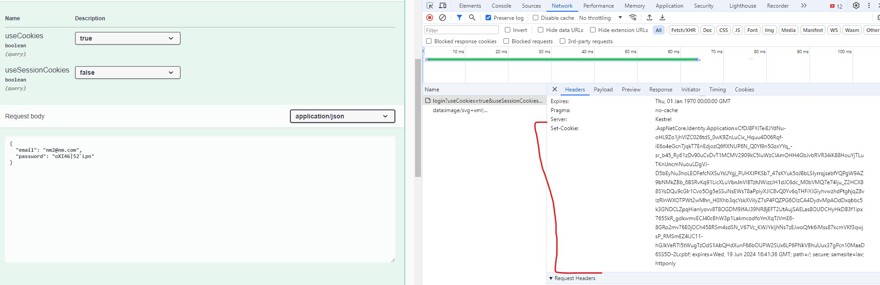
To avoid this, you need to include in AddAuthentication the use of a bearer token. But where is that method? It's inside AddDefaultIdentity, which is part of the identity library, meaning you can't easily change it. So what we do is copy the content of that method and modify it as needed:
//builder.Services.AddDefaultIdentity<IdentityUser>(options => options.SignIn.RequireConfirmedAccount = false)// .AddEntityFrameworkStores<ApplicationDbContext>();builder.Services.AddAuthentication(o =>{ o.DefaultScheme = IdentityConstants.ApplicationScheme; o.DefaultSignInScheme = IdentityConstants.ExternalScheme;}) .AddBearerToken(IdentityConstants.BearerScheme) .AddIdentityCookies(o => { }) ;builder.Services.AddIdentityCore<IdentityUser>(options =>{ options.Stores.MaxLengthForKeys = 128; options.SignIn.RequireConfirmedAccount = false;}) .AddDefaultUI() .AddDefaultTokenProviders() .AddEntityFrameworkStores<ApplicationDbContext>();
The first two lines are what we had before, now commented out.
The rest is what was inside that, but with a small addition for the BearerToken.

And now we can use it to make API calls.
Although the implementation is simple, the API itself has a problem—just like the interface, the endpoints can’t be modified and you are at the mercy of the way the library implements its features.
