In this post, we're going to see how we can create components for our applications written in Blazor.
Blazor components, like those in other front-end frameworks, are reusable and contain the logic for their own creation so they're visible to the user.
This means that everything in your application can be a component: the home page, a registration form, or the web menu itself.
If we use components, it will be much easier to understand the web or the code, as it will be made up of sets of components that are intended to be small, and therefore also contain a small amount of logic.
Table of Contents
1 - Creating components in blazor
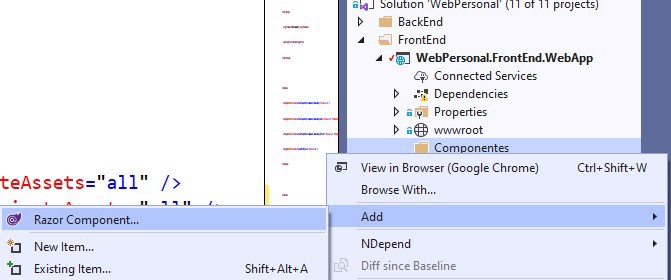
The first thing before starting is that we need to have the code well structured - https://www.netmentor.es/Entrada/estrucutra-aplicacion - so we're going to create a folder for our components, called, componentes.
And on this folder we right-click and create a Blazor component.
For this Blazor course, I'll continue with the front end of what was the backend we did in the rest-api course. So my component, in this case, will be the "personal profile" part.
As soon as we create the component, we can see that it has two parts, the HTML part and the code part
<h3>PerfilPersonal</h3>

@code {

}
I think it's pretty clear: the HTML part, where we'll include all the HTML code, and the code part, where we'll handle the logic for that component.
So let's modify the .razor file we just created to get closer to our PersonalProfileDto (but without using any C# code, for now).
Let's change the HTML to the following:
<div>
    <div class="row">
        <div class="col-sm-12 text-center">NetMentor</div>
    </div>
</div>

<h3>Perfil Personal</h3>
<div class="row">
    <div class="col-sm-12">
        <p>
            Desarrollador Senior con experiencia como Full-Stack en 4 grandes empresas. Motivado y adaptable a cualquier tipo de equipo aunque también tengo la capacidad de trabajar individualmente. Experiencia en trabajar en varios proyectos a la vez con una gran habilidad para aprender y compartir mi conocimiento y gracias a esto completar los objetivos de la empresa.
            <br /><br />
            Experiencia definiendo y liderando procesos de desarrollo. He entrenado y sido mentor de equipos de desarrollo en el que hemos hecho hincapié en las mejores practicas para llevar a cabo elementos reusables. Asegurando así una mayor visibilidad a los problemas o impedimentos del equipo, toda estos cambios han llevado a tener una mayor cualidad de producto.
           <br /><br />
            Finalmente, recientemente me he unido a la comunidad OpenSource y YouTube. Estoy trabajando principalmente en curos de programación en .Net y de novedades, así como consejos como programador para gente que quiere empezar. En GitHub puedes encontrar mi ultimo proyecto el cual es una librería para leer CSV en .Net core.
        </p>
    </div>
</div>
<div class="row">
    <div class="col-sm-3">
        <b>Teléfono:</b> 555555555
    </div>
    <div class="col-sm-3">
        <b>Email:</b> [email protected]
    </div>
    <div class="col-sm-3">
        <b>GitHub:</b> /ElectNewt
    </div>
    <div class="col-sm-3">
        <b>Website:</b> <a href="https://www.netmentor.es">Netmentor.es</a>
    </div>
</div>
1.1 - Using a component in blazor
To use or invoke a component in Blazor, we just have to proceed as we would on the backend. For this, we need to include the namespace where the component is, but instead of using the using keyword, we use the at symbol @ and, as if it were an HTML tag, specify the name of the component.
If we modify the index.razor file as follows, we're invoking our component:
@page "/"
@using WebPersonal.FrontEnd.WebApp.Componentes

<PerfilPersonal></PerfilPersonal>
And this would be the result.
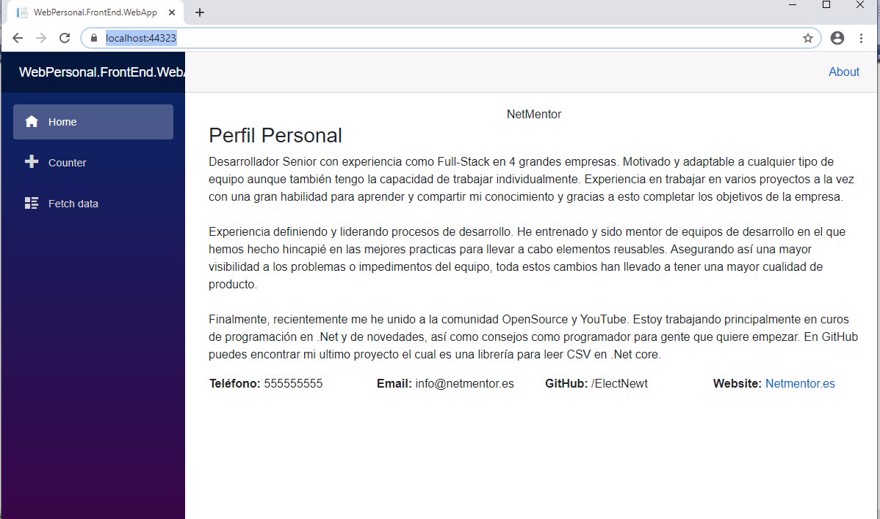
Note: index.razor is another component, the main view, which calls the top and side menus; it's located at Shared/MainLayout.razor
2- Sending variables to a component in Blazor
But obviously, so far we're only doing pure HTML, not really making improvements. The power of components is being able to include logic in them.
For this first example, let's see how to send parameters to a component.
We'll begin with a simple example, just a single parameter, to send the phone number from our main view to our component. First we have to specify in the component that we're going to receive it.
For this, we include the [Parameter] attribute before our parameter, always inside the @code block.
And we reference it in the HTML, using @{Parameter}
Note: If someone has experience with razor, Blazor will be much easier for them as it uses the same syntax.
<div class="row">
    <div class="col-sm-3">
        <b>Teléfono:</b> @Telefono
    </div>
    <div class="col-sm-3">
        <b>Email:</b> [email protected]
    </div>
    <div class="col-sm-3">
        <b>GitHub:</b> /ElectNewt
    </div>
    <div class="col-sm-3">
        <b>Website:</b> <a href="https://www.netmentor.es">Netmentor.es</a>
    </div>
</div>

@code {
    [Parameter]
    public string Telefono { get; set; }
}
And to send it from the main component, we have to specify it in the tag that calls the component.
@page "/"
@using WebPersonal.FrontEnd.WebApp.Componentes

<PerfilPersonal Telefono="911-1234567"></PerfilPersonal>
By the way, intellisense shows us the parameters when we're writing them to be sent to the component:

2.1 - Sending objects to a Blazor component
But most of us - or at least in the vast majority of cases - do object-oriented programming, and as such we have whole objects, not just simple parameters.
Well, following the same logic, we can send objects to our components
<PerfilPersonal PersonalProfile="profile"></PerfilPersonal>

@code{
    PersonalProfileDto profile = new PersonalProfileDto()
    {
        Description = "Ejemplo descripción",
        Phone = "911-1234567",
        FirstName = "Net",
        LastName = "Mentor",
        Email = "[email protected]",
        GitHub = "/ElectNewt",
        Website = "netmentor.es"
    };
}
And receive them the same way
@using WebPersonal.Shared.Dto;

<div>
    <div class="row">
        <div class="col-sm-12 text-center">@PersonalProfile.FirstName @PersonalProfile.LastName</div>
    </div>
</div>

<h3>Perfil Personal</h3>
<div class="row">
    <div class="col-sm-12">
        @PersonalProfile.Description
    </div>
</div>
<div class="row">
    <div class="col-sm-3">
        <b>Teléfono:</b> @PersonalProfile.Phone
    </div>
    <div class="col-sm-3">
        <b>Email:</b> @PersonalProfile.Email
    </div>
    <div class="col-sm-3">
        <b>GitHub:</b> @PersonalProfile.GitHub
    </div>
    <div class="col-sm-3">
        <b>Website:</b> <a href="https://@PersonalProfile.Website">@PersonalProfile.Website</a>
    </div>
</div>

@code {
    [Parameter]
    public PersonalProfileDto PersonalProfile { get; set; }
}
2.2 - Cascading parameters
Blazor lets us pass cascading parameters to ALL children. For this we have to use the [CascadingParameter] attribute
Personally, I'm not a fan of them, but they are an option and I think they must be explained.
For this, in the child, we need to specify the parameter (in this case, it'll be a color to style the border of an element):
<div class="row">
...
    <div class="col-sm-3" style="border: 1px solid @BorderColor">
        <b>Email:</b> @PersonalProfile.Email
    </div>
   ...
</div>

@code {
    [Parameter]
    public PersonalProfileDto PersonalProfile { get; set; }

    [CascadingParameter]
    public string BorderColor { get; set; }
}
When calling the content, we must indicate the <CascadingValue> element with the value
<div class="main">
....
    <div class="content px-4">
        <CascadingValue Value="Bordercolor">
            @Body
        </CascadingValue>
    </div>
</div>
@code{
    private readonly string Bordercolor="red";
}
And when we run it, we can see the result:

2.2.1 - Multiple cascading elements
There may be cases where we have multiple cascading elements, and using the <CascadingValue> element we can only invoke them one by one, but we can add as many as we want
In this case, we should also specify the Name attribute:
<div class="main">
...
    <div class="content px-4">
        <CascadingValue Name="borde" Value="Bordercolor">
            <CascadingValue Name="background" Value="BackgroundColor">
                @Body
            </CascadingValue>
        </CascadingValue>
    </div>
</div>
@code{
    private readonly string Bordercolor="red";
    private readonly string BackgroundColor = "cyan";
}
And later in the component we must modify the attribute to indicate the name we've passed:
<div class="row">
...
    <div class="col-sm-3" style="border: 1px solid @BorderColor">
        <b>Email:</b> @PersonalProfile.Email
    </div>
    <div class="col-sm-3" style="background-color: @BackgroundColor">
        <b>GitHub:</b> @PersonalProfile.GitHub
    </div>
...
</div>

@code {
    [Parameter]
    public PersonalProfileDto PersonalProfile { get; set; }

    [CascadingParameter(Name ="borde")]
    public string BorderColor { get; set; }

    [CascadingParameter(Name = "background")]
    public string BackgroundColor { get; set; }
}
And this would be the result:

3 - Inheritance in component classes
Finally, before wrapping up with components, I want to show how to use a normal c# class in our component, instead of using "code behind" (@code{...})
To do this, we need to create a class, which must inherit from ComponentBase. For the example, let's add a single property:
public class ExperienciaLaboralBase : ComponentBase
{
    public string Titulo => "Experiencia Laboral";
}
This allows us to remove the @code{} block from our view, but we need to inherit the class in the same, using @inherits {class}
@using WebPersonal.FrontEnd.WebApp.Componentescs
@inherits ExperienciaLaboralBase
<h3>@Titulo</h3>
3.1 - Partial classes in Blazor
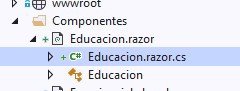
Following the previous example, we can create partial classes, thus avoiding having to inherit from ComponentBase; we also don't need to use @inherit. But it's not all benefits, because to access information from our partial classes they must be in the same namespace and must be named as our component
For example, if our component is called "Educacion.razor" our partial view must be named "Educacion.cs" or, alternatively, the file (not the class) can be named "Educacion.razor.cs" and Visual Studio will group it together with the view.
And as we can see in the code, we only call @Titulo and it immediately understands what we mean.
public partial class Educacion
{
    public string Titulo => "Estudios académicos";
}
////Educacion.razor file
<h3>@Titulo</h3>
Conclusion:
- In this post, we've seen how to create components in blazor
- Different ways to use and send parameters to blazor components.
- How to use cascading components and access them from child components.
- How to use C# classes in Blazor. Also, their partial version
