In the previous post we saw how to abstract the producer-consumer pattern so that users of our library can implement it very easily.
In this case, we are going to see how to use this abstraction on the service side that we will be using, in our case, RabbitMQ, but it could also be another such as Kafka, Mosquitto, etc.
As I mentioned in the previous post, these posts are very important because you might be asked in an interview to develop a system that includes asynchronous communication. With the Distribt library, you’ll be fully capable of implementing the producer-consumer pattern with just a few lines of code.
Table of Contents
1 - What is RabbitMQ?
RabbitMQ is software that acts as a Message Broker; in other words, it’s the place where we publish messages when we want asynchronous communication in our application.
RabbitMQ also allows us to manage queues, which work like the queues in .NET collections.
1.2 - How does RabbitMQ work?
Each message broker has its own features and functionalities. In the case of RabbitMQ, there are two key architectural elements: queues and exchanges.
1.2.1 - What is a queue in RabbitMQ?
Queues in RabbitMQ operate the same way as queues in programming in general: an element enters on one side and leaves on the other, always in order and always one by one. This means that one message enters and only one message leaves.

So if we want to use message queues for our asynchronous communication, this is the element to choose.
1.2.2 - What is an exchange in RabbitMQ?
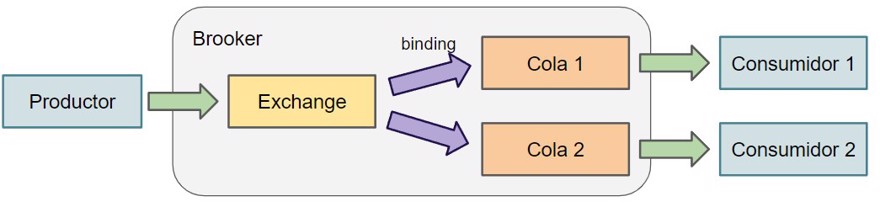
Exchanges, on the other hand, are a bit more complicated; in short, you can think of an exchange as the place where you must publish messages when you want the possibility of having more than one consumer.
There will be scenarios in our system, such as the integration messages we saw in the previous post, where we need X number of clients to consume a particular message.
Exchanges in RabbitMQ function in a particular way: they do not store information, they only transfer it. This means that if you send a message to an exchange and there are no consumers, that message is lost.
However, you cannot consume directly from an exchange in your application; you can only consume from queues.
Therefore, you must bind the relevant exchanges to queues; this action is called binding.
Together, Exchange, binding, and queues represent a broker.
- Note: when doing the binding, it’s also possible to bind from one exchange to another exchange.
But that’s not all, this exchange can be configured in multiple ways:
1.2.3 - Types of exchanges in RabbitMQ
Before explaining the different types, let's mention what RoutingKey is, a simple way to understand its purpose is as an address. Basically, it’s a property you specify when sending the message, and this property can be configured in the different bindings.
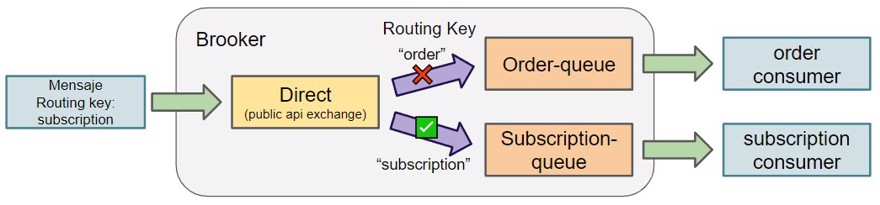
Direct exchange in RabbitMQ
A direct exchange is directly tied to the Routing Key, meaning when we send a message, the exchange checks the routing key and sends the message only to those bindings configured with the same routing key.
Topic exchange in RabbitMQ
A topic exchange uses the routing key to match using wildcards that allow for extra configuration. For example, you produce a message with a routing key value of “api.private.order”, and then have bindings that configure their routing key as “api.private.order” or “api.private.*”. As you can see, the asterisk is the wildcard.
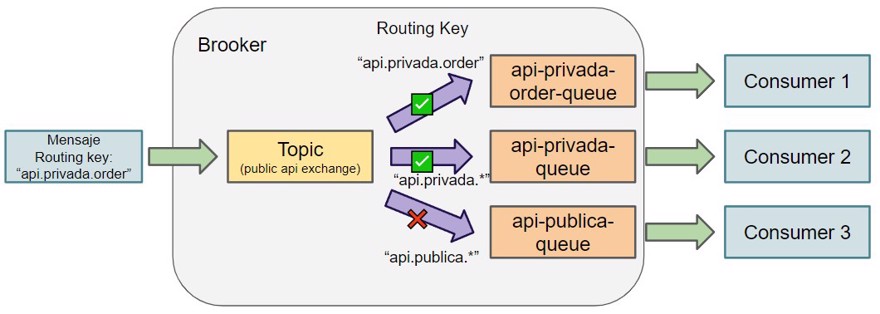
There are two different types of wildcards:
- Asterisk (
*), this allows any value as in the example above. - Hash (
#), this allows specifying that there may or may not be a word. For example,“api.private”will send the message to a topic with the routing key value“api.private.#”, while with an asterisk, it will not.
Header exchange in RabbitMQ
A header exchange is very similar to a direct type. When creating a direct exchange, you do so with the routing key, but what if you need more than one argument to define the binding?
That’s when you use the header type, since you can configure as many arguments as you want.

In the example, we see more than one argument specified in the binding, in this case, message type and format.
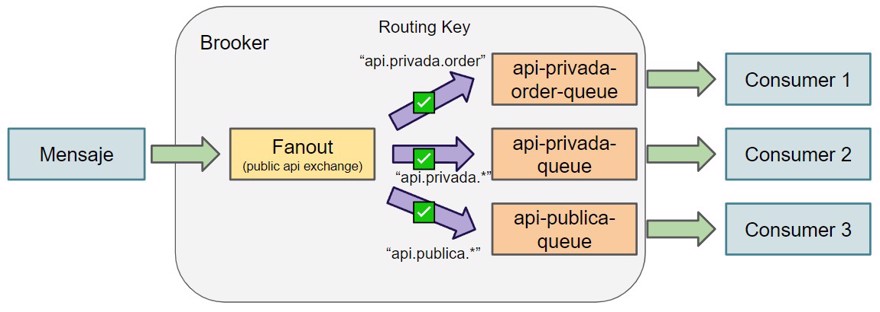
Fanout exchange in RabbitMQ
Finally, the fanout exchange propagates messages to all bindings, regardless of the routing key or any other configuration.
1.3 - Why RabbitMQ
I chose RabbitMQ mainly because it’s very common in the .NET ecosystem. Many libraries written in .NET that abstract messaging functionalities do so first for RabbitMQ and then for other message brokers. This leads many companies to choose RabbitMQ for the same reason.
And for that reason, I decided to use RabbitMQ in the Distribt course.
2 - Creating the RabbitMQ structure
Before beginning to create the structure, it’s important to understand that we can do this in two different ways: in code or through the system’s structure configuration files.
- The first way is usually called “lazy creation”, which means those elements (queues, exchanges, bindings, etc.) are only created when they are actually used.
- The second way doesn’t have a particular name as far as I know, other than including the infrastructure in the configuration. Generally, the service being configured allows importing this structure. In the case of RabbitMQ, it’s a json file.
Each approach has its pros and cons. For example, with lazy creation, you must ensure that queues, exchanges, dead-letter queues exist before sending each message, while if you do it via configuration, you get an exception at runtime if a queue doesn’t exist.
For this course, I will choose the configuration approach because I believe that infrastructure configuration should be separated from application code. But if you prefer to do it in code, be aware that RabbitMQ provides a library for this in a very simple way.
The path for the configuration files will be ./tools/rabbitmq
First of all, let’s see what we’ll be implementing in this post.
Based on the proposed application architecture, we’ll implement producers/consumers between the public API and the subscription microservice.
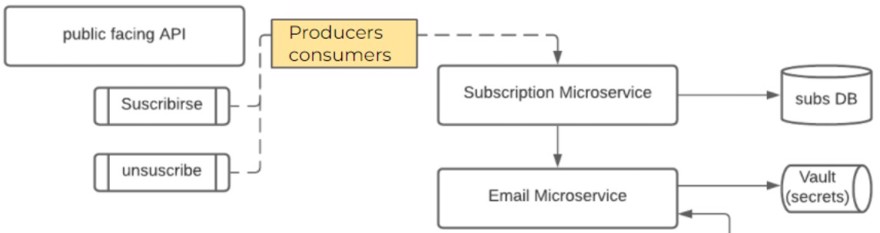
This means we generate an event in the API and the microservice consumes it.
To do this, we need several elements:
- Exchange to publish messages from the API
- Exchange to receive messages in the subscription microservice
- Queue for subscriptions
- dead letter exchange
- dead letter queue
- and their respective bindings
and for this, we need two files, the first called rabbitmq.config, which points to the second file containing the configuration:
[
  {rabbit, [
    {loopback_users, []}
  ]},
  {rabbitmq_management, [
    {load_definitions, "/etc/rabbitmq/definitions.json"}
  ]}
].
and now the configuration file definitions.json:
{
  "users": [],
  "vhosts": [
    {
      "name": "/"
    }
  ],
  "permissions": [],
  "parameters": [],
  "policies": [
      {"vhost":"/","name":"DLX","pattern":".*","apply-to":"queues","definition":{"dead-letter-exchange":"dead-letter.exchange"},"priority":0}
  ],
  "queues": [
      {"name":"subscription-queue","vhost":"/","durable":true,"auto_delete":false,"arguments":{}},
      {"name":"subscription-queue.dead-letter","vhost":"/","durable":true,"auto_delete":false,"arguments":{}}
  ],
  "exchanges": [
      {"name":"api.public.exchange","vhost":"/","type":"direct","durable":true,"auto_delete":false,"internal":false,"arguments":{}},
      {"name":"subscription.exchange","vhost":"/","type":"topic","durable":true,"auto_delete":false,"internal":false,"arguments":{}},
      {"name":"dead-letter.exchange","vhost":"/","type":"direct","durable":true,"auto_delete":false,"internal":false,"arguments":{}}
  ],
  "bindings": [
      {"source":"api.public.exchange","vhost":"/","destination":"subscription.exchange","destination_type":"exchange","routing_key":"subscription","arguments":{}},
      {"source":"subscription.exchange","vhost":"/","destination":"subscription-queue","destination_type":"queue","routing_key":"subscription","arguments":{}},
      {"source":"dead-letter.exchange","vhost":"/","destination":"subscription-queue.dead-letter","destination_type":"queue","routing_key":"subscription","arguments":{}}
  ]
}
As you can see, the way to define the dead-letter queue is through a policy.
Finally, all that remains is to tie everything together in a docker-compose file
version: "3.9"
services:
  rabbitmq:
    image: rabbitmq:3.9-management-alpine #management version needed to be able to have a User interface
    container_name: rabbitmq
    environment:
        - RABBITMQ_DEFAULT_USER=DistribtAdmin
        - RABBITMQ_DEFAULT_PASS=DistribtPass
    ports:
        - 5672:5672
        - 15672:15672
    volumes:
          - ./tools/rabbitmq.config:/etc/rabbitmq/rabbitmq.config
          - ./tools/definitions.json:/etc/rabbitmq/definitions.json
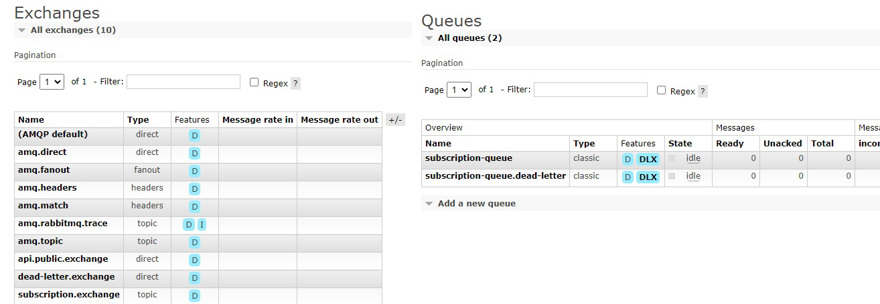
If you go to the browser (http://localhost:15672), you can see that we have all the configuration implemented.
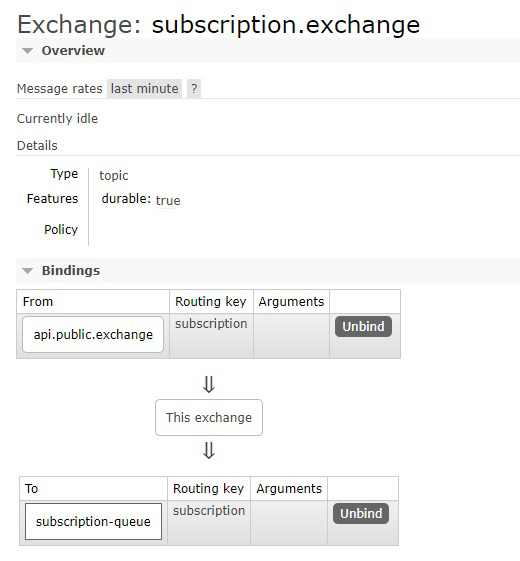
And you can also see how the bindings have been configured correctly:
Now let's implement the code. To do this, the first thing to do in a new library project is to add a reference from NuGet to the RabbitMQ.Client package
3 - Publishing messages with RabbitMQ
In the previous post, we looked at the producer-consumer pattern abstraction and saw that all we need to do is call _publisher.publish() to publish messages, but what are we really doing behind the scenes?
As you’ll recall, we indicated that all our publisher needs to do is implement a class that adheres to IExternalMessagePublisher<TMessage>, and that’s exactly what we do, we create a class implementing that interface
public class RabbitMQMessagePublisher<TMessage> : IExternalMessagePublisher<TMessage>
    where TMessage : IMessage
{
    private readonly ISerializer _serializer;
    private readonly RabbitMQSettings _settings;
    private readonly ConnectionFactory _connectionFactory;

    public RabbitMQMessagePublisher(ISerializer serializer, IOptions<RabbitMQSettings> settings)
    {
        _settings = settings.Value;
        _serializer = serializer;
        _connectionFactory = new ConnectionFactory()
        {
            HostName = _settings.Hostname,
            Password = _settings.Password,
            UserName = _settings.Username
        };
    }

    public Task Publish(TMessage message, string? routingKey = null, CancellationToken cancellationToken = default)
    {
        using IConnection connection = _connectionFactory.CreateConnection();
        using IModel model = connection.CreateModel();

        PublishSingle(message, model, routingKey);

        return Task.CompletedTask;
    }

    public Task PublishMany(IEnumerable<TMessage> messages, string? routingKey = null, CancellationToken cancellationToken = default)
    {
        using IConnection connection = _connectionFactory.CreateConnection();
        using IModel model = connection.CreateModel();
        foreach (TMessage message in messages)
        {
            PublishSingle(message, model, routingKey);
        }

        return Task.CompletedTask;
    }


    private void PublishSingle(TMessage message, IModel model, string? routingKey)
    {
        var properties = model.CreateBasicProperties();
        properties.Type = RemoveVersion(message.GetType());

        model.BasicPublish(exchange: GetCorrectExchange(),
            routingKey: routingKey ?? "",
            basicProperties: properties,
            body: _serializer.SerializeObjectToByteArray(message));
    }

    private string GetCorrectExchange()
    {
        return (typeof(TMessage) == typeof(IntegrationMessage)
            ? _settings.Publisher?.IntegrationExchange
            : _settings.Publisher?.DomainExchange)
               ?? throw  new ArgumentException("please configure the Exchanges on the appsettings");
    }
}
In the code we implement both methods, Publish and PublishMany. Both do pretty much the same thing: we create the connection, the model, and publish the messages.
When we publish messages, we indicate the type property, which will help us later identify the type of message itself.
- Note: The
RemoveVersionpart is to shorten the text (since there is a 250 characters limit) and leave only the assembly as type, so we can deserialize without problems.
Finally, we publish the message with model.BasicPublish(), passing several parameters:
- Exchange: this part depends a bit on your logic. In our application logic, integration events go to one exchange and domain events go to another.
- Routingkey: explained above, if specified when sending the message, it is included; otherwise, an empty string is sent.
- Properties: including the type.
- Message: RabbitMQ receives messages as byte arrays so we must serialize them to
byte[]. Theserializercode is also part of Distribt.
With all this configured, all that’s left is to add the publisher to the dependency injection container for it to be injected.
public static void AddRabbitMQPublisher<TMessage>(this IServiceCollection serviceCollection)
    where TMessage : IMessage
{
    serviceCollection.AddPublisher<TMessage>();
    serviceCollection.AddSingleton<IExternalMessagePublisher<TMessage>, RabbitMQMessagePublisher<TMessage>>();
}
This is included in both AddServiceBusIntegrationPublisher and AddServiceBusDomainPublisher, the methods used within our application, as seen in the previous post.
Now, from our minimal API, we can publish messages with just two lines of code:
app.MapPost("/subscribe", async (SubscriptionDto subscriptionDto) =>
{
    IIntegrationMessagePublisher publisher = app.Services.GetRequiredService<IIntegrationMessagePublisher>();
    await publisher.Publish(subscriptionDto, routingKey: "subscription");
});
But before running, don’t forget to specify the configuration in the appsettings.json file
{
  ....
"Bus": {
    "RabbitMQ": {
      "Hostname": "localhost",
      "Username": "DistribtAdmin",
      "Password": "DistribtPass",
      "Publisher": {
        "IntegrationExchange": "api.public.exchange"
      }
    }
  }
}
4 - Consuming messages with RabbitMQ
The process to configure the RabbitMQ consumer is similar; we just need to implement the IMessageConsumer<TMessage> interface, for which we create the RabbitMQMessageConsumer<TMessage> class:
public class RabbitMQMessageConsumer<TMessage> : IMessageConsumer<TMessage>
{
    private readonly ISerializer _serializer;
    private readonly RabbitMQSettings _settings;
    private readonly ConnectionFactory _connectionFactory;
    private readonly IHandleMessage _handleMessage;


    public RabbitMQMessageConsumer(ISerializer serializer, IOptions<RabbitMQSettings> settings, IHandleMessage handleMessage)
    {
        _settings = settings.Value;
        _serializer = serializer;
        _handleMessage = handleMessage;
        _connectionFactory = new ConnectionFactory()
        {
            HostName = _settings.Hostname,
            Password = _settings.Password,
            UserName = _settings.Username
        };
    }

    public Task StartAsync(CancellationToken cancelToken = default)
    {
        return Task.Run(async () => await Consume(), cancelToken);
    }

    private Task Consume()
    {
        using IConnection connection = _connectionFactory.CreateConnection();
        using IModel channel = connection.CreateModel();
        RabbitMQMessageReceiver receiver = new RabbitMQMessageReceiver(channel, _serializer, _handleMessage);
        string queue = GetCorrectQueue();

        channel.BasicConsume(queue, false, receiver);

        return Task.CompletedTask;
    }
}- Note: RabbitMQ does not work with
asyncprocesses but we should assume the rest of the libraries do, hence theTask.Run.
We need to consume messages from the queue specified in the consumer’s appsettings:
{
...
"Bus": {
    "RabbitMQ": {
      "Hostname" : "localhost",
      "Username": "DistribtAdmin",
      "Password" : "DistribtPass",
      "Consumer": {
        "IntegrationQueue" : "subscription-queue"
      }
    }
  },
}
When we call .BasicConsume, notice we indicate the queue and also pass an object called RabbitMQMessageReceiver.
This object will be called by the RabbitMQ library when a message is consumed, because it implements DefaultBasicConsumer, which has a method called HandleBasicDeliver. Here is where we execute the handler we created in the consuming application.
public class RabbitMQMessageReceiver : DefaultBasicConsumer
{
    private readonly IModel _channel;
    private readonly ISerializer _serializer;
    private byte[]? MessageBody { get; set; }
    private Type? MessageType { get; set; }
    private ulong DeliveryTag { get; set; }
    private readonly IHandleMessage _handleMessage;

    public RabbitMQMessageReceiver(IModel channel, ISerializer serializer, IHandleMessage handleMessage)
    {
        _channel = channel;
        _serializer = serializer;
        _handleMessage = handleMessage;
    }

    public override void HandleBasicDeliver(string consumerTag, ulong deliveryTag, bool redelivered, string exchange,
        string routingKey, IBasicProperties properties, ReadOnlyMemory<byte> body)
    {
        MessageType = Type.GetType(properties.Type)!;
        MessageBody = body.ToArray();
        DeliveryTag = deliveryTag; // Used to delete the message from rabbitMQ

        // #5 not ideal solution, but seems that this HandleBasicDeliver needs to be like this as its not async
        var t = Task.Run(HandleMessage);
        t.Wait();
    }

    private async Task HandleMessage()
    {
        if (MessageBody == null || MessageType == null)
        {
            throw new ArgumentException("Neither the body or the messageType has been populated");
        }

        IMessage message = (_serializer.DeserializeObject(MessageBody, MessageType) as IMessage)
                           ?? throw new ArgumentException("The message did not deserialized properly");

        await _handleMessage.Handle(message, CancellationToken.None);

        //When success, delete from the queue
        _channel.BasicAck(DeliveryTag, false);
    }
}
With this, the handlers we defined in the previous post will work without problems.
Conclusion
- In this post, we have seen what RabbitMQ is and its features.
- We saw how RabbitMQ works with Docker.
- The implementation of RabbitMQ with .NET
