The MVVM pattern has been around for 20 years, starting in desktop applications, evolving beyond the .NET environment, and is now extremely popular in front-end development today.
1 - What is MVVM?
The term MVVM stands for Model-View-ViewModel, a design pattern primarily focused on the user interface.
The main idea of this pattern is to clearly separate business logic from the UI itself. Unlike other common patterns, you do not put logic in what is known as the UI's code-behind, but instead abstract this logic into the view model.
This way, the view contains no logic, making applications easier to maintain and test.
MVVM has been around since around 2005 with WPF in .NET, later adopted by Xamarin, MAUI, etc. However, nowadays in front end, all frameworks like Vue, React, or Angular are MVVM.
2 - How does MVVM work?
The main operation is carried out through a data binding system and the command mechanism provided by the framework itself. This way, the view interacts with the ViewModel without knowing it directly.
If we go to the "official" Microsoft documentation, we have a diagram like the following:
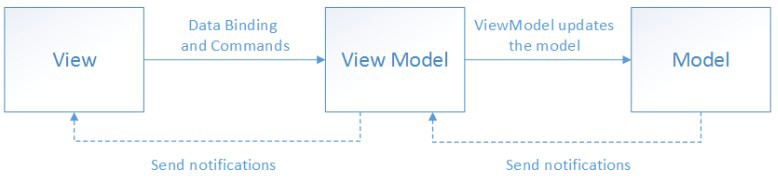
Here we see how the view communicates with the ViewModel through commands, and it is the ViewModel who updates the model. Subsequently, the data is updated in the view through notification events. This ensures the view doesn't know the internal logic and the model doesn't depend on the view.
This layer separation is clear, since each one has an expected role:
- Model: This is the data access layer. That means inserting into the database or external service, reading, etc.
- View: The user interface, which contains no business logic. It is only responsible for the visual representation. In WPF, this would be in xaml format. Of course, we have to bind the view to the properties exposed by the ViewModel via bindings.
- ViewModel: A class, or rather a set of classes, that acts between the view and the model. The ViewModel holds the necessary data to expose it in properties that are used by the view. Additionally, it implements commands for possible actions invoked by the view. For example, if the view has a button to execute an action, the ViewModel has a command that will be executed when that action occurs. However, this ViewModel does not know whether the action occurs via a button or any other trigger, it only knows that it happens. This command is behind the ICommand interface, so we need to specify a command for each action.
But what about data logic?
Well, as with every architecture, there are a thousand opinions. One that I like is this: If it's a simple CRUD APP, most likely what you insert goes straight to the model, and you have a layer with a repository that you inject into the ViewModel. But if you have more logic or need to aggregate data, etc., my personal opinion is that between the model and the ViewModel, you can add a business logic layer just like in any other architecture.
3 - Create a TODO app with MVVM in C#
For this example, let's see how to create a simple application, the typical TODO app. These types of apps are easy to build and clearly demonstrate the basic elements of the architecture we want to show.
From the user's perspective, we're going to have something like this:
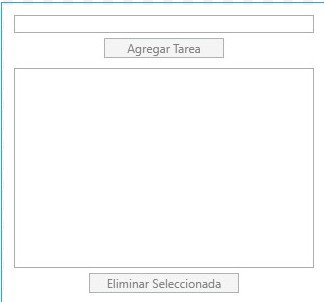
A textbox to enter the task name and then display and delete them. Simple.
Technically, when coding, we can start with the design and then modify it to add bindings, etc., but in our case, we'll start with the model. For our scenario, it's very straightforward, a single class called SimpleTask that contains two properties: Description and Completed.
public class SimpleTask
{
    public string Description { get; set; }
    public bool Completed { get; set; }
}
In certain scenarios, you might need to know if a property changes, it allows you to invoke a C# event, for this you use the INotifyPropertyChanged interface and its required implementation, which would look like the following:
public class SimpleTask : INotifyPropertyChanged
{
    public string Description { get; set; }

    private bool _completed;
    public bool Completed
    {
        get => _completed;
        set
        {
            if (Completed != value)
            {
                Completed = value;
                OnPropertyChanged(nameof(Completed));
            }
        }
    }

    public event PropertyChangedEventHandler? PropertyChanged;

    protected virtual void OnPropertyChanged([CallerMemberName] string? propertyName = null)
    {
        PropertyChanged?.Invoke(this, new PropertyChangedEventArgs(propertyName));
    }
}
Many purists might tell you that INotifyPropertyChanged is exclusively for the view, but in my opinion, it depends. In our case, if we're simulating a database entity, it makes sense NOT to implement it.
Now, let's create the ViewModel, which contains a list of tasks. Be careful, not just any list, but an ObservableCollection<T> because we're going to bind this collection to the task list in the UI.
public class ListSimpleTasksViewModel
{
    public ObservableCollection<SimpleTask> SimpleTasks { get; } = new ObservableCollection<SimpleTask>(); 👈
}
Next, we need a text field for the new task, which will be bound to a TextBox in the view.
public class ListSimpleTasksViewModel
{
    public ObservableCollection<SimpleTask> SimpleTasks { get; } = new ObservableCollection<SimpleTask>();
    public string NewSimpleTask { get; set; } 👈
}
//in the view
<TextBox Text="{Binding NewSimpleTask}" Width="300" Margin="0 0 0 5" />
Now we need the functionality to add tasks. For this, we need an ICommand to perform an action. Make sure the "CommunityToolkit.Mvvm" package is installed, it isn't strictly necessary, but it gives us the RelayCommand class and we only need to define a delegate in the constructor for it to work:
public class ListSimpleTasksViewModel
{
    public ObservableCollection<SimpleTask> SimpleTasks { get; } = new ObservableCollection<SimpleTask>();

    public string NewSimpleTask { get; set; }

    public ICommand AddSimpleTask { get; } 👈

    public ListSimpleTasksViewModel()
    {
        AddSimpleTask = new RelayCommand(AddSimpleTaskAction); 👈
    }

    private void AddSimpleTaskAction() 👈
    {
        SimpleTasks.Add(new SimpleTask()
        {
            Description = NewSimpleTask,
            Completed = false,
        });
        NewSimpleTask = string.Empty;
    }
}

//in the view
<Button Content="Agregar Tarea" Command="{Binding AddSimpleTask}" Width="120" />
Now we need to bind the list we have in the code behind with the view, so we put it in a listbox where we display each element:
<ListBox ItemsSource="{Binding SimpleTasks}" Margin="0 10 0 5" Height="200">
    <ListBox.ItemTemplate>
        <DataTemplate>
            <StackPanel Orientation="Horizontal">
                <CheckBox IsChecked="{Binding Completed, Mode=TwoWay}" />
                <TextBlock Text="{Binding Description}" Margin="5,0,0,0" />
            </StackPanel>
        </DataTemplate>
    </ListBox.ItemTemplate>
</ListBox>
As we can see, we have the binding between the listbox and the observable list of tasks, and then for each element we display a checkbox to indicate completion and the description. Now, let's give it a try:
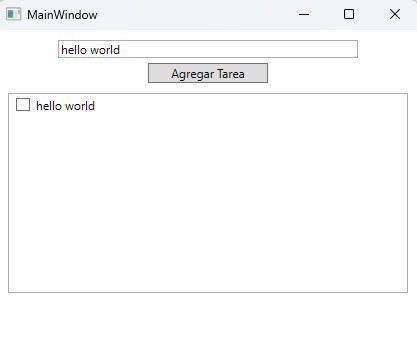
Before proceeding to remove completed (or not) tasks, keep in mind that after adding, the textbox value hasn't changed.
This is because when we create the task, we assign NewSimpleTask to an empty value but don't notify the view that the value changed since we don't use INotifyCollectionChanged. Therefore, we need to implement it in the code:
public class ListSimpleTasksViewModel : INotifyPropertyChanged 👈
{
    public ObservableCollection<SimpleTask> SimpleTasks { get; } = new ObservableCollection<SimpleTask>();

    private string _newSimpleTask = string.Empty; 👈
    public string NewSimpleTask 👈
    {
        get => _newSimpleTask;
        set
        {
            if (_newSimpleTask != value)
            {
                _newSimpleTask = value;
                OnPropertyChanged();
            }
        }
    }

    ...

    public event PropertyChangedEventHandler? PropertyChanged; 👈

    protected virtual void OnPropertyChanged([CallerMemberName] string? propertyName = null) 👈
    {
        PropertyChanged?.Invoke(this, new PropertyChangedEventArgs(propertyName));
    }
}
Now, if you try, you'll see how the textbox is cleared when you add the task.
Note: For the list, we don't have to do this because it's a special WPF type that already implements INotifyPropertyChanged.
Finally, let's delete tasks from the list. In our case, we'll create a property in the ViewModel called SelectedSimpleTask of type SimpleTask, and in the ListBox in the UI, we'll use the SelectedItem property for binding:
public class ListSimpleTasksViewModel : INotifyPropertyChanged
{
    public ObservableCollection<SimpleTask> SimpleTasks { get; } = new ObservableCollection<SimpleTask>();

    public SimpleTask? SelectedSimpleTask { get; set; } 👈

    ...
}

<ListBox ItemsSource="{Binding SimpleTasks}"
            SelectedItem="{Binding SelectedSimpleTask}" 👈
            Margin="0 10 0 5" Height="200">

    <ListBox.ItemTemplate>
    ....
    </ListBox.ItemTemplate>
</ListBox>
This way, selecting an item in the list updates the SelectedSimpleTask property. Just as we did for adding tasks, we need to create a command to remove them:
public class ListSimpleTasksViewModel : INotifyPropertyChanged
{
    public ObservableCollection<SimpleTask> SimpleTasks { get; } = new ObservableCollection<SimpleTask>();

    public SimpleTask? SelectedSimpleTask { get; set; }

    private string _newSimpleTask = string.Empty;
    public string NewSimpleTask
    {
        get => _newSimpleTask;
        set
        {
            if (_newSimpleTask != value)
            {
                _newSimpleTask = value;
                OnPropertyChanged();
            }
        }
    }

    public ICommand AddSimpleTask { get; }

    public ICommand RemoveSimpleTask { get; } 👈

    public ListSimpleTasksViewModel()
    {
        AddSimpleTask = new RelayCommand(AddSimpleTaskAction);
        RemoveSimpleTask = new RelayCommand(RemoveSimpleTaskAction);
    }

    private void AddSimpleTaskAction()
    {
        SimpleTasks.Add(new SimpleTask()
        {
            Description = NewSimpleTask,
            Completed = false,
        });
        NewSimpleTask = string.Empty;
    }

    private void RemoveSimpleTaskAction() 👈
    {
        if (SelectedSimpleTask is not null)
        {
            SimpleTasks.Remove(SelectedSimpleTask);
            SelectedSimpleTask = null;
        }

    }

    public event PropertyChangedEventHandler? PropertyChanged;

    protected virtual void OnPropertyChanged([CallerMemberName] string? propertyName = null)
    {
        PropertyChanged?.Invoke(this, new PropertyChangedEventArgs(propertyName));
    }
}


//ui


<Window x:Class="WpfApp1.MainWindow"
        xmlns="http://schemas.microsoft.com/winfx/2006/xaml/presentation"
        xmlns:x="http://schemas.microsoft.com/winfx/2006/xaml"
        xmlns:d="http://schemas.microsoft.com/expression/blend/2008"
        xmlns:mc="http://schemas.openxmlformats.org/markup-compatibility/2006"
        xmlns:local="clr-namespace:WpfApp1"
        xmlns:viewModel="clr-namespace:WpfApp1.ViewModel"
        mc:Ignorable="d"
        Title="MainWindow">
    <Window.DataContext>
        <viewModel:ListSimpleTasksViewModel />
    </Window.DataContext>

    <StackPanel Margin="10">

        <TextBox Text="{Binding NewSimpleTask}"
                 Width="300" Margin="0 0 0 5" />


        <Button Content="Agregar Tarea" Command="{Binding AddSimpleTask}"
                Width="120" />

        <!-- Lista de tareas -->
        <ListBox ItemsSource="{Binding SimpleTasks}"
                 SelectedItem="{Binding SelectedSimpleTask}"
                 Margin="0 10 0 5" Height="200">
            <!-- Definimos la plantilla visual para cada ítem Tarea -->
            <ListBox.ItemTemplate>
                <DataTemplate>
                    <StackPanel Orientation="Horizontal">
                        <!-- Checkbox ligada a la propiedad Completada de Tarea -->
                        <CheckBox IsChecked="{Binding Completed, Mode=TwoWay}" />
                        <!-- Texto mostrando la descripción de la tarea -->
                        <TextBlock Text="{Binding Description}" Margin="5,0,0,0" />
                    </StackPanel>
                </DataTemplate>
            </ListBox.ItemTemplate>
        </ListBox>

        <Button Content="Delete" Command="{Binding RemoveSimpleTask}" Width="150" /> 👈
    </StackPanel>
</Window>
Here you can see all the code, both the ViewModel and the UI.
If you have something more complex, like a database with repository pattern or use cases, etc., you can do normal dependency injection within the ViewModel, and you'll need to keep both the database and your ViewModel collections in sync continuously.
For example, when you add a task, you do so both in the DB and your list. The same goes for removing, it is removed from the DB and then from your list when done.
