This post is the second in a complete and free course about Stripe, which is available both on this website and on YouTube.
Both the course and its code are openly and freely available. If you like the content, you can support the website by becoming a premium member, or buying my book.
In the YouTube video, the content of this post starts at minute 79:50.
Table of Contents
The way Stripe notifies us that a payment has been successfully made is through webhooks.
1 - What is a Webhook?
A webhook is simply an HTTP call that Stripe will make from its server to ours. In this case, it’s a direct server-to-server call, not a redirect like in payment confirmation. This is important because Stripe cannot call your local machine directly from its server.
To test locally, what we need to do is use the Stripe CLI.
2 - The Stripe CLI
The CLI or Command Line Interface for Stripe is a tool that allows us to perform actions that we would normally do via the API, but not only that, it also lets us trigger events to test webhooks, which is what we’ll do here.
Everything I’ll explain in this section is in the official documentation;
Assuming you’re on Windows, you need to download the stripe.exe file from GitHub and add its path to your Path environment variable. In my case, I’ve put the executable inside `C:\Program Files\Stripe`.
Now what we need to do is log in.
If you run stripe login, it will log into your normal account; if you want to log into your test account, you need to provide the test API key with the command
stripe login --api-key {sk_test_…..}There’s no command to check directly if you’re in test mode, but what I do is compare the balances: with the command stripe balance retrieve, it tells you if you’re in production mode or not.
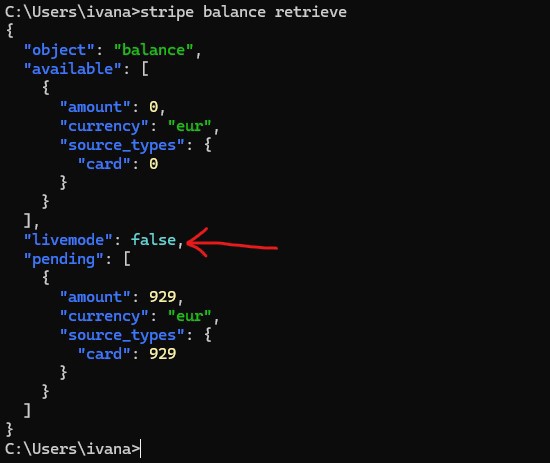
One important thing to keep in mind with Stripe is that prices are shown in the smallest denomination of your currency. For example, in euros we have euros and cents, so the amounts shown by Stripe are in cents, meaning that 929 is actually €9.29.
3 - Listening to Stripe webhooks
Once we have the CLI set up, we now need to connect it to our application.
For our specific case, we’re going to use the listen command in the CLI. This command listens for events happening in Stripe (remember, it’s now connected) and we need to specify which event we want to listen for. In our case, it’s a checkout.session.completed, then we tell the CLI to send that event to a specific URL, in this case, the local URL we have to create. The command is as follows:
stripe listen -e checkout.session.completed --forward-to https://localhost:7265/api/webhook --latest
It’s important to create this before running our code, since the command will give us a code, which is a secret – just like the API secret, but for the webhook. This ensures it is really Stripe calling us and not a malicious actor.
This code in production is available in the Stripe interface, and it is a secret that you should never share. In the local environment, it doesn’t matter as no one can access it.
What the listen command does is allow the CLI to forward the events happening in the Stripe system to the local application. For this, we must create the endpoint that we’ve indicated in the forward parameter.
namespace StripeCourse.Controllers.Api;

[Route("api/[controller]")]
[ApiController]
public class WebhookController : ControllerBase
{


	[HttpPost]
	public async Task Post()
	{
	}
}
Here, we’re just creating the endpoint, but we need to read the message itself.
NOTE: Before continuing, I want to pause here. We are listening for the checkout.session.completed event, which is triggered when making a payment in the Stripe checkout. If you’re using the API or Stripe Elements, this event is not generated, so you need to listen for payment_intent.succeeded; Technically, you can always listen for the latter, but payment_intent.succeeded does not include information about the user who made the purchase, whereas checkout.session.completed does, which can be very important if you’re selling a digital good such as a book. Also, Stripe recommends listening for checkout.session.completed.
[HttpPost]
public async Task<IActionResult> Post()
{
	var json = await new StreamReader(HttpContext.Request.Body).ReadToEndAsync();
	try
	{
		Event? stripeEvent = EventUtility.ConstructEvent(json,
				Request.Headers["Stripe-Signature"], configuration["StripeWebhookSecret"]);

		// Handle the event
		switch (stripeEvent.Type)
		{
			case Events.CheckoutSessionCompleted:
					HandleSessionCompleted(stripeEvent.Data.Object as Session);
				break;
			default:
				Console.WriteLine("Unhandled event type: {0}", stripeEvent.Type);
				break;
			}
		return Ok();
	}
	catch (StripeException e)
	{
		return BadRequest();
	}
}

public void HandleSessionCompleted(Session checkoutSession)
{
	Console.WriteLine("Session Completed Event");
	Console.WriteLine($"By user: {checkoutSession.CustomerDetails.Name} ({checkoutSession.CustomerDetails.Email})");

	var options = new SessionGetOptions();
	options.AddExpand("line_items");
	var service = new SessionService();
	Session sessionWithLineItems = service.Get(checkoutSession.Id, options);
	Console.WriteLine("Items:");
	foreach (var item in sessionWithLineItems.LineItems)
	{
		Console.WriteLine($"PriceId: {item.Price.Id} - Quantity: {item.Quantity}");
	}

	Console.WriteLine("In production this will lookup the id from the " +
		"stripePaymentID and send them by email, create an order, etc");
}
There’s quite a bit to explain here. Stripe sends the information via POST, so we need to read the body to get the content, which we read as a string and then convert into a Stripe Event. We also validate that the event comes from Stripe using the “Stripe-Signature” header and the secret provided by the CLI.
Next, since we have just a single endpoint for the webhook, we validate the event type and react accordingly.
In our case, we only check if it is a “checkout.session.completed” event and we have a handler for it. While it doesn’t send the book via email (since the mail system is not configured), you can see how to access all the necessary data.
Once everything is running, we can launch the application; when making a payment, you’ll see how the CLI can read the event and send it to our local application:

To finish this section, Stripe allows you to resend an event with stripe events resend evt_…. This can be very useful if you don’t have the CLI properly configured or if there’s a bug in your code, since you can send the same event as many times as you need, allowing you to debug without having to go through the entire payment process.
If you remove the -e option from the listen command, you will listen to all events happening in the system, and the CLI will send them all to your code, although you’ll probably only react to one of them.
4 - Webhooks in production
As we’re not covering production setups here, it's important to mention that, for events to be sent, you have to specify this in Stripe.
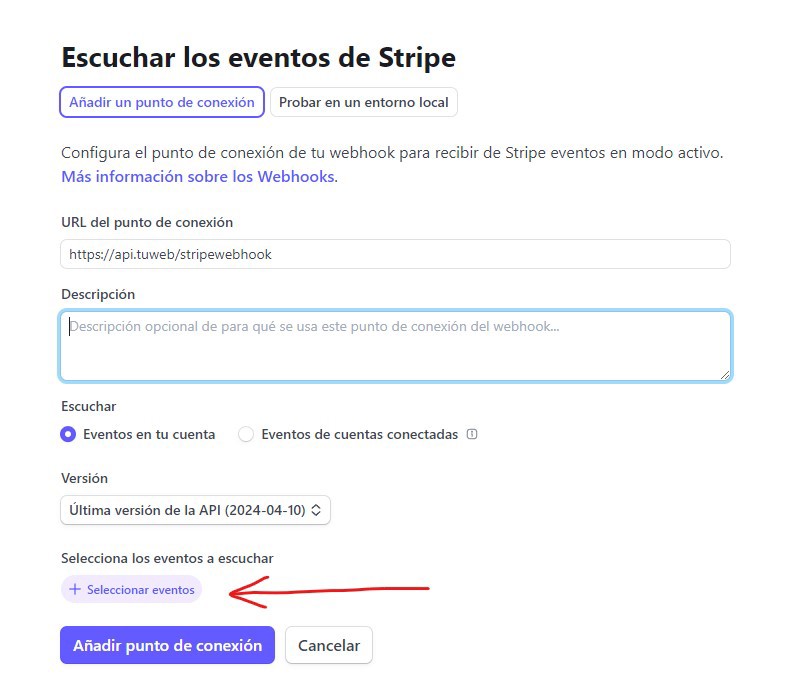
Not only that, but you also have to specify which events you want to listen for, so that they’re sent to you.
