This is a post I’ve been wanting to do for quite a while, and I’ve waited until the release of .NET 7 to create it, because the new version of .NET brings built-in rate limiting functionality, which makes things a lot easier.
Table of Contents
1 - What is Rate Limiting?
When we create an API, sometimes, especially when it’s publicly accessible, we want to limit its usage.
This is done to prevent overuse. A clear example is in paid applications: the paid version allows X number of calls, while the free version allows many fewer:
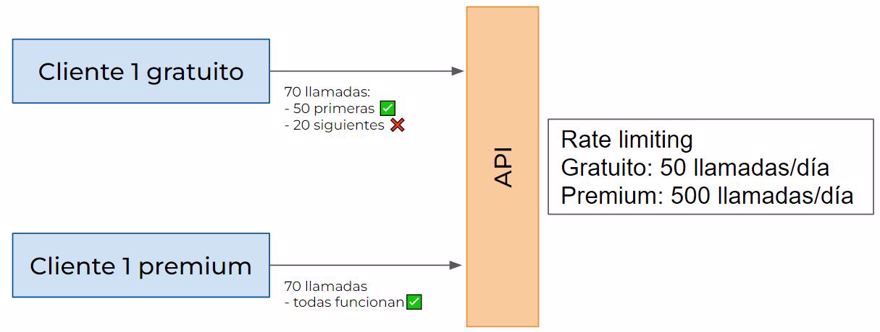
A real world example is the YouTube API, which only lets you “query” 10,000 units (videos, comments, etc.) per day.
What is not rate limiting? It’s not a filter to restrict where a client can access or permissions, the proper solution for that is either API Keys or JWTs.
2- Why use rate limiting?
One reason is to directly put restrictions on clients, for example, only allowing X number of calls and offering a paid or premium version with a higher limit.
Another example I’ve also seen, even if it’s less common now, is when the app (or its database) can only handle X number of simultaneous calls, if you go beyond that number, the performance drops considerably or even crashes. Limiting the API calls ensures this doesn’t happen.
And of course, it protects you from DDoS attacks and similar cases.
These reasons, or a combination of them, are the most common, often, you have clients who can make all the calls they want, but there’s a little asterisk saying "10 per minute" or something similar.
3 - Implementing rate limiting in .NET
As I mentioned, in the new .NET version (version 7), rate limiting is built-in. That means if you create or update your project to net7 or higher, you’ll be able to use the middleware that lets you configure rate limiting.
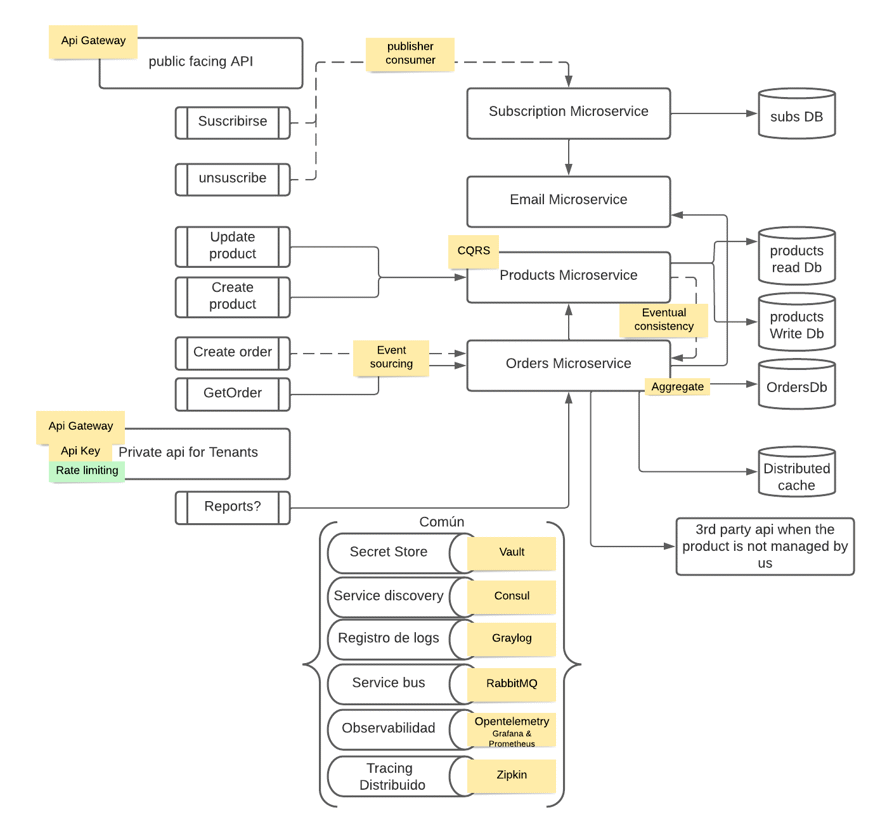
For this post, I implemented rate limiting in the application for the Distribt distributed systems course, which has its code available on GitHub.
This is the full diagram, but for this example, you only need to focus on the green dot and a bit on the API key we discussed in the previous post.
The library is quite complete, and we’ll explore the different options it provides. In any case, you’ll need to use the extension method to configure the rate limiting middleware with UseRateLimiter().
webappBuilder.Services.AddRateLimiter(options => {...})
app.UseRateLimiter();
By the way, add the UseRateLimiter middleware before your first endpoint because, as you may recall, middlewares execute in order.
Before moving on to the different types of rate limiting, I want to explain a bit how the library itself works, let’s look at a very simple example:
webappBuilder.Services.AddRateLimiter(options =>
    options.AddConcurrencyLimiter(policyName: "concurrencyPolicy", limiterOptions =>
    {
        limiterOptions.PermitLimit = 10;
    }));
This example is the simplest: the API with this configuration will only be able to handle 10 simultaneous calls. But what about the rest?
3.1 - Queues in Rate Limiting
One option is to enable a queue, where you specify its size and the order (FIFO or LIFO)
webappBuilder.Services.AddRateLimiter(options =>
    options.AddConcurrencyLimiter(policyName: "concurrencyPolicy", limiterOptions =>
    {
        limiterOptions.PermitLimit = 10;
        limiterOptions.QueueLimit = 100;
        limiterOptions.QueueProcessingOrder = QueueProcessingOrder.OldestFirst;
    }));
3.2 - Rejecting calls with Rate Limiting
But once the simultaneous call limit and the queue are both full, what happens to the new requests coming in?
Well, if everything’s “full,” those requests will be rejected, and you can specify the status code to return with RejectionStatusCode.
webappBuilder.Services.AddRateLimiter(options =>
{
    options.RejectionStatusCode = 429; // Too many request
    options.AddConcurrencyLimiter(policyName: "concurrencyPolicy", limiterOptions =>
    {
        limiterOptions.PermitLimit = 10;
        limiterOptions.QueueLimit = 100;
        limiterOptions.QueueProcessingOrder = QueueProcessingOrder.OldestFirst;
    });
});
In our case, we return 429 which is commonly used to indicate too many requests have been made.
3.3 - Rate Limiting response message
Returning an error code is fine, but it’s not very informative, ideally, you’d include an error message using the OnRejected delegate:
webappBuilder.Services.AddRateLimiter(options =>
{
    options.RejectionStatusCode = 429; // Too many request
    options.OnRejected = async (context, token) =>
    {
        await context.HttpContext.Response.WriteAsync("too many requests, please try again later ");
    };
    options.AddConcurrencyLimiter(policyName: "concurrencyPolicy", limiterOptions =>
    {
        limiterOptions.PermitLimit = 10;
        limiterOptions.QueueLimit = 100;
        limiterOptions.QueueProcessingOrder = QueueProcessingOrder.OldestFirst;
    });
});
Ideally you’d want to standardize your responses to meet the normalization requirements of the rest of your APIs.

3.4 - Identifying the caller in rate limiting
To identify who is making the call and apply different rate limiting filters, you use the PartitionKey, and in the next section, we’ll see how to configure it.
But basically, it’s as follows:
partitionKey: "the identifier here"4 - Types of Rate Limiting
Within rate limiting there are several configurations you can apply and also several ways (algorithms) to build that configuration. Until now, we’ve used options.AddConcurrencyLimiter(...), which is fine, but you can also set up your configuration with options.GlobalLimiter, and we’ll see a couple of examples.
Note: GlobalLimiter limits the entire app, whereas .Add.. needs to be specified per endpoint/controller, etc.
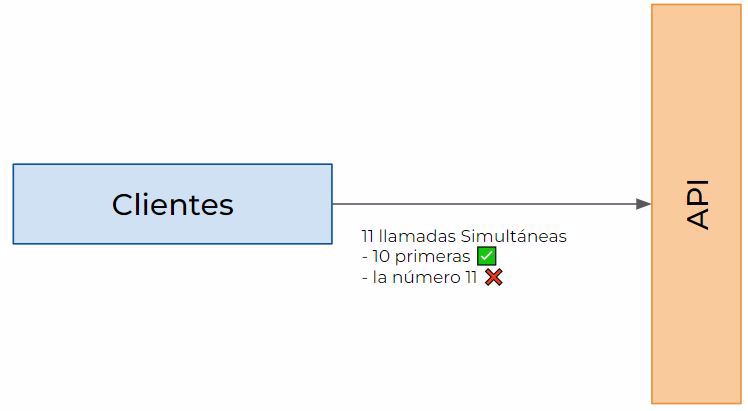
4.1 - Concurrency limit
This is the clearest and simplest example: you allow X number of simultaneous calls. If you allow 10 simultaneous calls, the 11th will be denied
 And this would be the code:
webappBuilder.Services.AddRateLimiter(options =>
{
    options.RejectionStatusCode = StatusCodes.Status429TooManyRequests;
    options.OnRejected = async (context, token) =>
    {
        await context.HttpContext.Response.WriteAsync("too many requests, please try again later ");
    };
    options.GlobalLimiter = PartitionedRateLimiter.Create<HttpContext, string>(httpContext =>
        RateLimitPartition.GetConcurrencyLimiter(
            partitionKey: "the identifier here",
            factory: _ => new ConcurrencyLimiterOptions()
            {
                PermitLimit = 10,
                QueueLimit = 0,
                QueueProcessingOrder =  QueueProcessingOrder.OldestFirst
            }));
});
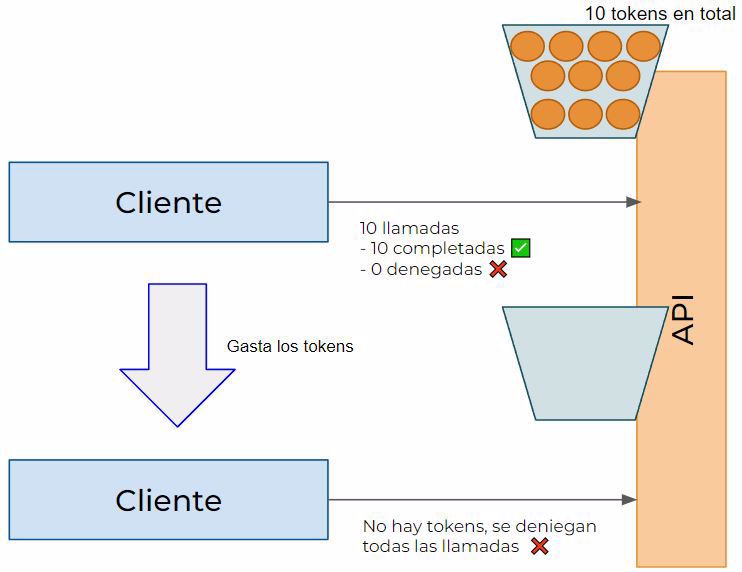
4.2 - Token bucket limit
The name comes from its real world representation.
We have a limited number of calls (tokens), for example 100, and when a request arrives, it spends a token; once you’ve used them all, you can’t use the service anymore.
Here you can see the code:
webappBuilder.Services.AddRateLimiter(options =>
{
    options.RejectionStatusCode = StatusCodes.Status429TooManyRequests;
    options.OnRejected = async (context, token) =>
    {
        await context.HttpContext.Response.WriteAsync("too many requests, please try again later ");
    };

    options.AddTokenBucketLimiter("policy-name", limiterOptions =>
    {
        limiterOptions.TokensPerPeriod = 2;
        limiterOptions.TokenLimit = 100;
        limiterOptions.ReplenishmentPeriod = TimeSpan.FromMinutes(5);
    });
});
In this example, we have a limit of 100 tokens, and every 5 minutes you get two tokens back.
4.3 - Fixed window limit
Similar to the previous case, the difference here is that there’s no token limit:
webappBuilder.Services.AddRateLimiter(options =>
{
    options.RejectionStatusCode = StatusCodes.Status429TooManyRequests;
    options.OnRejected = async (context, token) =>
    {
        await context.HttpContext.Response.WriteAsync("too many requests, please try again later ");
    };

    options.AddFixedWindowLimiter("policy-name", limiterOptions =>
    {
        limiterOptions.PermitLimit = 2;
        limiterOptions.QueueLimit = 10;
        limiterOptions.Window = TimeSpan.FromMinutes(5);
    });
});
4.4 - Sliding window limit
Similar to the previous case, but the difference is that each window has a set number of segments. In the following example:
webappBuilder.Services.AddRateLimiter(options =>
{
    options.RejectionStatusCode = StatusCodes.Status429TooManyRequests;
    options.OnRejected = async (context, token) =>
    {
        await context.HttpContext.Response.WriteAsync("too many requests, please try again later ");
    };


    options.AddSlidingWindowLimiter("policy-name", limiterOptions =>
    {
        limiterOptions.PermitLimit = 5;
        limiterOptions.QueueLimit = 10;
        limiterOptions.SegmentsPerWindow = 5;
        limiterOptions.Window = TimeSpan.FromMinutes(5);


    });
});
Here we have 5 calls per window, and the window lasts 5 minutes, but as well, it’s divided into 5 segments, so you can only make one call per minute.
5 - Custom Rate Limiting policies
We can create a policy completely customized for our system. To do that, all you have to do is create a class that inherits from IRateLimiterPolicy<T>, where T is the partition key you’re going to use, normally it’ll be a string.
When you create the class, you implement the members you need, and you’ll have something like this:
public class DistribtRateLimiterPolicy : IRateLimiterPolicy<string>
{
    public RateLimitPartition<string> GetPartition(HttpContext httpContext)
    {
        return RateLimitPartition.GetFixedWindowLimiter(
            partitionKey: httpContext.Request.Headers["apiKey"].ToString(),
            partition => new FixedWindowRateLimiterOptions
            {
                PermitLimit = 10,
                Window = TimeSpan.FromMinutes(60),
            });
    }

    public Func<OnRejectedContext, CancellationToken, ValueTask>? OnRejected { get; } =
        (context, _) =>
        {
            context.HttpContext.Response.StatusCode = StatusCodes.Status429TooManyRequests;
            context.HttpContext.Response.WriteAsync("too many requests, please try again later ");
            return new ValueTask();
        };
}
In this case, since it’s Distribt and we know we have an API Key, we simply read that key for the partition key, which represents a client. But for other public services, you could have a policy for when the API Key exists, for example 10 calls per hour, but if it doesn't exist, only one call per hour.
- Note: this is just like any other class, it supports dependency injection, etc.
Now we need to change the configuration a bit: you no longer need to use services.AddRateLimiter but instead, when you call useRateLimiter, you specify the policy.
app.UseRateLimiter();
app.MapGet("/rate-limiting-test", () =>
{
    return "Hello World!";
}).RequireRateLimiting(new DistribtRateLimiterPolicy());
6 - Rate limiting per endpoint
Most rate limiting configurations are set up for the API as a whole (you have X calls, no matter where), but you can also limit per endpoint.
For this, instead of using app.UseRateLimiting() in your configuration, you create a policy and then use it with RequireRateLimiting.
webappBuilder.Services.AddRateLimiter(options =>
{
    options.RejectionStatusCode = StatusCodes.Status429TooManyRequests;
    options.OnRejected = async (context, token) =>
    {
        await context.HttpContext.Response.WriteAsync("too many requests, please try again later ");
    };

    options.AddConcurrencyLimiter("policy-name", limiterOptions =>
    {
        limiterOptions.PermitLimit = 2;
        limiterOptions.QueueLimit = 0;
    });
});

....

app.MapGet("/rate-limiting-test", () =>
{
    Thread.Sleep(2 * 60 * 1000);
    return "Hello World!";
}).RequireRateLimiting("policy-name");
A similar approach works if you want to disable rate limiting, just use the DisableRateLimiting filter or extension method.
app.MapGet("/", () => "Hello World!").DisableRateLimiting()
As I mentioned, this works both with minimal APIs and standard MVC controllers.
In MVC, you’ll use the filter attributes [EnableRateLimiting("policy-name")] and [DisableRateLimiting] at either the controller or endpoint level.
Conclusion
In this post, we’ve seen how to create Rate Limiting in .NET
We’ve covered the different types of Rate Limiting
