Welcome to this post where we're going to see how to create a chat that will work in real time thanks to SignalR.
Table of Contents
1 - What are real-time applications?
Nowadays, most of the applications we use are real-time. This means, for example, that when we visit a webpage, we don't have to reload it to see updated information—it updates automatically.
A very simple example is a chat: you have your chat window, and when you receive a message, you simply see it—you don't have to refresh the chat. The same happens with emails or in online games.
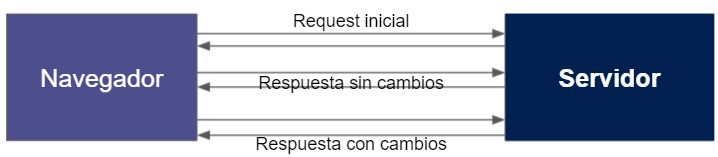
When browsing the internet, the regular flow is that we visit a page by making an HTTP request and the server sends us a response:

But this isn't enough for real-time applications, since the server needs to send messages to the client (browser) every time something changes.

To get real-time information, we have several options:
1.1 - Polling
One of the techniques to achieve "real-time updates" is polling, which means the browser will keep making requests to the server to check if something has changed.
To do this, we make periodic http calls to the server, which means putting all the request code in a loop while or for, and the server will respond if there are changes or not.
1.2 - Long polling
Similar to the previous case, with the difference that the server doesn't send a response until something has changed. Therefore, the http connection remains open.
In this situation, unlike with Polling, we also need a loop on the server side that will run until a change occurs.

1.3 - Server-Sent Events (SSE)
Server-sent events are an HTML5 feature to receive real-time information from the server. Once the initial connection is made, the server can send data to the client using the EventSource object, which has an event called onmessage that allows processing the messages received. Note: they're limited to sending only text messages.
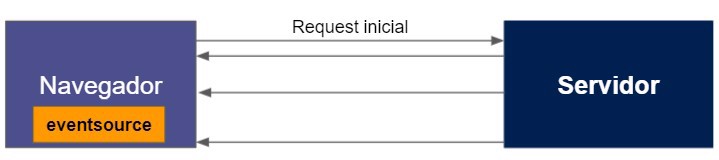
In this scenario, communication is one-way only, from server to client.
Also, only one http connection is created, which makes it a much more efficient solution than polling or long polling.
1.4 - Websockets
Websockets are a standard that allows us to use a single TCP socket to send messages between the server and the client.
Both the client and the server can send messages to each other through the websocket
. 
Unlike the previous cases, with websockets we can do audio or video streaming since it allows sending both text and binary data.
1.4.1 - How websockets work
Normal HTTP calls also use a TCP socket; the difference is the websockets standard uses a handshake to upgrade a currently used socket (your http request) to a websocket using the ws protocol.
Here's an image of how a websocket works (high level):
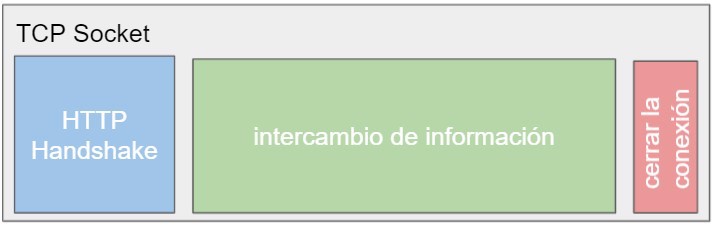
First, communication is established using an HTTP request. In this request, the server indicates that the socket needs to be upgraded to a websocket, thus leaving the channel open for data exchange until it is manually closed (for example, by closing the browser).
Blazor, for example, uses websockets through SignalR in its server-side version.
2 - What is SignalR
SignalR is a framework that abstracts the different techniques we've just seen for real-time communication, saving us a lot of headaches when it comes to configuring everything correctly.
Additionally, if our user is using a very old browser, SignalR can detect this and automatically use Server-Sent Events or long polling if it's even older.
SignalR also uses RPC for communication between the client and the server, making it very fast (we'll see RPC in another post).
Finally, it's important to note that SignalR has been adopted by Microsoft for all its real-time technology, and "SignalR server" comes as a library in the asp.net web package.
2.1 - SignalR Communication - Hubs
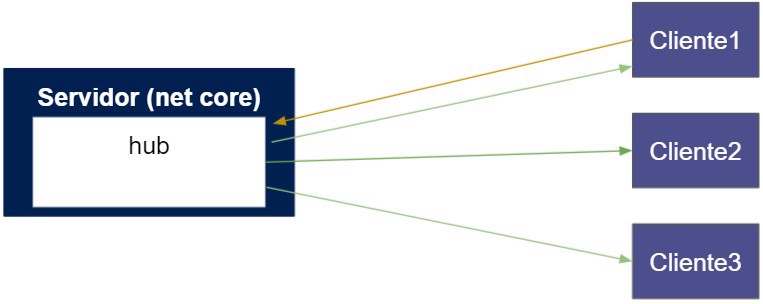
SignalR provides us with Hubs, which are components we place on the server that send and receive messages from clients.
Within the hub, we can define if we want to send information to all clients, a single client, or a group of clients.
Just like from the client, we can call a method inside the hub.
With both points considered, we can communicate bidirectionally between client and server in real time.
For example, in the use case of a group chat.
User 1 sends a message to the hub, and this hub propagates it to all clients.
Note: Authorization to ensure no one connects unexpectedly works the same way as it does in controllers, using the Authorize attribute.
3 - Creating a chat with SignalR
Let's see, in practice, how to create a real-time chat using Blazor.
3.1 - Server configuration for a real-time chat with SignalR
The first step is to create a console application, which will act as our server/host.
In the past, with .NET Framework, we would have had to create a web application, but nowadays it's not necessary, since a console app can function as a server.
For our specific case, we only need to install the Microsoft.AspNetCore.App library, which gives us everything required to run a web server in a console application.
Also, remember that from netCore 3 SignalR (server) comes installed with the language.
First, let's create the Hub to which clients will connect:
class ChatHub : Hub
{
    public async Task SendMessage(string user, string message)
    {
        await Clients.All.SendAsync("ReceiveMessage", user, message);
    }
}
As we can see, it's very simple: it only receives two parameters and propagates them through ReceiveMessage. This means that when our hub is invoked, a message is sent to all clients that are set up to receive ReceiveMessage.
Finally, we have to configure our console app to function as a server. We do this the same way as we would in a regular web application, through the startup class:
public class Startup
{
    public IConfiguration Configuration { get; }

    public Startup(IConfiguration configuration) { Configuration = configuration; }

    public void ConfigureServices(IServiceCollection services)
    {
        services.AddCors();
        services.AddSignalR();
    }

    public void Configure(IApplicationBuilder app)
    {
        // global cors policy
        app.UseCors(x => x
            .AllowAnyMethod()
            .AllowAnyHeader()
            .SetIsOriginAllowed(origin => true)); //Fix this configuration in production

        app.UseRouting();
        app.UseEndpoints(endpoints =>
        {
            endpoints.MapHub<ChatHub>("/chat");
        });
    }
}
As you can see, we've added cors and SignalR to the dependency container, as well as configuring cors to accept any origin. Remember to change this setup if you're going to go to production.
Finally, within the configuration, we've defined an endpoint which will be the entry point for clients to the hub.
app.UseEndpoints(endpoints =>
{
    endpoints.MapHub<ChatHub>("/chat");
});
Now, we just need to run our server; we can do it from the command line with dotnet run
3.2 - Client configuration for a real-time chat with SignalR and Blazor
Now, let's create a client that will connect to our server.
To do this, create a new web project -> blazor.
Now we need to install the SignalR client; for this, install Microsoft.AspNetCore.SignalR.Client from NuGet, and then simply set up a view to let your users write and see messages from the hub.
Create a component that will contain two inputs — one for the username you'll use in the chat and one for the message to send.
<h3>Chat Example</h3>
<div class="form-group row">
    <label for="usuario" class="col-sm-2 col-form-label">User</label>
    <div class="col-sm-10">
        <input type="text" class="form-control" id="usuario" @bind="userInput">
    </div>
</div>
<div class="form-group row">
    <label for="Mensage" class="col-sm-2 col-form-label">Message</label>
    <div class="col-sm-10">
        <input type="text" class="form-control" id="Mensage" @bind="messageInput">
    </div>
</div>
As you can see, the fields are bound to two properties.
To send the data, we'll do it with a button that triggers a method—but first, we need to connect to the hub, which we'll do from the component's onInitializedAsync method.
@page "/chat"
@using Microsoft.AspNetCore.SignalR.Client

@code{
    private HubConnection hubConnection;
    private List<string> messages = new List<string>();
    private string userInput;
    private string messageInput;

    protected override async Task OnInitializedAsync()
    {
        hubConnection = new HubConnectionBuilder()
            .WithUrl("http://localhost:5000/chat")
            .Build();

        hubConnection.On<string, string>("ReceiveMessage", (user, message) =>
        {
            var encodedMsg = $"{user}: {message}";
            messages.Add(encodedMsg);
            StateHasChanged();
        });

        await hubConnection.StartAsync();
    }
}
Notice we connect to the hub through HubConnectionBuilder and the endpoint we pointed out on the server. In our case, http://localhost:5000/chat.
- Note: the Url will change in production
We continue with the .on method of the hub itself, which is the server handler—that is, every time someone invokes the hub on the server that contains this handler, the content inside this method will run.
hubConnection.On<string, string>("ReceiveMessage", (user, message) =>
{
    var encodedMsg = $"{user}: {message}";
    messages.Add(encodedMsg);
    StateHasChanged();
});
Here, we add a message to the list of messages and update the component.
Finally, we start the server connection with await hubConnection.StartAsync();
Now we need to create the button to send messages. To do this, we create a normal button. It will be disabled if we're not connected to the hub. To know if we're connected, we can use the State property inside our hubConnection type.
And, of course, the method to send information to the hub.
<button @onclick="Send" disabled="@(!IsConnected)">Send</button>

@code {
    async Task Send() =>
        await hubConnection.SendAsync("SendMessage", userInput, messageInput);

    public bool IsConnected =>
        hubConnection.State == HubConnectionState.Connected;
}
Lastly, all that's left in the component's HTML is to add a loop to iterate through the messages received in the handler, and implement Idisposable since we must release the connection when leaving the component.
@page "/chat"
@using Microsoft.AspNetCore.SignalR.Client
@implements IAsyncDisposable

<h3>Chat Example</h3>
<div class="form-group row">
    <label for="usuario" class="col-sm-2 col-form-label">User</label>
    <div class="col-sm-10">
        <input type="text" class="form-control" id="usuario" @bind="userInput">
    </div>
</div>
<div class="form-group row">
    <label for="Mensage" class="col-sm-2 col-form-label">Message</label>
    <div class="col-sm-10">
        <input type="text" class="form-control" id="Mensage" @bind="messageInput">
    </div>
</div>
<button @onclick="Send" disabled="@(!IsConnected)">Send</button>

<hr>

<ul id="messagesList">
    @foreach (var message in messages)
    {
        <li>@message</li>
    }
</ul>

@code {
    private HubConnection hubConnection;
    private List<string> messages = new List<string>();
    private string userInput;
    private string messageInput;

    protected override async Task OnInitializedAsync()
    {
        hubConnection = new HubConnectionBuilder()
            .WithUrl("http://localhost:5000/chat")
            .Build();

        hubConnection.On<string, string>("ReceiveMessage", (user, message) =>
        {
            var encodedMsg = $"{user}: {message}";
            messages.Add(encodedMsg);
            StateHasChanged();
        });

        await hubConnection.StartAsync();
    }

    async Task Send() =>
        await hubConnection.SendAsync("SendMessage", userInput, messageInput);

    public bool IsConnected =>
        hubConnection.State == HubConnectionState.Connected;

    public async ValueTask DisposeAsync()
    {
        await hubConnection.DisposeAsync();
    }
}
This is the final result: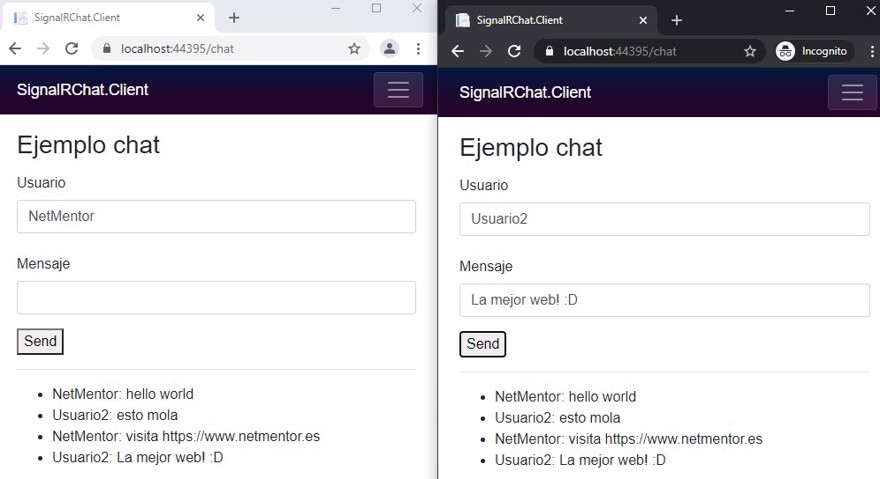
Conclusion
- In this post, we’ve seen what real-time applications are and what our options are for creating them.
- We have seen what SignalR is and how it works.
- And we've also learned how to create a real-time chat with SignalR and .NET.
