Today we're going to see how to run AI models directly on your own machine, without paying monthly subscriptions, without losing control of your data, and without needing to be connected to the internet.
Table of Contents
1 - Would you like to use artificial intelligence without relying on expensive APIs or sending your data to third parties?
If you've followed my channel or my blog, you've seen that I've worked quite a bit with artificial intelligence. I have a video testing Codex and another evaluating the 6 most popular online AIs with a real comparison between them. Both videos were well liked, but one comment kept coming up: the cost of these tools, which is a problem for many people.
That's why, in this post (and possibly in the whole course), I'm going to show you how to run AI models locally with C#, so you can experiment, learn, or even work without relying on external services.
In many cases, the company will pay these costs, but in others, they don't want artificial intelligence involved at all, or we can’t access it from a device that doesn’t belong to the company. So if you want to test or play around with it, it's just not possible.
Not to mention privacy issues, there are free models and APIs for those who can't afford the price of AI, but we end up sending information, often personal or even confidential (if it’s company data), to other companies who then know what we’re doing. This is clearly a problem, and if you're not paying for a product, you are the product.
Finally, local models work on your own machine, meaning you don’t need an internet connection to function, although you do need a more powerful computer since some models are very large.
2 - Preparing our local machine to run Artificial Intelligence.
In this video, we're working with Llama, but you can use DeepSeek, Gemma, Mistral, or whichever one you prefer.
Now, to communicate with the models there are two ways. You can call the model directly via the CLI, for which you need to download a couple of things: first, the Llama binaries, which you can get from GitHub (https://github.com/ggml-org/llama.cpp/releases). Pick the one for your operating system.
Once you’ve downloaded them, you need to get the pre-trained model, which you can find here: Link to tinyLllama1.1b.
Now, put the DLL and CLI from the release together with the model you’ve downloaded from Llama in a folder.
If we run the following command, it should work:
.
llama-cli.exe --model .
tinyllama-1.1b-chat-v1.0.Q8_0.gguf --prompt "reverse a binary tree in C#"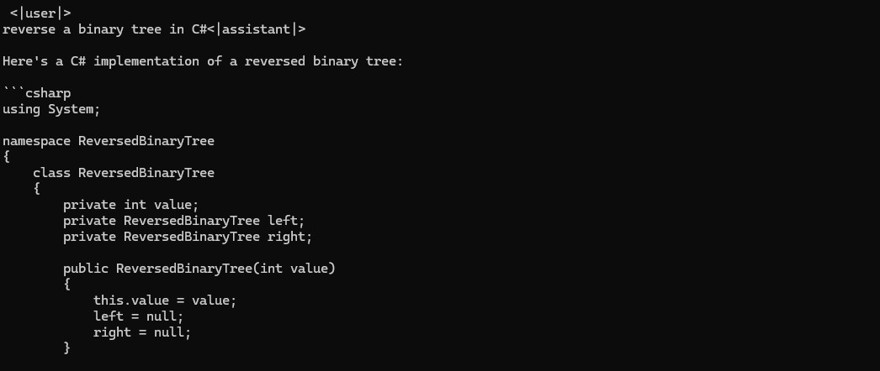
Of course, we don't want to use the CLI, at least not directly, so we have several options for that.
2.1 - Run Artificial Intelligence via Ollama and C#
The first (and most popular) option is to install Ollama on your local machine, a model client that allows you to run models locally.
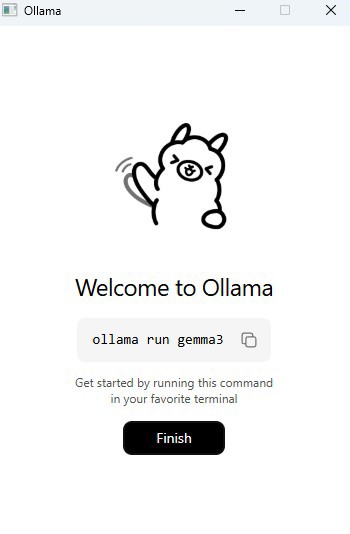
Once you install Ollama, you have to download the models. If you run the command shown in the image, you'll download gemma3, but you can change it to download whichever model you want, like Llama3:

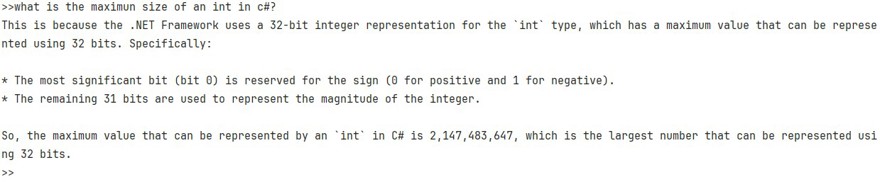
Once downloaded, you can use it from the command line:
Note: Alternatively, there are projects on GitHub that put an interface over this CLI.
But for the purpose of this post, the way we'll communicate from an application to Ollama is by making HTTP calls using the OllamaSharp library, which is the most popular one.
Uri uri = new Uri("http://localhost:11434");
OllamaApiClient ollama = new OllamaApiClient(uri);

// select a model which should be used for further operations
ollama.SelectedModel = "llama3";

Chat chat = new Chat(ollama);

while (true)
{
    Console.Write(">>");
    string? message = Console.ReadLine();
    await foreach (string answerToken in chat.SendAsync(message))
        Console.Write(answerToken);
}
And if we run it, we see it works perfectly:
2.2 - Run AI models directly from C#
The second option is to use the model directly. For this, we’re going to use the LlamaSharp library. We use a library here because it makes life easier, but you could do it without one.
To do this, we must install llamasharp and llamasharp.backend.cpu and adapt the following code to our needs, especially the system context prompt and the model path:
string modelPath = @"C:\Users\ivan\Downloads\tinyllama-1.1b-chat-v1.0.Q8_0.gguf"; // 👈 model path

var parameters = new ModelParams(modelPath)
{
    ContextSize = 1024, // The longest length of chat as memory.
    GpuLayerCount = 5 // How many layers to offload to GPU. Please adjust it according to your GPU memory.
};
using var model = LLamaWeights.LoadFromFile(parameters);
using var context = model.CreateContext(parameters);
var executor = new InteractiveExecutor(context);
// Add chat histories as prompt to tell AI how to act.
var chatHistory = new ChatHistory();
chatHistory.AddMessage(AuthorRole.System, "you are an expert in programmin and C#. You should answer all " +
                                          "questions in a friendly manner and provide code examples if needed.");

ChatSession session = new(executor, chatHistory);

InferenceParams inferenceParams = new InferenceParams()
{
    MaxTokens = 256, // No more than 256 tokens should appear in answer. Remove it if antiprompt is enough for control.
    AntiPrompts = new List<string> { "User:" }, // Stop generation once antiprompts appear.

    SamplingPipeline = new DefaultSamplingPipeline(),
};

Console.ForegroundColor = ConsoleColor.Yellow;
Console.WriteLine("The chat session has started;");
Console.ForegroundColor = ConsoleColor.Blue;
Console.Write("User: ");
Console.ForegroundColor = ConsoleColor.Green;
string userInput = Console.ReadLine() ?? "";

while (userInput != "exit")
{
    await foreach ( // Generate the response streamingly.
                   var text
                   in session.ChatAsync(
                       new ChatHistory.Message(AuthorRole.User, userInput),
                       inferenceParams))
    {
        Console.ForegroundColor = ConsoleColor.Blue;
        Console.Write(text);
    }
    Console.ForegroundColor = ConsoleColor.Green;
    userInput = Console.ReadLine() ?? "";
}
Now if we run it, we see it works the same as before:

Conclusion
Using local models to work with artificial intelligence has a ton of advantages, as we mentioned at the beginning, not just in terms of privacy but also cost.
Using paid models via an API can become very expensive, sometimes as much as a developer’s salary, so in most scenarios, especially programming, the free models are almost as efficient as the paid ones.
When it comes to using Ollama or the model directly, it’s more a matter of taste. My recommendation is to try both and see which you like best!
