When creating distributed services, we are going to create multiple services, each of which will be called in a different way, in different addresses or with different domains.
Doing these actions can be quite a hassle, since if the system grows a lot, there are many names to remember, many addresses to memorize, and what's worse, many updates we have to send to our clients with messages like: "the address has changed from X to Y" or "A new service has been added at address X" (which is different from Y).
To avoid all this communication which can lead to confusion, we have the API Gateway.
Table of Contents
1 - What is an API Gateway?
An API Gateway is an extra layer that we add between our Front End services or external clients so that they interact with it instead of communicating directly with the corresponding Back End service.
An API Gateway acts as a reverse proxy to which we can include extra functionalities, such as security, usage policies, alerts, etc.
In our Distribt application, the API Gateways will be located both on the private access side and the public access for external clients.
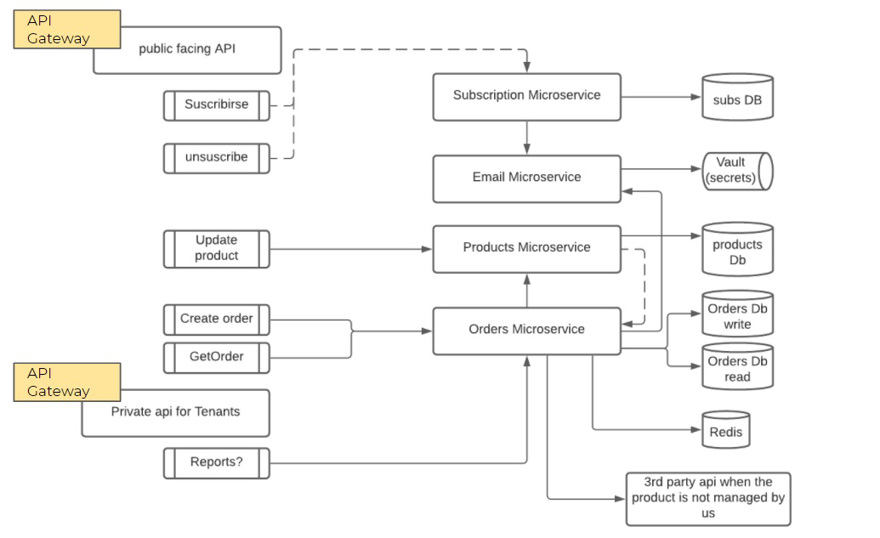
NOTE: Technically, it could be the same API Gateway, but we will separate both concepts to see specific use cases.
1.1 - When to use an API Gateway?
As we've mentioned, some of the benefits of using an API Gateway is to centralize where calls are made, both from clients and from services.
It also allows us to introduce features such as:
- Authentication: the first security filter for access control.
- Rate Limiting: Means controlling the amount of data that clients can use/download to avoid abuse, or for example, if we offer a SaaS service, it allows us to implement greater control with customer billing. For example: the first 10,000 calls to the API are free, then €2 for each additional thousand calls.
- Monitor the API: having everything centralized makes it easier to monitor and know what is used most and how.
- If you change a service, you do not need to notify clients, as long as you do not change the API Gateway contract, since the client will continue to call the Gateway while the gateway will redirect to the new service.
- There are many more, such as cache, load balancers, etc.
2 - API Gateway Implementation
When we create a distributed system, we have several options to choose from. Right now, we have well-known options such as Ocelot, which I think is the best known within the .NET environment.
Alternatively, we have options like Ambassador or the one I use on this blog nginx.
Alternatively, if we are using a cloud service provider such as AWS or Azure, note that they already have their own API gateways implemented in their system and that, for a moderate cost, you can adopt them.
- Amazon API Gateway (AWS)
- Azure API Management (Azure)
- API Gateway (Google cloud)
2.1 - Implementing an API Gateway in .NET with YARP
If we want our application to be vendor-free, we cannot use any of those coming from the service provider, so we must choose a service that allows us to deploy it as a regular application.
In this case, I chose YARP (yet another reverse proxy), which was presented at netconf 2021 and is completely open source.
Another advantage is that it comes with quite a few features already implemented, such as CORS, load balancing, or route mapping.
Finally, its documentation is very comprehensive.
3 - Creating an API Gateway with YARP
As mentioned, the main idea of the API gateway is to act as a reverse proxy, but with greater functionality, for which we will use YARP.
The first thing we're going to do is assign our microservices to known URL addresses. Let me explain: when you create a project, the URLs with the port are randomly assigned, so what we'll do here is give them a fixed and recognizable value.
For this, we go to the lauchnsettings.json file and modify the Distrib.Services.XXX profile, where XXX is the microservice to modify; and we change the applicationUrl element with the following values.
- Email:
https://localhost:50120;http://localhost:50110 - Orders:
https://localhost:50220;http://localhost:50210 - Products:
https://localhost:50320;http://localhost:50310 - Subscriptions:
https://localhost:50420;http://localhost:50410
Note: If you want to run the applications through the ISSExpress profile, keep in mind that the SSL port must be between 44300 and 443900.
Once we have assigned the addresses, we proceed to install the Yarp.ReverseProxy package from NuGet.
After installing, we can apply the .AddReverseProxy().LoadFromConfig() method to our API's IServiceCollection. And as the name suggests, we are going to load the configuration from the appsettings file, pointing to the relevant section.
Remember that we create an abstraction to reduce code size, so we will use the Action<WebApplicationBuilder> delegate to pass this information:
WebApplication app = DefaultDistribtWebApplication.Create(webappBuilder =>
{
    webappBuilder.Services.AddReverseProxy()
        .LoadFromConfig(webappBuilder.Configuration.GetSection("ReverseProxy"));
});
And also
app.MapReverseProxy();Alternatively, we can create an abstraction, but in this case I don't see it as 100% necessary, since it's a single line of code.
Now we need to configure the ReverseProxy section in our configuration file. For this, we will use YARP's official documentation, and we'll see that it's very easy to do.
A basic example of the configuration looks like the following:
"ReverseProxy": {
    "Routes": {
      "OrderRoute": {
        "ClusterId": "OrderCluster",
        "Match": {
          "Path": "order-ms/{**catch-all}"
        },
        "Transforms": [
          {
            "PathPattern": "{**catch-all}"
          }
        ]
      },
      "ProductRoute": {
        "ClusterId": "ProductCluster",
        "Match": {
          "Path": "product-ms/{**catch-all}"
        },
        "Transforms": [
          {
            "PathPattern": "{**catch-all}"
          }
        ]
      }
    },
    "Clusters": {
      "OrderCluster": {
        "Destinations": {
          "OrderCluster/destination1": {
            "Address": "https://localhost:50220/"
          }
        }
      },
      "ProductCluster": {
        "Destinations": {
          "ProductCluster/destination1": {
            "Address": "https://localhost:50320/"
          }
        }
      }
    }
  }
Within the configuration we can find two key sections:
Routes:
This section describes a series of routes that will be matched when a request arrives at the API.
When we define a route we assign it to a cluster (which contains the target URL) and we also specify a URL pattern to match when a request reaches our API Gateway.
{**catch-all}As you may have noticed, there is a sort of odd code here , this code is the part of the URL that the proxy will collect and forward to the real URL; and this action is performed thanks to thePathPatternsection.
Clusters
This section describes the endpoints associated with our requests, grouped by name.
Destinations: Assigned URL address. An important point to keep in mind is that if we introduce more than one destination, YARP will also act as aload balancer.
For the example we just saw, when we receive a call to the API Gateway URL http://localhost:7022/order-ms/order/3fa85f64-5717-4562-b3fc-2c963f66afa6 it is internally redirected to https://localhost:50220/order/3fa85f64-5717-4562-b3fc-2c963f66afa6. As you can see, the order-ms/ section has been ignored.
And we can see it in the application console; if we make the call to https://localhost:7022/order-ms/order/3fa85f64-5717-4562-b3fc-2c963f66afa6 we will see the following message:
info: Yarp.ReverseProxy.Forwarder.HttpForwarder[9]
      Proxying to https://localhost:50220/order/3fa85f64-5717-4562-b3fc-2c963f66afa6 HTTP
/2 RequestVersionOrLower no-streaming
Conclusion
- In this post we have seen what an API Gateway is and when to use it.
- We also saw how to implement API Gateway in .NET using YARP.
If you want to learn more about them, don't forget to follow the website via RSS or the YouTube channel where I will post videos about each aspect.
