In this post, we’re going to see how to create forms in Blazor and how to send the information to the backend for processing.
This allows us to display different messages to the user depending on whether the data is correct or not.
Table of Contents
1 - Use Case
For this use case, we’re going to add a contact form to our website.
To do this, the first thing we need to do is create an endpoint in the backend that will receive the information.
Something as simple as the following object will work for our example:
public class ContactDto
{
    public string Name { get; set; }
    public string Surname { get; set; }
    public string Email { get; set; }
    public string Message { get; set; }
}
And in the endpoint, a simple return true will be enough for now. Remember, we’re testing the frontend here, not the backend.
[ApiController]
[Route("api/[controller]")]
public class ContactController : Controller
{
    [HttpPost]
    public Task<ResultDto<ContactResponse>> Post(ContactDto Contacto)
    {
        return Task.FromResult(new ContactResponse()
        {
            MessageSent = true
        }.Success()
        .MapDto(x => x));
    }
}

public class ContactResponse
{
    public bool MessageSent { get; set; }
}Note: Remember that in this project we use railway oriented programming.
2 - Creating a Form in Blazor
First of all, we have to create a component for our form, and there we’ll create the form.
In this case, it’s a component inside our main page, but in many other circumstances a form would be a standalone page, like for product creation or product booking, which are common elements in the professional world.
The first thing we have to do is create a private property _contactoDto that references the type we just created. We’ll use this property to bind the fields in the form to the actual object.
We’ll also create a method called Enviar which will be executed when the user submits the form.
Remember that we can do it in the .razor file itself using the @code block, or in a partial class. Personally, I find it easier to modify in a partial class.
public partial class Contacto
{
    private ContactDto _contact { get; set; } = new ContactDto();

    private void Enviar()
    {

    }
}
3 - Defining a Form in Blazor
Now, we just need to create our form. For this we’ll use the component that Microsoft provides, called EditForm. Here, we can use the Model attribute to indicate our _contactoDto property, as well as the OnSubmit callback to call the method we’ve defined.
<h3>Contacto</h3>
<EditForm Model="_contact" OnSubmit="Enviar">
    // Rest of the form
    <button type="submit">Enviar formulario </button>
</EditForm>
As you can see, we haven't specified the method attribute as we would in a normal HTML form. That’s because it won’t be sent in the same way; sending the form will call our method, where we have to write how to send the data to the backend.
3.1 - Elements of a Form in Blazor
For our form fields, we're also going to use components provided directly by Microsoft with the language.
Although we can use native HTML form elements, I recommend using Blazor's components. That way, you get various default validations. For example, using <inputnumber …> is like <input type="number"…>, same for date, checkbox, etc.
Each of these components has a property called @bind-Value that allows us to bind that particular field to a property on our object.
<h3>Contacto</h3>
<EditForm Model="_contact" OnSubmit="Enviar">
    <div class="form-group row">
        <label for="name" class="col-md-2 col-form-label">Nombre:</label>
        <div class="col-md-10">
            <InputText id="name" class="form-control" @bind-Value="_contact.Name" />
        </div>
    </div>
    <div class="form-group row">
        <label for="surname" class="col-md-2 col-form-label">Apellido:</label>
        <div class="col-md-10">
            <InputText id="surname" class="form-control" @bind-Value="_contact.Surname" />
        </div>
    </div>
    <div class="form-group row">
        <label for="email" class="col-md-2 col-form-label">Email:</label>
        <div class="col-md-10">
            <InputText id="email" class="form-control" @bind-Value="_contact.Email" />
        </div>
    </div>
    <div class="form-group row">
        <label for="message" class="col-md-2 col-form-label">mensaje:</label>
        <div class="col-md-10">
            <InputTextArea rows="5" id="message" class="form-control" @bind-Value="_contact.Message" />
        </div>
    </div>
    <button type="submit">Enviar formulario </button>
</EditForm>
Also, as you can see, we can nest HTML elements inside the EditForm component and assign CSS classes.
Now, in our Enviar method, we just need to make an HTTP call to the backend, indicating it’s a POST.
public partial class Contacto
{
    [Inject]
    private IHttpClientFactory ClientFactory { get; set; }
    private ContactDto _contact { get; set; } = new ContactDto();

    private async Task Enviar()
    {
        HttpClient client = ClientFactory.CreateClient("BackendApi");
        HttpResponseMessage result = await client.PostAsJsonAsync($"api/contact", _contact);
        //We’ll work with the result later
        var contactResponse = await result.Content.ReadFromJsonAsync<ResultDto<ContactResponse>>();
    }
}
4 - Form Validation in Blazor
We have several options to validate a form.
4.1 - Manual Form Validation in Blazor
If we have assigned the @bind-Value attribute correctly, each property of our object will have the value entered by the user. So in our Enviar method, we could check that each field has the values we need and, if not, not send the form to the backend.
private async Task Enviar()
{
    if (string.IsNullOrEmpty(_contact.Message))
    {
        //don’t send the information
    }
    else
    {
        HttpClient client = ClientFactory.CreateClient("BackendApi");
        HttpResponseMessage result = await client.PostAsJsonAsync($"api/contact", _contact);
        //We’ll work with the result later
        var contactResponse = await result.Content.ReadFromJsonAsync<ResultDto<ContactResponse>>();
    }
}
4.2 - Validation Using Annotations
Additionally, we can validate forms using annotations in our class.
To do this, the first thing is to install the System.ComponentModel.Annotations library. This allows us to include attributes on our properties, which serve to validate those form elements.
In this use case, we need to ensure both the name and the message content are required, as well as ensure the email is a valid email.
public class ContactDto
{
    [Required(ErrorMessage = "Por favor indica tu nombre")]
    public string Name { get; set; }
    public string Surname { get; set; }
    [RegularExpression("^[a-zA-Z0-9_\\.-]+@([a-zA-Z0-9-]+\\.)+[a-zA-Z]{2,6}$", ErrorMessage = "Debes indicar un email válido")]
    public string Email { get; set; }
    [Required(ErrorMessage = "El contenido del mensaje es obligatorio")]
    public string Message { get; set; }
}
Now we can modify our form by adding the <DataAnnotationsValidator/> component along with ValidationMessage, which will display the error message we specified.
<h3>Contacto</h3>
<EditForm Model="_contact" OnSubmit="Enviar">
    <DataAnnotationsValidator />
    <div class="form-group row">
        <label for="name" class="col-md-2 col-form-label">Nombre:</label>
        <div class="col-md-10">
            <InputText id="name" class="form-control" @bind-Value="_contact.Name" />
            <ValidationMessage For="@(() => _contact.Name)" />
        </div>
    </div>
    <div class="form-group row">
        <label for="surname" class="col-md-2 col-form-label">Apellido:</label>
        <div class="col-md-10">
            <InputText id="surname" class="form-control" @bind-Value="_contact.Surname" />
        </div>
    </div>
    <div class="form-group row">
        <label for="email" class="col-md-2 col-form-label">Email:</label>
        <div class="col-md-10">
            <InputText id="email" class="form-control" @bind-Value="_contact.Email" />
            <ValidationMessage For="@(() => _contact.Email)" />
        </div>
    </div>
    <div class="form-group row">
        <label for="message" class="col-md-2 col-form-label">mensaje:</label>
        <div class="col-md-10">
            <InputTextArea rows="5" id="message" class="form-control" @bind-Value="_contact.Message" />
            <ValidationMessage For="@(() => _contact.Message)" />
        </div>
    </div>
    <button type="submit">Enviar formulario </button>
</EditForm>
And this is what we’ll see.
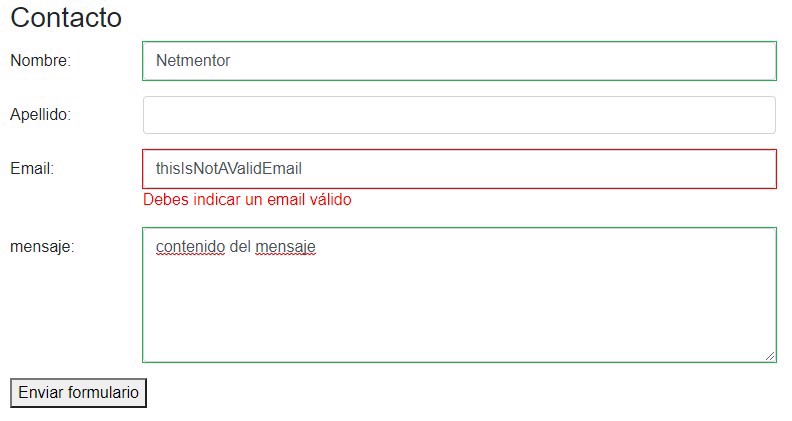
And if we try to send the message, we won’t be able to until we fix the errors.
Note: We’ll get the same result if we try to call the API directly.
5 - Working with Server Response
Finally, when we get the server’s response, we need to notify the user that everything has worked correctly (or show errors if there are any).
As you may have guessed, in Blazor we don’t have ajax like we do in conventional web apps to asynchronously call the server. Here we’ve done it with our HTTP call inside our Enviar method.
In our case, it returns ResultDto<contactoResponse>. What we need to do is check if the result is true and, if it is, display a message.
Personally, when dealing with a contact form, I like to hide the form and display a message instead, to reassure the user that their message has been sent.
First, create two CSS styles, one to show and one to hide content.
<style>
    .oculto{
        display: none;
    }
    .visible{
        display: inherit;
    }
</style>
We then add a block with our hidden message, and also assign the CSS rule to our form.
But instead of applying the rule directly, we use a variable that points to the CSS rule.
<h3>Contacto</h3>
<div class="alert alert-success @MessageBoxCss" role="alert">
    <h4 class="alert-heading">Mensaje enviado correctamente</h4>
    <p>Gracias por contactar con el equipo de netmentor, nos pondremos en contacto lo mas rápido posible.</p>
</div>
<div class="@FormCss">
    <EditForm Model="_contact" OnSubmit="Enviar" clas="@FormCss">
        ///Resto del formulario
        <button type="submit">Enviar formulario </button>
    </EditForm>
</div>
Of course, in our C# code we need to define these variables and assign the value we want for both the sent message box and the form itself.
private string MessageBoxCss { get; set; } = "oculto";
private string FormCss { get; set; } = "visible";
Now we just have to update the values when the message has been sent correctly.
private async Task Enviar()
{
    HttpClient client = ClientFactory.CreateClient("BackendApi");
    HttpResponseMessage result = await client.PostAsJsonAsync($"api/contact", _contact);
    ResultDto<ContactResponse> contactResponse = await result.Content.ReadFromJsonAsync<ResultDto<ContactResponse>>();

    if (contactResponse.Value)
    {
        MessageBoxCss = "visible";
        FormCss = "oculto";
    }
}
As we can see, once the form has been sent, only the message confirming it was sent will be visible.

Conclusion
In this post, we've seen how to work with forms inside Blazor as well as their validations, without the need to run JavaScript to dynamically update page elements.
Let’s not forget that forms are a basic part of our everyday professional work.
