In this post, we are going to add a service to our distributed system to store all passwords and confidential data within our system securely through a credential manager.
Table of Contents
1 - What is a credential manager?
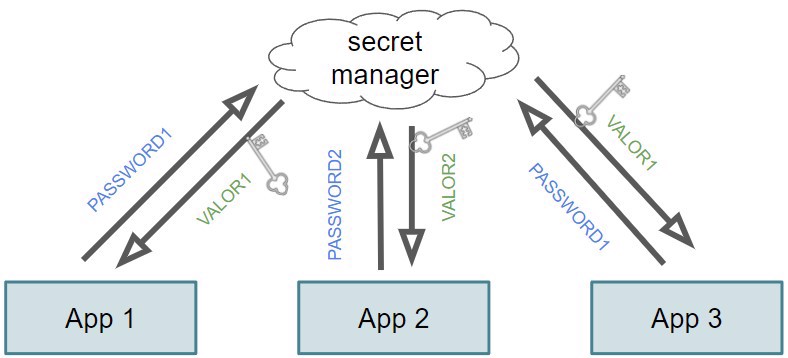
A credential manager (or secret manager) is a password or credential administrator. The place where you are going to store all that information that is confidential and must be stored securely.
It may be passwords, which is most common, configurations, or certificates for communication.
We can compare a secret manager to a user password manager, only that the secret manager is going to work at the application level.
When working at the enterprise level, we have several options. If you use AWS or Azure, they have their own, Octopus has its own as well, and in our case, we'll look at Vault by HashiCorp.
Note: Remember that all information we consider secret or secure will be a credential. For example, if we store database information, it's clear that the user and password are credentials, but we could also treat the server where the database is hosted as part of the credential, so we can store it as well.
1.1 - Why do we need a credential manager?
The main reason our applications will need a secret manager is primarily to prevent that information from leaking or falling into the wrong hands.
This prevents developers from being responsible for not leaking those passwords or even changing them.
We've all seen real-world cases where the database connection is specified in configuration files, which should never happen.
If you work with Kubernetes and Octopus, you can replace values in the values.yaml and those passwords are in the config file, but underneath you're using Octopus secrets.
Having credentials in a dedicated service allows us to add policies to those credentials, for example, rotate credentials every 3 months.
We configure the credential so the database password changes every 3 months and is updated in the database. When the application reads the credential, it will get the new value.
Note: To be able to connect to the secret manager, you must provide credentials for it. We will see how to do this in the implementation.
2 - What is Hashicorp Vault?
Before moving on to implementation, I would like to explain the reason I chose to use Vault.
Vault is a service created by HashiCorp, the creators of Terraform (which we will also see) and other services like Consul, which we will use for service discovery.
Also, I have to say that professionally I have only used AWS secret manager and Octopus secrets; and honestly, I don't want to tie this system to AWS and Octopus secrets aren't suitable for the long term, at least in my experience.
For those reasons, the options are drastically reduced, and I don't know if there are no other companies offering this service via Docker, or they simply don't have good SEO, but I've not been able to find another alternative.
2.1 - Options provided by Vault
When working with a secret manager, we usually do so with its key/value service. Meaning you have a key, for example passwordRabbitMQ, and you assign it a value.
This value can be a string or a JSON object. In our specific case, we are going to store the JSON object at the path secrets/rabbitmq.
{
  "password": "DistribtPass",
  "username": "DistribtAdmin"
}
Note: the path is a combination of the "engine" (key/value) and "key".
Engines are exclusive to Vault; in this case, the "key value" engine is the one mentioned previously.
Other engines allow you to add a series of applications where the action to obtain the credential will be different.
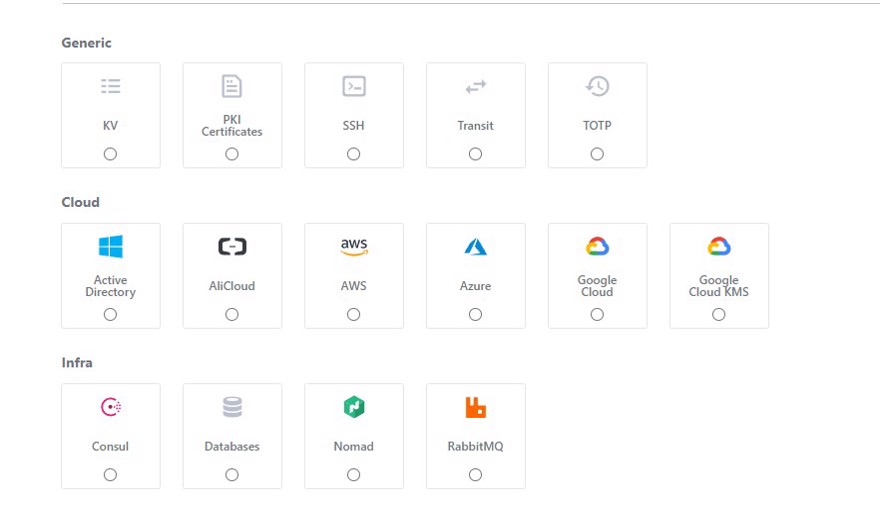 We can understand an engine as a plugin.
3 - Secret manager implementation in code
The first thing we have to do is add a new service to our docker-compose, where we already have rabbitMQ, which will contain Vault.
vault:
  image: vault:latest
  container_name: vault
  ports:
    - 8200:8200
  environment:
    VAULT_ADDR: "http://127.0.0.1:8200"
    # in production scenarios the token mechanisim for loggin will be forbidden,
    # it cannot be in source control.
    VAULT_TOKEN: "vault-distribt-token" # to be able to use the cli on dev
    VAULT_DEV_ROOT_TOKEN_ID: "vault-distribt-token"
  cap_add:
    - IPC_LOCK
  depends_on:
- rabbitmqNote: The image we are using is for development, the enterprise (licensed) image is different; in development, as we can see, we have a variable called VAULT_TOKEN and another VAULT_DEV_ROOT_TOKEN_ID, both with the value "vault-distribt-token", which is the credential to connect to the service. In production, this credential is not available for security, and you must create a user/password.
Additionally, we can run scripts or commands in the Docker CLI to create these secrets. Usually, secrets are created outside the application, just as we did in the previous post for the RabbitMQ infrastructure, separating the infrastructure from the code, in this case, the credentials are infrastructure.
We will run these commands from a script written in bash, and why bash? Because 20% of users visiting my website do so using Linux or Mac and they cannot run PowerShell, but Windows users can still run bash.
#!/bin/bash
docker exec -it vault vault kv put secret/rabbitmq username=DistribtAdmin password=DistribtPass
By running this command, we will have our credentials in the secret manager.
3.1 - Vault implementation with .NET
Now let's move on to the code part, where we abstract the functionality. The first thing to do is create the project that will contain access to Vault.
In my case, it will be Distribt.Shared.Secrets.
Within this library, we'll import the library that communicates with Vault, in our case VaultSharp, which is not the official Hashicorp one, but has triple the number of daily downloads from NuGet and from what I've seen, it is recommended.
Now, what we need to do is create an interface that returns the result when accessing our engine's information, in other words, that returns the configuration with the key.
public interface ISecretManager
{
    Task<T> Get<T>(string path) where T : new();
}
Next, let's implement the class that will implement the interface. Remember, we are now going to connect to Vault, so we need the token specified in the previous docker-compose file.
This action is performed by using environment variables, so that this value is NOT in the application's source code. Obviously, in production/UAT/test, but for local development, it doesn't matter.
Thus, we read the value from the environment variable:
internal class VaultSecretManager : ISecretManager
{
    private readonly VaultSettings _vaultSettings;

    public VaultSecretManager(IOptions<VaultSettings> vaultSettings)
    {
        _vaultSettings = vaultSettings.Value with { TokenApi = GetTokenFromEnvironmentVariable() };
    }

    private string GetTokenFromEnvironmentVariable()
        => Environment.GetEnvironmentVariable("VAULT-TOKEN") //"vault-distribt-token"
           ?? throw new NotImplementedException("vault is not implemented into the system");
}
In production, this environment variable will be injected during deployment, whether you use Octopus, manually, etc. But in development, you need to modify each project where you want to use it and update the launchSettings.json file in your profile to add the needed environment variable:
{
  ...
  "profiles": {
    "Distribt.API.Public": {
      ...
      "environmentVariables": {
        ...
        "VAULT-TOKEN": "vault-distribt-token"
      }
    },
  }
}
Now all that's left is to implement the Get function, which will connect to Vault and retrieve the credentials. Note that Vault returns information, even if it's an object, as a dictionary, so we must create a method to convert that dictionary into our T object.
By the way, the mountPoint property inside ReadSecretAsync refers to what we mentioned previously about Vault's "key value" engine.
public async Task<T> Get<T>(string path)
    where T : new()
{
    VaultClient client = new VaultClient(new VaultClientSettings(_vaultSettings.VaultUrl,
        new TokenAuthMethodInfo(_vaultSettings.TokenApi)));

    Secret<SecretData> kv2Secret = await client.V1.Secrets.KeyValue.V2
        .ReadSecretAsync(path: path, mountPoint: "secret");
    var returnedData = kv2Secret.Data.Data;

    return returnedData.ToObject<T>();
}

public static class ObjectExtensions
{
    public static T ToObject<T>(this IDictionary<string, object> source) where T : new()
    {
        var someObject = new T();
        var someObjectType = someObject.GetType();

        foreach (var item in source)
        {
            someObjectType
                .GetProperty(item.Key)!
                .SetValue(someObject, item.Value, null);
        }
        return someObject;
    }
}
Finally, let's add our secret manager to the dependency container:
public static void AddVaultService(this IServiceCollection serviceCollection, IConfiguration configuration)
{
    serviceCollection.Configure<VaultSettings>(configuration.GetSection("SecretManager"));
    serviceCollection.AddScoped<ISecretManager, VaultSecretManager>();
}

///Within our setup project
public static void AddSecretManager(this IServiceCollection serviceCollection, IConfiguration configuration)
{
    serviceCollection.AddVaultService(configuration);
}
Now we can inject ISecretManager into our services to fetch the credentials.
To see it in action, we can go to the RabbitMQMessagePublisher type we created in the previous post and inject ISecretManager to fetch the credentials.
Note: This code needs some refactoring, since these credentials are assigned in the constructor, and they shouldn't be, because .Result blocks the thread. Also, if implementation were singleton, the credentials would never refresh, and we would have to stop the app to load new ones. But for the example, it works.
public RabbitMQMessagePublisher(ISerializer serializer, IOptions<RabbitMQSettings> settings, ISecretManager secretManager)
{
    _settings = settings.Value;
    _serializer = serializer;
    var credentials = secretManager.Get<RabbitMQCredentials>("rabbitmq").Result; //Not ideal (used for the example).
    _connectionFactory = new ConnectionFactory()
    {
        HostName = _settings.Hostname,
        Password = credentials.username,
        UserName = credentials.password
    };
}
3.2 - Configuring RabbitMQ with Vault
As mentioned above, Vault allows us to add a secret engine, which basically means a plugin that will connect to our application. In our case, we'll use the RabbitMQ engine, whose documentation you can find here, but there are many others.
The first thing we need to do is modify our script to add the commands that will connect Vault with RabbitMQ
docker exec -it vault vault secrets enable rabbitmq

docker exec -it vault vault write rabbitmq/config/connection \
    connection_uri="http://rabbitmq:15672" \
    username="DistribtAdmin" \
    password="DistribtPass" \

docker exec -it vault vault write rabbitmq/roles/distribt-role \
    vhosts='{"/":{"write": ".*", "read": ".*"}}'
As you can see, we're enabling the RabbitMQ plugin and configuring the user and password to use (in production, this would be done in infrastructure definition). Note that the URI is http://rabbitmq because we are using Docker networking.
Finally, we create a role that will have read and write access to the RabbitMQ host.
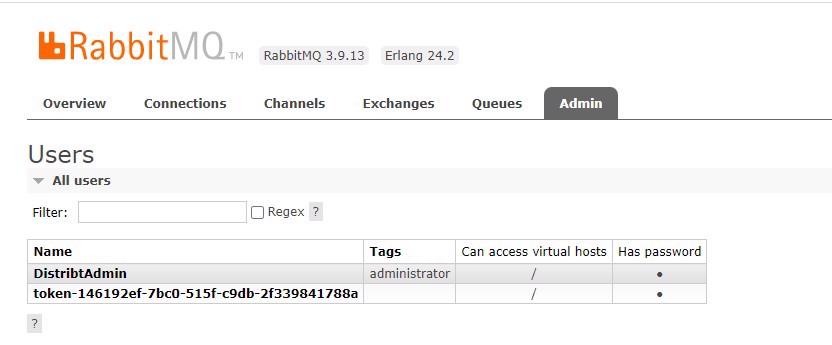
What Vault will actually do behind the scenes is, using the credentials we assigned, create a "private" user; in this example, the username and password will not expire, but we can apply policies to the role to have them expire, etc.
We can see that after running, we have the user in RabbitMQ:
Now let's modify the service to fetch credentials from the RabbitMQ engine:
public async Task<UsernamePasswordCredentials> GetRabbitMQCredentials(string roleName)
{
    VaultClient client = new VaultClient(new VaultClientSettings(_vaultSettings.VaultUrl,
        new TokenAuthMethodInfo(_vaultSettings.TokenApi)));

    Secret<UsernamePasswordCredentials> secret = await client.V1.Secrets.RabbitMQ
        .GetCredentialsAsync(roleName, "rabbitmq");
    return secret.Data;
}
And we see how we obtain the username and password we created:
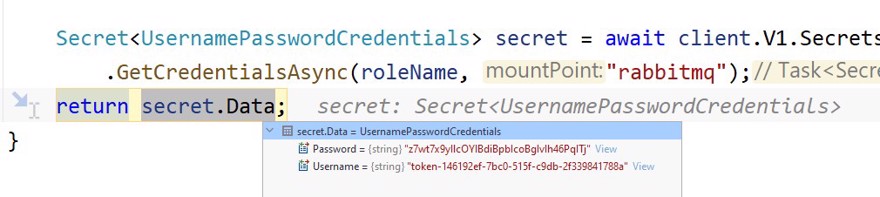 And the message is sent without any problems.
Finally, secrets will likely be an element you'll need in each of your microservices, whether to fetch the RabbitMQ configuration or in the future, for your database. So don't forget that you can add it inside DefaultDistribtWebApplication, so that developers using it won't need to add anything to their code.
public static WebApplication Create(Action<WebApplicationBuilder>? webappBuilder = null)
{
    WebApplicationBuilder builder = WebApplication.CreateBuilder();
    ....
    builder.Services.AddVaultService(builder.Configuration);

    if (webappBuilder != null)
    {
        webappBuilder.Invoke(builder);
    }

    return builder.Build();
}
Conclusion
In this post we have seen what a credential manager is and why it is important to have one.
We have seen how to implement a credential manager with Vault.
We have seen how to implement different engines in Vault.
