This post is the second of a complete and free course on Stripe, which is available both on this same website as well as on YouTube.
Both the course and its code are open and free. If you enjoy the content, you can support the site by becoming a premium member, or buying my book.
In the YouTube video, the content from this post starts at minute 142:21 (2h 22 min 21 sec).
Table of Contents
One of the most important features of software-as-a-service products is the ability to subscribe, granting users certain benefits. This is the case with Netflix, HBO, or Amazon Prime, but subscriptions aren’t limited to cloud streaming services. For instance, a book company might offer subscriptions where, as long as you are subscribed, you can access all books for free.
That’s the version we’re going to simulate in our use case. Subscriptions tend to be highly domain-dependent and can offer different tiers or layers, where each offers more or fewer features, for example.
Here, we’ll look at a model, which in my experience is the most common, since adding layers to subscriptions essentially means assigning different permissions in the application and different prices in Stripe.
What we’re going to do is go to Stripe and create a product, which has a price and a recurring payment.
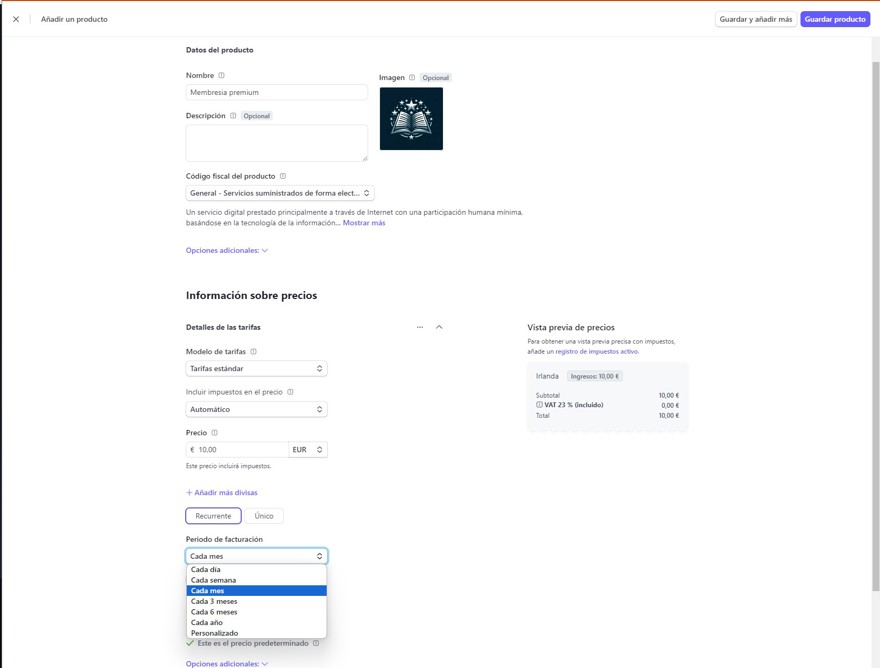
Personally, I’ve chosen a monthly plan, but that’s up to you; some may charge monthly, weekly, or yearly, which is often cheaper.
1 - Create Premium Users in Our System
Obviously, what we need to do now is include in the code a way to identify whether the user is premium or not.
To achieve this, we’re going to use claims. Technically, we could use roles because we’re in C# and have roles available, but to me, a role is an internal piece of information about a user that groups certain responsibilities, while a claim is an attribute of the user.
Regardless of the approach (claims or roles), we need to program a way to identify that the user is premium.
In our case, it’s as simple as creating a use case where we add a new claim to the user:
public static class UserConstants
 {
     public const string PREMIUM_ACCOUNT = "PREMIUM_ACOUNT";
 }

 public class SetPremium(ApplicationDbContext applicationDbContext)
 {
     public async Task Execute(string userId)
     {
         if (applicationDbContext.UserClaims
             .Any(a => a.UserId == userId
             && a.ClaimType == UserConstants.PREMIUM_ACCOUNT))
             return;

         await applicationDbContext.UserClaims.AddAsync(new IdentityUserClaim<string>()
         {
             ClaimType = UserConstants.PREMIUM_ACCOUNT,
             ClaimValue = "enabled",
             UserId = userId
         });

         await applicationDbContext.SaveChangesAsync();
     }
 }

 public class RemovePremium(ApplicationDbContext applicationDbContext)
{
    public async Task Execute(string userId)
    {
        IdentityUserClaim<string>? claim = applicationDbContext.UserClaims
            .FirstOrDefault(a => a.UserId == userId
            && a.ClaimType != UserConstants.PREMIUM_ACCOUNT);

        if (claim is not null)
            applicationDbContext.UserClaims.Remove(claim);

        await applicationDbContext.SaveChangesAsync();
    }
}
As you can see, it is a very simple way to indicate that a user is premium.
What we need to do now is create an endpoint that will create a subscription checkout session for Stripe. In this case, we’ll send the subscription price ID we created earlier and set the mode to subscription.
[HttpGet("subscription")]
[Authorize]
public async Task<IActionResult> ChekoutSubscription()
{

    SessionCreateOptions options = new SessionCreateOptions
    {
        SuccessUrl = "https://localhost:7265/payment-completed",
        CustomerEmail = User?.FindFirstValue(ClaimTypes.Email),
        LineItems = new List<SessionLineItemOptions>
        {
            new SessionLineItemOptions
            {
                Price = "price_1PK0LiCNTtv2rbe14Z3THGqr", 👈
                Quantity = 1,
            },
        },
        Mode = "subscription" 👈
    };

    SessionService service = new SessionService();
    Session stripeSession = await service.CreateAsync(options);

    return Redirect(stripeSession.Url);
}
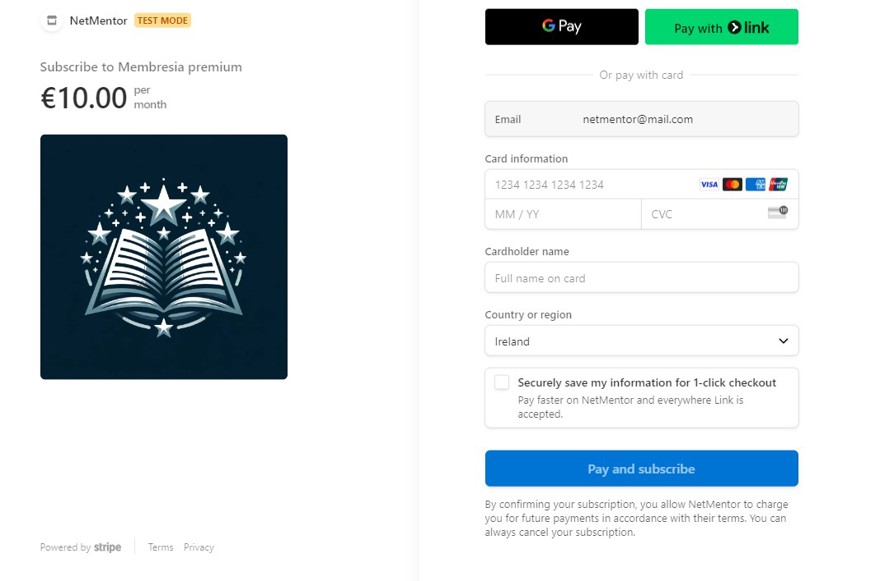
All that’s left is to create a button in the frontend to call this endpoint and see how it works:
NOTE: Subscription handling is slightly different from one-time payments, because here we change the user claims. These claims are not reflected until the user refreshes their token , in other words, logs in and out again, or you force a token refresh.
2 - Read Stripe Subscription Events
When we reviewed the payment gateway in earlier chapters, we saw that Stripe generates an event for us. Here we have exactly the same: Stripe generates an event, which we can read to determine the subscription status.
Specifically, there are five different events:
- Created
- Deleted
- Paused
- Resumed
- Updated
Even though there are five events, in practice, only two are mainly used. This is because the subscription payment itself is done with a checkout.session.completed, just like when you pay for an individual product.
This means we need to implement logic to identify whether a product is an item (in our case, a book) or a subscription.
To save time, I’ll just use an IF statement. But if you’re building a project for production, do not leave the subscription price ID in the code.
public async Task HandleSessionCompleted(Session checkoutSession)
{
	Console.WriteLine("Session Completed Event");
	Console.WriteLine($"By user: {checkoutSession.CustomerDetails.Name} ({checkoutSession.CustomerDetails.Email})");

	var options = new SessionGetOptions();
	options.AddExpand("line_items");
	var service = new SessionService();
	Session sessionWithLineItems = service.Get(checkoutSession.Id, options);
	Console.WriteLine("Items:");
	foreach (var item in sessionWithLineItems.LineItems)
	{

		if (item.Price.Id.Equals("price_1PK0LiCNTtv2rbe14Z3THGqr", StringComparison.OrdinalIgnoreCase)) 👈
		{
			if (checkoutSession.Metadata.TryGetValue("userid", out string userId))
			{
				await setPremium.Execute(userId);
			}
		}

		Console.WriteLine($"PriceId: {item.Price.Id} - Quantity: {item.Quantity}");
	}


	Console.WriteLine("In production this will lookup the id from the " +
		"stripePaymentID and send them by email, create an order, etc");
}
You’ve probably noticed a key detail: we’re reading the userId from the metadata of the event. This means we must also send it. That’s not the only option; there are three ways to identify the user:
- First, when creating a user, you can create a customer in Stripe. This will return an ID, which you should save as a user property. Then you just look up that ID in your database to update it.
- Second, you could do the same thing by using the user’s email address. Currently, we send to Stripe the email with which the user registered; the event that Stripe sends to the webhook contains that email, so you can read it and find it in your database.
- The final option is to use the metadata property of the object sent to Stripe. When creating the checkout, add the user ID as metadata. That’s what we’ve done in this example.
[HttpGet("subscription")]
[Authorize]
public async Task<IActionResult> ChekoutSubscription()
{

    SessionCreateOptions options = new SessionCreateOptions
    {
        SuccessUrl = "https://localhost:7265/payment-completed",
        CustomerEmail = User?.FindFirstValue(ClaimTypes.Email),
        LineItems = new List<SessionLineItemOptions>
        {
            new SessionLineItemOptions
            {
                Price = "price_1PK0LiCNTtv2rbe14Z3THGqr",
                Quantity = 1,
            },
        },
        Metadata = new Dictionary<string, string> 👈
        {
            {"userid", User!.FindFirstValue(ClaimTypes.NameIdentifier)! }
        },
        Mode = "subscription"
    };

    SessionService service = new SessionService();
    Session stripeSession = await service.CreateAsync(options);

    return Redirect(stripeSession.Url);
}Note: We don’t need to worry about this being null since the endpoint has the Authorize attribute Authorize.
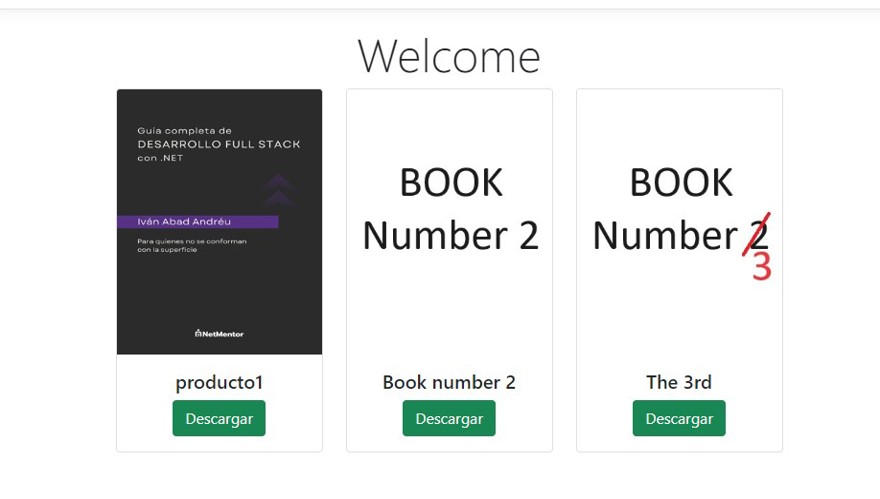
Before testing the functionality, we will modify the view so that if the user is registered and is premium, they get a download button instead of the buy and add to cart buttons.
@if (User.IsPremium())
{
	<a href="#" class="btn btn-success">Download</a>
}
else
{
	<a href="/checkout/@product.StripePriceId" class="btn btn-primary">Buy (€@product.Price)</a>
	<span class="btn btn-info addBookToCart" data-priceid="@product.StripePriceId">Add to cart</span>
}

//these are the helper methods
public static class UserExtensions
{
	public static bool IsPremium(this ClaimsPrincipal claimsPrincipal)
	{
		Claim? result = claimsPrincipal.FindFirst(UserConstants.PREMIUM_ACCOUNT);
		return result is not null;
	}

	public static bool IsAuthenticated(this ClaimsPrincipal user)
	{
		return user.Identity is { IsAuthenticated: true };
	}
}Note: This validation should also be enforced in the backend, so no one can download a book just by having the URL.
Now, let’s simply test that everything works as expected. Don’t forget to connect the Stripe CLI to forward events to your PC
stripe listen -e checkout.session.completed --forward-to https://localhost:7265/api/webhook --latest
We can see it works correctly (as a premium user, you simply download instead of buying):
3 - Cancel a Subscription
It might seem like canceling a subscription would be as easy as pressing a button and everything working as expected. Unfortunately, that’s not the case, because Stripe’s subscription events DO NOT include user information such as email or the metadata we manually passed.
The only information they include that might help identify the user is either the client ID inside Stripe, or the subscription ID.
So, to cancel a subscription, we first need to store one of those two IDs in a table.
We’ll create a new table where we store the user and the subscription ID returned by Stripe. For this course, I’m using Entity Framework with code first, so the implementation is as follows:
First, we’ll create the entity:
public class UserSubscriptionEntity
{
	public required string userId { get; set; }
	public required string SubscriptionId { get; set; }
	public bool IsActive { get; set; }
}
Now we add the entity to the DbContext, and for better SQL code, I’ve created the table with a composite key of both columns:
public class ApplicationDbContext : IdentityDbContext
{

	public DbSet<ProductEntity> Products { get; set; }
	public DbSet<UserSubscriptionEntity> UserSubscriptions { get; set; } 👈

	public ApplicationDbContext(DbContextOptions<ApplicationDbContext> options)
		: base(options)
	{
	}

	protected override void OnModelCreating(ModelBuilder modelBuilder)
	{
		modelBuilder.Entity<UserSubscriptionEntity>()
			.HasKey(a => new { a.userId, a.SubscriptionId }); 👈

		base.OnModelCreating(modelBuilder);
	}
}
Now we need to build the migrations:
dotnet ef migrations add UserSubscription
Before running the code, let’s modify our SetPremium and RemovePremium use cases, so that this table is also considered:
public class SetPremium(ApplicationDbContext applicationDbContext)
{
	public async Task Execute(string userId, string subscriptionId)
	{
		if (applicationDbContext.UserClaims
			.Any(a => a.UserId == userId
			&& a.ClaimType == UserConstants.PREMIUM_ACCOUNT))
			return;

		await applicationDbContext.UserClaims.AddAsync(new IdentityUserClaim<string>()
		{
			ClaimType = UserConstants.PREMIUM_ACCOUNT,
			ClaimValue = "enabled",
			UserId = userId
		});

        // 👇
		UserSubscriptionEntity? subscription = await applicationDbContext.UserSubscriptions
			.FirstOrDefaultAsync(a => a.SubscriptionId == subscriptionId
			&& a.userId == userId);

		if (subscription is not null)
		{
			subscription.IsActive = true;
			applicationDbContext.UserSubscriptions.Update(subscription);
		}
		else
		{
			applicationDbContext
				.UserSubscriptions
				.Add(new UserSubscriptionEntity()
				{
					SubscriptionId = subscriptionId,
					userId = userId,
					IsActive = true
				});
		}
        // 👆


		await applicationDbContext.SaveChangesAsync();
	}
}
You can also see that we’re now sending the subscription ID as a parameter, which means we need to update the method that calls this use case:
public async Task HandleSessionCompleted(Session checkoutSession)
{
	....
	foreach (var item in sessionWithLineItems.LineItems)
	{

		if (item.Price.Id.Equals("price_1PK0LiCNTtv2rbe14Z3THGqr", StringComparison.OrdinalIgnoreCase))
		{
			if (checkoutSession.Metadata.TryGetValue("userid", out string userId))
			{
				await setPremium.Execute(userId, checkoutSession.SubscriptionId);
			}
		}
	}
    ...
}
With this change, we can now store the subscription ID in the database, which will be the information we receive from the cancellation event, which we must also read.
3.1 - Allow Subscription Cancellation
So far, we’ve created a system that can cancel a subscription internally, but the user still has no way to do it.
The logic is very simple: you just need to read the user’s subscription ID and call the Stripe API:
public class CancelSubscription(ApplicationDbContext applicationDbContext)
{
	public async Task Execute(string userId)
	{
		UserSubscriptionEntity subscription = await applicationDbContext.UserSubscriptions
			.SingleAsync(a => a.userId == userId && a.IsActive == true);

		var options = new SubscriptionUpdateOptions { CancelAtPeriodEnd = true };
		var service = new SubscriptionService();
		service.Update(subscription.SubscriptionId, options);
	}
}
And you just call this use case from a controller via a button:
[Route("[controller]")]
public class SubscriptionController(CancelSubscription cancelSubscription) : Controller
{
	[Authorize]
	[HttpGet("cancel")]
	public async Task<IActionResult> CancelSubscription()
	{
		await cancelSubscription.Execute(User!.FindFirstValue(ClaimTypes.NameIdentifier)!);
		return View();
	}
}
3.2 - Handle a Cancellation
When a cancellation is created, or in other words when we click the cancel button and complete the process, Stripe will create an update event to notify us of the change.
This comes through customer.subscription.updated. We need to read this event because it tells us until when that subscription will be valid. This gives us a new feature: we should store the final date of the subscription so we can show a message like “You have X days left to renew.” Let’s expand the UserSubscription entity to include this value.
public class UserSubscriptionEntity
{
	public required string userId { get; set; }
	public required string SubscriptionId { get; set; }
	public bool IsActive { get; set; }
	public DateTime? ValidUntilUTC { get; set; }
}
Create a use case to indicate when a subscription will end by just updating this field:
public class SetPremiumEnd(ApplicationDbContext applicationDbContext)
{
	public async Task Execute(string subscriptionId, DateTime subscriptionEndDate)
	{
		UserSubscriptionEntity subscription = await applicationDbContext.UserSubscriptions
			.SingleAsync(a => a.SubscriptionId == subscriptionId);

		subscription.ValidUntilUTC = subscriptionEndDate;
		applicationDbContext.UserSubscriptions.Update(subscription);

		// Here we should generate an event to be executed on the subscription end date
		// which should execute  RemovePremium

		await applicationDbContext.SaveChangesAsync();
	}
}
Now, let’s read that event, so in your webhook, create a new option:
[HttpPost]
public async Task<IActionResult> Post()
{
	var json = await new StreamReader(HttpContext.Request.Body).ReadToEndAsync();
	try
	{
		Event? stripeEvent = EventUtility.ConstructEvent(json,
				Request.Headers["Stripe-Signature"], configuration["StripeWebhookSecret"]);

		// Handle the event
		switch (stripeEvent.Type)
		{
			case Events.CheckoutSessionCompleted:
				await HandleSessionCompleted(stripeEvent.Data.Object as Session);
				break;
			case Events.CustomerSubscriptionUpdated: 👈
				await HandleSetEndSubscriptionDate(stripeEvent.Data.Object as Subscription);
				break;
			default:
				Console.WriteLine("Unhandled event type: {0}", stripeEvent.Type);
				break;
		}
		return Ok();
	}
	catch (StripeException e)
	{
		return BadRequest();
	}
}

public async Task HandleSetEndSubscriptionDate(Subscription subscription)
{
	if (subscription.CancelAtPeriodEnd && subscription.CancelAt is not null)
	{
        await setPremiumEnd.Execute(subscription.Id, (DateTime)subscription.CancelAt);
    }
}NOTE: Before testing this functionality, don’t forget to configure the CLI to listen to the new event.
Keep in mind, you will receive any update event, so here we only react to those where the property "cancelationatPeriodEnd" is true and CancelAt is not null; these are subscription cancellation events.
3.3 - End of Subscription Cycle
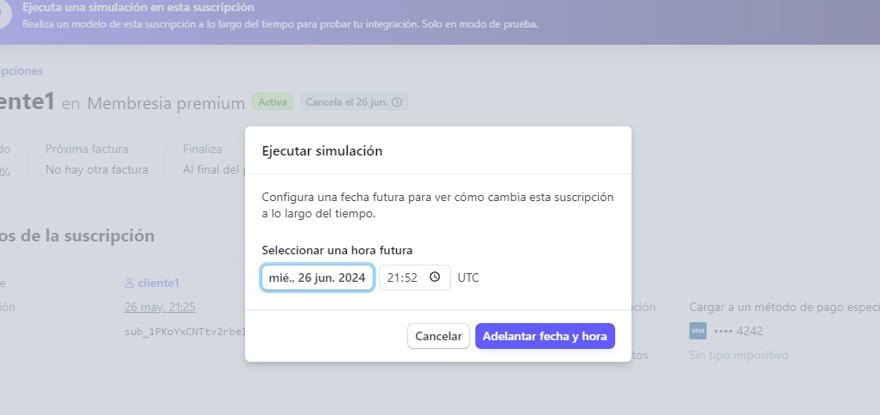
When a subscription ends, that is, on the last day, Stripe will send us an event. And, helpfully, we can simulate this functionality in Stripe test mode. If we go to a subscription, we can see the details:
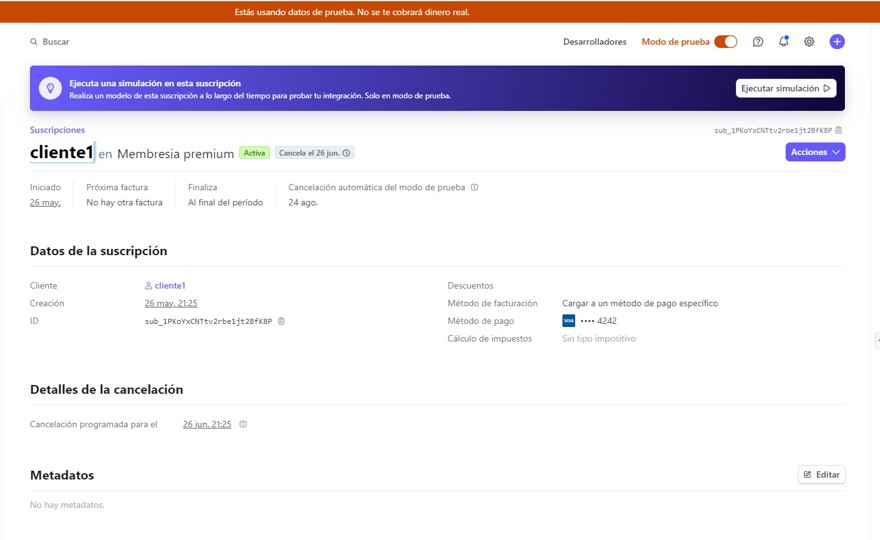
Here, you’ll see information such as when it started or when it will end, but the important info is at the top, in the purple bar, where you can run a simulation.
This lets us simulate the state of the subscription at a certain date and time (obviously only in test mode).
If I move it forward a month, when the subscription ends:
This will generate ALL the events that would have occurred up to that point, including the customer.subscription.deleted event, which is the one that indicates the user is no longer paying and should be removed from the list of premium users.
To do this, create a use case whose job is to remove everything that needs to be removed:
public class RemovePremium(ApplicationDbContext applicationDbContext)
{
	public async Task Execute(string subscriptionId)
	{
		UserSubscriptionEntity subscription = await applicationDbContext.UserSubscriptions
			.SingleAsync(a => a.SubscriptionId == subscriptionId);

		IdentityUserClaim<string>? claim = applicationDbContext.UserClaims
			.FirstOrDefault(a => a.UserId == subscription.userId
			&& a.ClaimType == UserConstants.PREMIUM_ACCOUNT);

		if (claim is not null)
			applicationDbContext.UserClaims.Remove(claim);


		if (subscription is not null)
		{
			subscription.IsActive = false;
			applicationDbContext.UserSubscriptions.Update(subscription);
		}

		await applicationDbContext.SaveChangesAsync();
	}
}
This means removing the premium claim and marking the subscription as inactive. Marking the record as deleted or inactive is called a soft delete. If you want to hard delete a record, that is fine too. Here’s a post about that topic.
We just have to call this use case from our webhook:
[HttpPost]
public async Task<IActionResult> Post()
{
	var json = await new StreamReader(HttpContext.Request.Body).ReadToEndAsync();
	try
	{
		Event? stripeEvent = EventUtility.ConstructEvent(json,
				Request.Headers["Stripe-Signature"], configuration["StripeWebhookSecret"]);

		// Handle the event
		switch (stripeEvent.Type)
		{
			case Events.CheckoutSessionCompleted:
				await HandleSessionCompleted(stripeEvent.Data.Object as Session);
				break;
			case Events.CustomerSubscriptionUpdated:
				await HandleSetEndSubscriptionDate(stripeEvent.Data.Object as Subscription);
				break;
			case Events.CustomerSubscriptionDeleted: 👈
				await HandleRemoveUserPremium(stripeEvent.Data.Object as Subscription);
				break;
			default:
				Console.WriteLine("Unhandled event type: {0}", stripeEvent.Type);
				break;
		}
		return Ok();
	}
	catch (StripeException e)
	{
		return BadRequest();
	}
}

public async Task HandleRemoveUserPremium(Subscription subscription)
{
	await removePremium.Execute(subscription.Id);
}
And with that, the application can manage the entire lifecycle of a subscription.
