Table of Contents
Since times are changing, companies, thankfully, no longer create gigantic all-in-one applications. Instead, these applications are now divided into different modules or small projects, each dedicated to a specific function.
The use of small projects to build a larger application is called microservices architecture, which I will cover in another video. The reason I mention this architecture here is because microservices are built on or rely on APIs.
1 - What is an API?
There are several ways to define what an API is. Personally, I define it as follows: An API is the entry point from the outside to your project.
Of course, the same applies when we are the ones consuming different APIs.
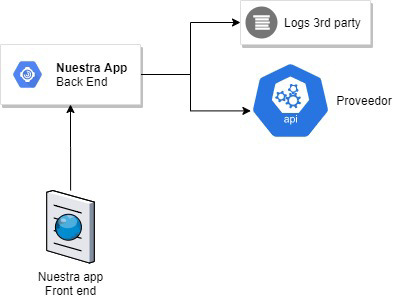
As shown in the image, we have our frontend, which consumes the backend through an API, and the backend, in turn, consumes two other services via APIs.
An API can return anything from a single character to a list containing thousands of elements.
2 - Types of API in C#
In C#, we have two options for creating APIs: SOAP and REST.
Both options have different characteristics, but the ultimate goal is the same: sending information between a client and a server.
2.1 - Differences between SOAP and REST
There are many differences, enough to make an entire post about them, but I will list those that seem most important:
A - Protocol
A major difference is that SOAP is a protocol, while REST is an architecture that runs over the HTTP protocol.
B - Development
Developing a SOAP service takes more time, both for the client and the server, since we need to create a .wsdl file, which is an XML containing the required data and the address of the web service. The `.wsdl` format also allows us to add a DTD, which can validate all fields in the XML before sending the message.
On the other hand, REST works over the HTTP protocol, which means that to receive/send information we must do so through web requests, using the URL or the body of the message. For the message body, we use Json or XML. But unlike SOAP, all validations will be on the server.
For these reasons, developing a REST API is much faster than developing a SOAP web service.
Of course, SOAP has advantages in other areas. For example, it can maintain state between multiple requests, while in REST each request is individual.
And because of the aforementioned aspect, the wsdl file with XML and DTD, SOAP services are much more secure.
3 - Creating an API in C#
Creating a REST API in C# is very simple. We just need to create a new web project.
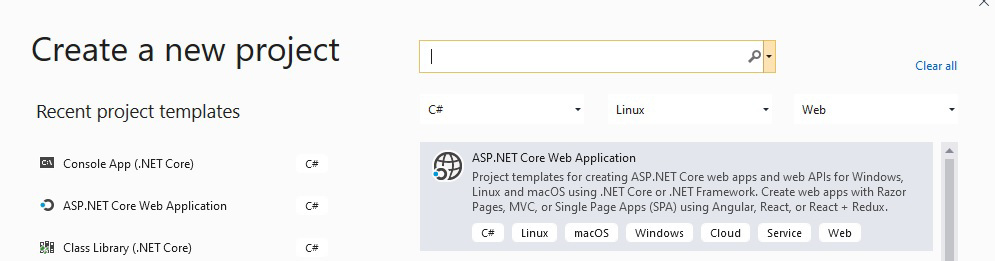
For the type, we choose API. We can choose either empty, web application, or even web application (MVC). The only difference is that they come with more or fewer default features.
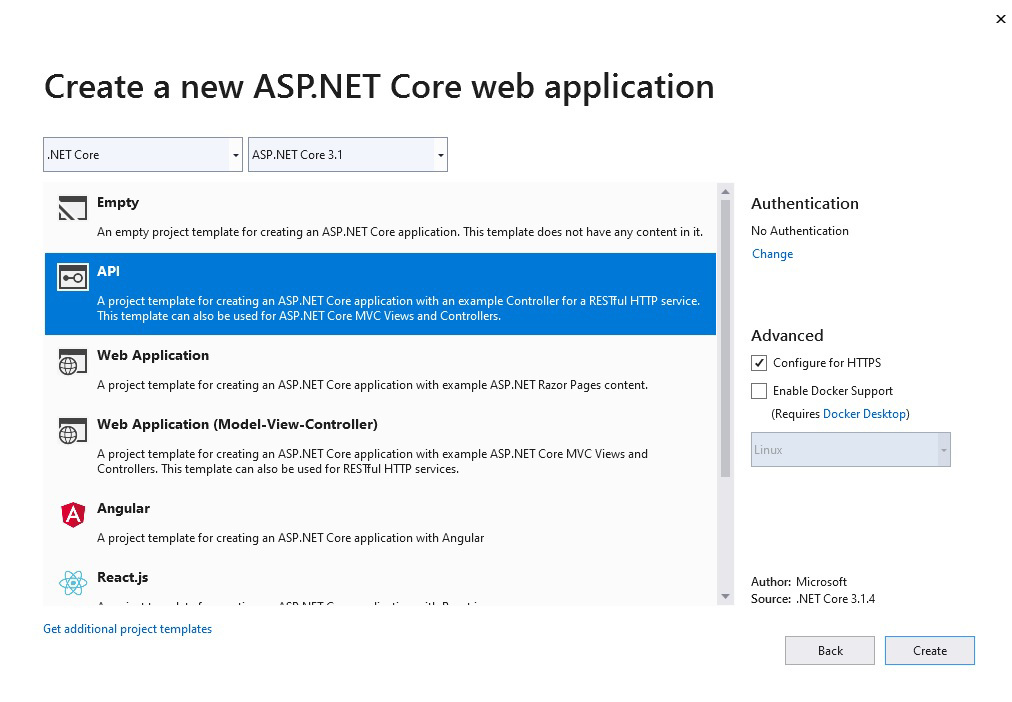
For this example, I chose an empty project.
Before continuing, in NetCore we have middleware that lets us configure endpoints in the startup.cs class, but for now we're going to "ignore" it since it's a more advanced topic.
When creating APIs, we should build endpoints with CRUD in mind.
3.1 - What is CRUD?
CRUD is an acronym that stands for:
- Create - used with HTTP POST method.
- Read - used with HTTP GET method.
- Update - used with HTTP PUT method.
- Delete - used with HTTP DELETE method.
There are more HTTP methods, but 99.9% of actions are performed with these.
In C#, our entry point will be the controllers.
To do this, we must make sure that within the startup.cs class, we have the service that adds the controllers.
public void ConfigureServices(IServiceCollection services)
{
    services.AddControllers();
}
And in this same class, in the configure method, inside UseEndpoints we must specify that it should look for these endpoints in the controllers with the condition endpoints.MapControllers().
app.UseEndpoints(endpoints =>
{
    endpoints.MapGet("/", async context =>
    {
        await context.Response.WriteAsync("Hello World!");
    });
    endpoints.MapControllers();
});
3.2 - Creating the Endpoints
In C#, when we create endpoints for an API, we do so in a controller, so we will create a controller class called EjemploController and add the [ApiController] attribute. We also need to import the library using Microsoft.AspNetCore.Mvc;
[ApiController]
public class EjemploController : Controller
{
}
Note: remember that controllers should always inherit from Controller.
Now all that's left is to create endpoints for both reading and writing.
A - Creating a GET endpoint in C#
A GET endpoint is used to read data and is very simple. We just need to create a method and decorate it with either the `[HttpGet]` attribute to indicate the HTTP method to use together with `[Route(“route”)]` to specify the route, or directly with [HttpGet(“route”)] to specify the HTTP method and the route needed by the browser to call it.
[HttpGet("nombre/{id}")]
public string LeerNombre(int id)
{
    return id switch
    {
        1 => "Net",
        2 => "mentor",
        _ => throw new System.NotImplementedException()
    };
}
As you can see, we can indicate variables in the route using brackets.
You can then call the endpoint with the browser at https://localhost:44303/nombre/1
B - Creating a POST endpoint in C#
We use a POST endpoint to update data. We'll define the route just like with GET, but unlike GET, we must send information in the body of the message.
Of course, don't forget to indicate the attribute as [HttpPost(“route”)].
[HttpPost("insertarempleado")]
public int InsertEmployee(Employee employee)
{
///Code to insert employee into the database
return 1;
}
public class Employee
{
public string Name { get; set; }
public string LastName { get; set; }
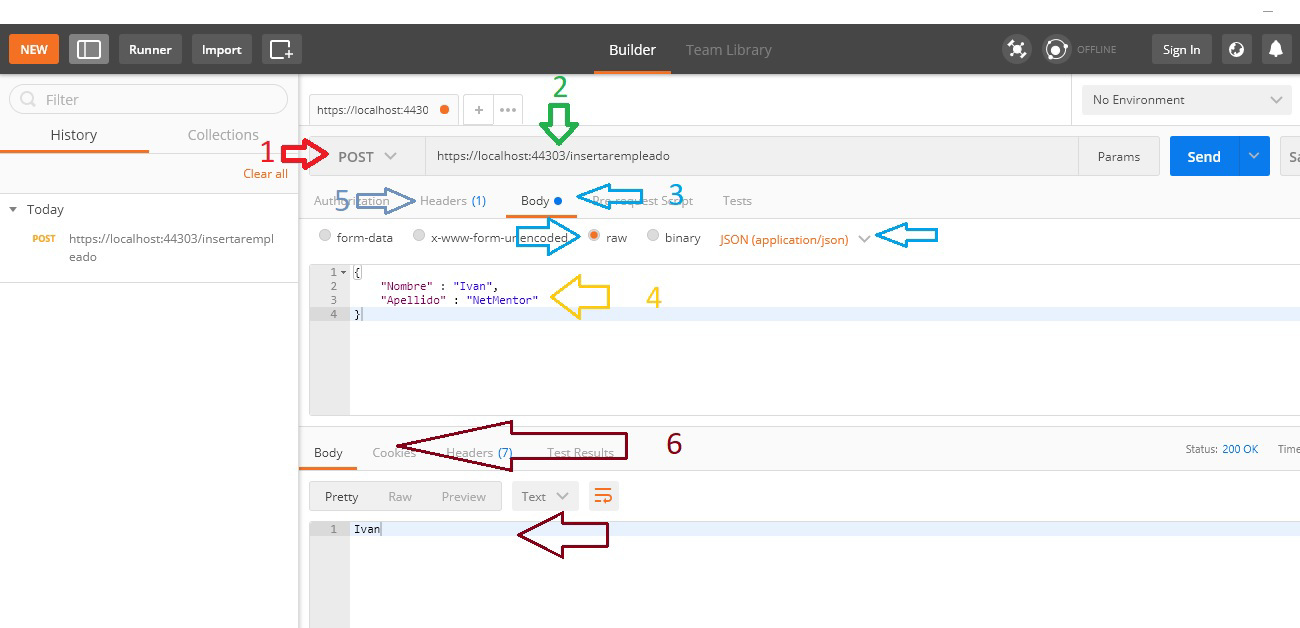
}This information will be an object that we can send in JSON or XML format, and to send it we can use any application that allows sending messages via the HTTP protocol, but the most common is postman.
We should configure the application a bit by specifying the following points:
- HTTP method.
- Destination URL.
- Body in raw format, specifying that it is JSON.
- The actual body.
- Make sure that in the headers, you have the following
Content-Typeasapplication/json. - Finally, after sending the request, you can see the result in the body section of the response.
C - Other Scenarios
For other scenarios, it is the same; you just need to change the method you wish to use as well as the message body.
Others
Before we finish, I want to mention one more point: it is very common to use the name of the controller as part of the URL. As we saw in the previous example, this is not 100% mandatory, but it is a common practice.
To use the controller as part of the URL, you do not need to modify each of your methods to add the controller name. Instead, the class itself has its decorator where you can specify the route with [Route("[controller]")], where controller is literally the word controller, not the name of your controller, although you can, of course, modify it.
[ApiController]
[Route("[Controller]")]
public class EjemploController : Controller
{
   //methods
}
Conclusion
Having a clear understanding of what an API is, is essential in today's workplace.
We work with APIs all the time, whether our architecture is microservices, or we are consumers or providers of API services.
Knowing how to distinguish the features and differences between SOAP and REST can make a significant difference in terms of design.
Using APIs also helps with development, as, generally, the codebase is smaller, which makes it easier to test, and in case there is a bug, it is easier to fix.
Finally, many interviews for mid or senior positions will include a part where you have to create an API in code or define an API on a whiteboard.
