Language Models (LLMs) are incredibly powerful, but on their own, they exist completely isolated from the real world. How can we make a chatbot check an order status, show the weather in your city, or search your database? The answer lies in the Model Context Protocol (MCP).
Table of Contents
1 - What is Model Context Protocol (MCP)?
The Model Context Protocol (MCP) is a standard protocol designed to facilitate communication between clients (such as apps, agents, bots) and servers that expose tools, functions, or data for AI models and consumers to use.
In other words, the following points apply:
- Allows a server to declare a set of functions that can be invoked remotely.
- These functions or tools are called Tools.
- Clients, servers, and models can understand each other without relying on each custom API.
- Instead of a model being "closed" to a single logic, it can invoke multiple tools via MCP.
With this, LLMs can utilize external resources.
1.1 - MCP Architecture
MCP relies on a very simple client-server architecture:
- MCP Host: This is the application where the LLM lives (for example, a chatbot, your programming IDE, etc.).
- MCP Client: Resides in the Host and is responsible for translating LLM requests so that the server can understand them.
- MCP Server: It's a small application that will expose resources that we want the LLM to access. These capabilities can be of three types:
- Tools: Functions that the LLM can execute. For example, get_weather(city) or check_product_stock(id).
- Resources: Information or data we provide to the model for additional context, such as the content of a file or the result of a database query.
- Prompts: Predefined text templates to help the LLM perform specific tasks.
The flow is simple: when you ask the LLM a question, the MCP client communicates with one or several MCP servers, discovers which "capabilities" are available, and presents them to the model. The LLM, intelligently, decides if it needs to use any of these tools or resources to build a much more complete and precise answer.
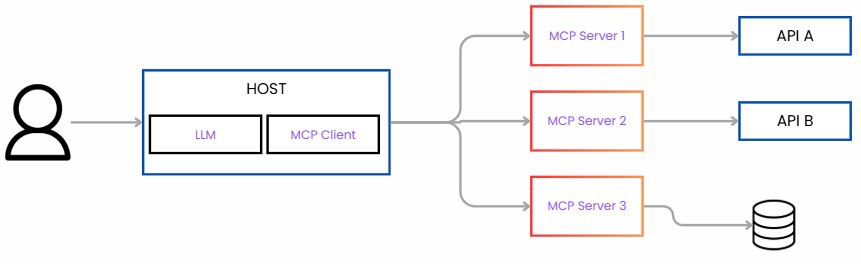
The great advantage is that it completely decouples the LLM from the tools. You can create a single MCP server for your database, and any compatible LLM can use it without having to program custom integration for each one.
1.2 - What benefits does MCP provide?
Some of the benefits MCP offers (though not the only ones) are:
- Eases integration with clients like your IDE, or editors that support MCP, since they automatically detect what Tools are available and allow you to execute them very easily. This is what we’ll see in practice.
- If you are building an AI app that not only calls a model but also needs to access your database, call your API, or process complex data, MCP gives you a pattern for exposing those Tools.
- If you have multiple models or services, MCP helps to unify how clients consume them.
2 - Creating an MCP Server with C#
Let's move to the practical part, which will serve as a hello world for what an MCP is.
For this, we create a console app and need two packages. First, ModelContextProtocol, currently in preview, and second, to make our life easier, Microsoft.Extenions.Hosting.
With these, we can build the following code:
using Microsoft.Extensions.DependencyInjection;
using Microsoft.Extensions.Hosting;

var builder = Host.CreateApplicationBuilder(args);

builder.Services
    .AddMcpServer()
    .WithStdioServerTransport()
    .WithToolsFromAssembly();

await builder.Build().RunAsync();
At first glance, this code is very simple, and that's because it is. Aside from creating the application builder, we have our dependency container that includes:
AddMcpServer()to register the MCP serverWithStdioServerTransport()for the input and output transport layer, the MCP server just listens to stdin and responds via stdout instead of opening a network port.- This is for local; outside local, an HTTP request and endpoint would be the preferred way.
WithToolsFromAssembly(): this method scans the current project and includes all tools (remember, these are called tools) we have created.- Alternatively we can use
WithTools<TTool>()
- Alternatively we can use
Now we need to create the MCP tool that we’ll use. To do this, simply create a class, decorate it with the [McpServerToolType] attribute, and each tool we want to use with McpServerTool
[McpServerToolType]
public class WeatherTool
{
    [McpServerTool, Description("Returns the temperature in degrees.")]
    public static string GetWeather(string city)
    {
        //in a real case this will call an API
        var temperature = Random.Shared.Next(1, 40);
        return $"the temperature in {city} is {temperature}°C";
    }
}
To continue with the examples we usually see in C#, we’ll simulate a weather app where you pass the city and it returns the weather for that city.
In production, this should point to a URL, but for this test, a console app works. Production explanation.
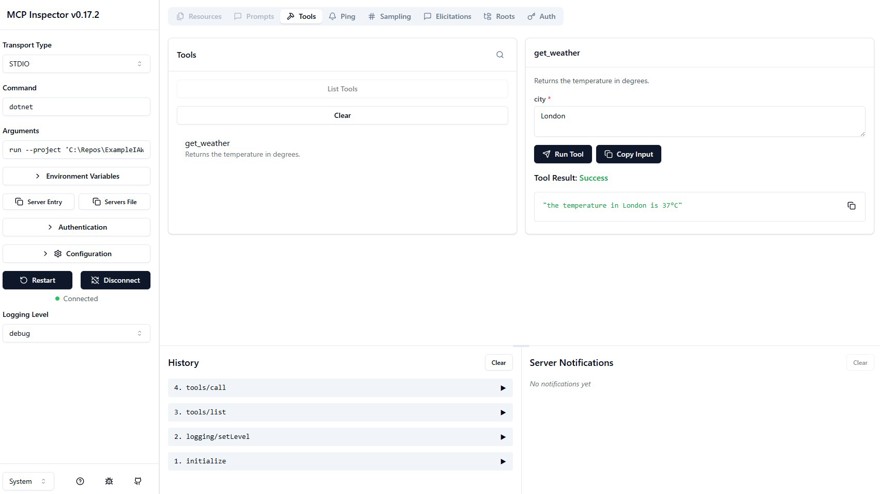
To access this MCP server, we have two options: the first is via the console and the browser.
For this you need node installed and mcp-inspector (npm install -g @modelcontextprotocol/inspector)
Once you have it, you need to run the following command:
mcp-inspector dotnet run --project ‘project/path’
This opens a web page where you can access the MCP server, list tools, etc.:
2.1 - Connect to a Local MCP from C# with Visual Studio Code
The other option is with Visual Studio Code, where you need a folder called .vscode in your directory with a file mcp.json that will contain the path to your project:
{
  "inputs": [],
  "servers": {
    "ExampleIA03MCP": {
      "type": "stdio",
      "command": "dotnet",
      "args": [
        "run",
        "--project",
        "..\\ExampleIA03MCP.csproj"
      ]
    }
  }
With this, any integrated chat in VS Code supporting MCP can automatically discover and use your Tools.
If this were a production project already deployed, it would be a URL.
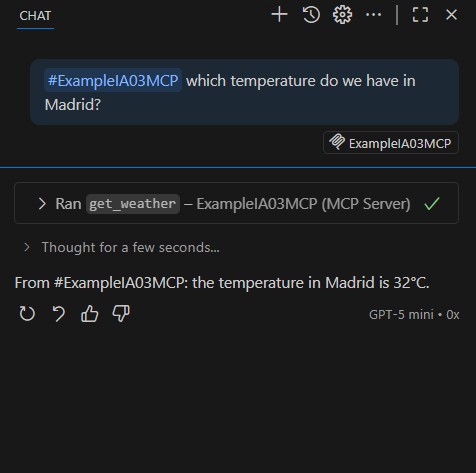
To test if our MCP works, we just need to interact with the chat.
We can force the use of our tool by invoking it with #, in our case #ExampleIAMCP.
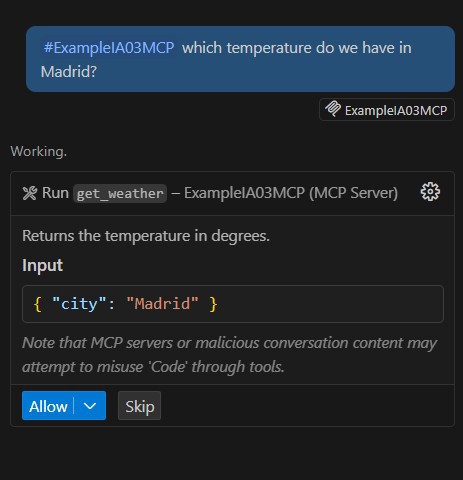
And from here you can see the result clearly:
Note: alternatively, there is another popular library called MCPSharp, which is also recommended.
If you'd like a post dedicated to that library, let me know in the comments below or on YouTube and we can create content about it.
3 - Improving Our MCP with C#
Inside MCPs, we don’t just have tools; we also have prompts and resources.
Before creating resources and prompts, don't forget you need to specify them in the builder:
var builder = Host.CreateApplicationBuilder(args);

builder.Services
    .AddMcpServer()
    .WithStdioServerTransport()
    .WithToolsFromAssembly()
    .WithResourcesFromAssembly() // 👈
    .WithPromptsFromAssembly(); // 👈

await builder.Build().RunAsync();
3.1 - Prompts in MCP Using C#
When you have a prompt inside an MCP, it’s not the text the user sends, but rather extra capabilities exposed by the server just like it does with tools.
The main advantage is that it encapsulates a well-designed prompt’s logic. Instead of the client developer having to figure out the perfect prompt, the MCP server gives it ready-made.
In the end, it’s the same as if a user wrote it, but authored by those working directly with the prompt:
[McpServerPromptType]
public class WeatherPrompt
{
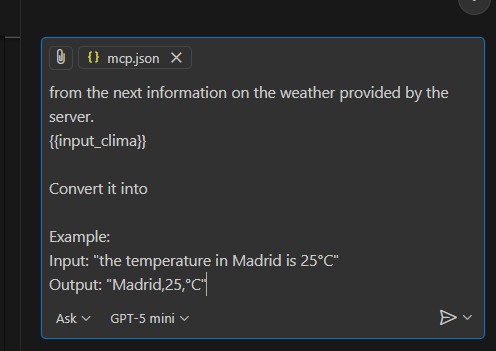
[McpServerPrompt(Name = "FormatReport")]
public static string MakeWeatherFriendly()
{
return """
from the next information on the weather provided by the server.
{{input_clima}}
Convert it into
Example:
Input: "the temperature in Madrid is 25°C"
Output: "Madrid,25,°C"
""";
}
}
In Visual Studio Code, you can access it using ‘/’ and it will automatically fill the prompt for you:
3.2 - Resources in MCP Using C#
Resources are parts that provide information about our MCP; the idea is to explain how it works and to “activate” them before the user sends the prompt to the server.
For example, in this case we specify that only certain cities are allowed:
[McpServerResourceType]
public class WeatherResource
{
    [McpServerResource(Name = "SupportedCities")]
    public static string SupportedCities()
    {
        return """
               **Critical context:**
               Only the following cities are allowed:
               - Madrid
               - London
               - Lima
               - Buenos Aires

               If the user ask for any other city you should return an error and
               do not call the GetWeather tool.
               """;
    }
}
The problem with resources is that they are controlled from the client side, so we can't guarantee that they will be used. That’s why it’s important to also add the corresponding checks on the server where the tool is implemented.
In fact, Copilot Chat in VS Code ignores them completely. But you can use extensions like OpenAI, Continue/Cline (these support it), or directly on Cursor or Claude Code CLI.
4 - Creating an MCP Client with C#
I don’t want to finish without showing how to create an MCP client directly in C#.
You can use ModelContextProtocol with the MCPClient class, or as I mentioned before, the MCPSharp library. For today's demo, either one is fine, but if you want more content about that, let me know in the comments below.
To configure it, just create an McpClient and specify where your server is. In our case, we’re running it locally, but remember it can be fully online.
var serverExePath =  @"C:\Path to exe";

var transport = new StdioClientTransport(new StdioClientTransportOptions
{
    Name = "WeatherClient",
    Command = serverExePath,
    Arguments = Array.Empty<string>()
});

await using var client = await McpClient.CreateAsync(transport);

var tools = await client.ListToolsAsync();
var prompts = await client.ListPromptsAsync();
var resources = await client.ListResourcesAsync();

Console.WriteLine("Tools: " + string.Join(", ", tools.Select(t => t.Name)));
Console.WriteLine("Prompts: " + string.Join(", ", prompts.Select(p => p.Name)));
Console.WriteLine("Resources: " + string.Join(", ", resources.Select(r => r.Uri)));
And with this client, we can read the prompts, resources, and tools we have.
For our use-case, we’re just going to execute our tool. To do this, we need to call it (so we need to know the name of the tool) and pass the necessary parameters, in this case, just the city.
var toolResult = await client.CallToolAsync(
    "get_weather",
    new Dictionary<string, object?> { ["city"] = "Madrid" },
    cancellationToken: CancellationToken.None
);

var weatherLine = toolResult.Content
    .OfType<TextContentBlock>()
    .FirstOrDefault()?.Text ?? "";

Console.WriteLine(weatherLine);
As you see, we’re ignoring the prompts and the resources, because those features are controlled from the client side – which is what we’ll see in one of the next videos!
