In the previous post, we saw what code first in entity framework core is, but there we only scratched the surface, providing a brief explanation of how it works. In this post, we’ll see how 99.9% of companies implement code first, using migrations.
Table of Contents
1 - What are migrations in Entity Framework Core?
Migrations in Entity Framework Core are the way to keep the structure of the model you’re using in your application synchronized with your database. In other words, they let you update your code, and the database will be updated accordingly.
And Entity Framework lets you do this in a very simple way.
For this post, we will use the code hosted on GitHub that we saw in the previous post.
2 - Implementing migrations in Entity Framework Core
As in other posts, we're going to start from scratch. For now, all we have are the entities and the DbContex that, as you know, represent the structure of our database:
public class Wokringexperience
{
    public int Id { get; set; }

    public int UserId { get; set; }

    [MaxLength(50)]
    public string Name { get; set; }

    public string Details { get; set; }

    public string Environment { get; set; }

    public DateTime? StartDate { get; set; }

    public DateTime? EndDate { get; set; }
}

public class User
{
    public int Id { get; set; }
    public string UserName { get; set; }
}

ublic class CursoEfContext : DbContext
{
    public virtual DbSet<User> Users { get; set; }

    public virtual DbSet<Wokringexperience> Wokringexperiences { get; set; }

    protected override void OnConfiguring(DbContextOptionsBuilder optionsBuilder)
#warning To protect potentially sensitive information in your connection string, you should move it out of source code. You can avoid scaffolding the connection string by using the Name= syntax to read it from configuration - see https://go.microsoft.com/fwlink/?linkid=2131148. For more guidance on storing connection strings, see http://go.microsoft.com/fwlink/?LinkId=723263.
        => optionsBuilder.UseMySQL("server=127.0.0.1;port=4306;database=cursoEF;user=root;password=cursoEFpass");
}
Now what we’re going to do is generate migrations. For this, you have two options.
A - From the command line. Navigate to the folder that contains the project csproj that holds the DbContext and run the following code:
dotnet ef migrations add MigracionInicial
B - In the NuGet package manager console, run this command:
add-migration MigracionInicial
Both options will give you the same result, which consists of the following three files:
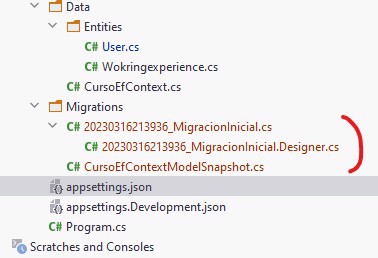
1 - The first is the main migration file, and it contains the Up and Down operations. If we open it, we can see how Up has all the information needed to create the database, while Down contains the instructions to undo everything Up created.
public partial class MigracionInicial : Migration
{
    /// <inheritdoc />
    protected override void Up(MigrationBuilder migrationBuilder)
    {
        migrationBuilder.AlterDatabase()
            .Annotation("MySQL:Charset", "utf8mb4");

        migrationBuilder.CreateTable(
            name: "Users",
            columns: table => new
            {
                Id = table.Column<int>(type: "int", nullable: false)
                    .Annotation("MySQL:ValueGenerationStrategy", MySQLValueGenerationStrategy.IdentityColumn),
                UserName = table.Column<string>(type: "longtext", nullable: false)
            },
            constraints: table =>
            {
                table.PrimaryKey("PK_Users", x => x.Id);
            })
            .Annotation("MySQL:Charset", "utf8mb4");

        migrationBuilder.CreateTable(
            name: "Wokringexperiences",
            columns: table => new
            {
                Id = table.Column<int>(type: "int", nullable: false)
                    .Annotation("MySQL:ValueGenerationStrategy", MySQLValueGenerationStrategy.IdentityColumn),
                UserId = table.Column<int>(type: "int", nullable: false),
                Name = table.Column<string>(type: "varchar(50)", maxLength: 50, nullable: false),
                Details = table.Column<string>(type: "longtext", nullable: false),
                Environment = table.Column<string>(type: "longtext", nullable: false),
                StartDate = table.Column<DateTime>(type: "datetime(6)", nullable: true),
                EndDate = table.Column<DateTime>(type: "datetime(6)", nullable: true)
            },
            constraints: table =>
            {
                table.PrimaryKey("PK_Wokringexperiences", x => x.Id);
            })
            .Annotation("MySQL:Charset", "utf8mb4");
    }

    /// <inheritdoc />
    protected override void Down(MigrationBuilder migrationBuilder)
    {
        migrationBuilder.DropTable(
            name: "Users");

        migrationBuilder.DropTable(
            name: "Wokringexperiences");
    }
}
This is done mainly so that if anything goes wrong, you can easily roll back.
2 - The designer file contains the metadata used by Entity Framework Core.
3 - The Snapshot file is a “snapshot” of the current model, and it’s what Entity Framework Core uses to detect what has changed since the last migration.
2.1 - Running migrations in Entity Framework Core
Before continuing, make sure your database is running and your connection string is correct; in my case, I'm using MySQL.
As I mentioned in the previous post, this action used to be done from the command line, but nowadays you can do it in code. This means making sure the database is synchronized with the migration in your code.
In my case, there isn't a database created, so the migration will create it, as well as the tables.
Go to the code and in your startup.cs make sure you have the following code so the migration is executed
using (var scope = app.Services.CreateScope())
{
    CursoEfContext context = scope.ServiceProvider.GetRequiredService<CursoEfContext>();
    context.Database.Migrate();
}
And that's it, just run the project.
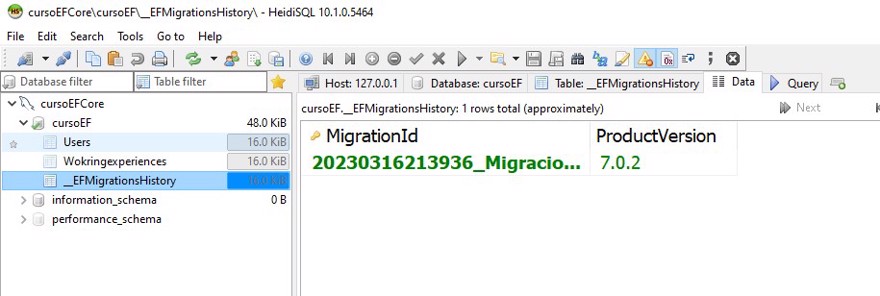
This action has created both tables and also an extra table that contains all the information about the migrations that have been run, so you know what migration 'version' your database is at.
3 - Updating a database with migrations in Entity Framework Core
Migrations is part of code first, which means that if you have to update the database, you'll do it through migrations themselves.
For our scenario, we’re going to add a new field inside the Users table, in this case email. The first thing you need to do is go to the entity and add this property:
public class User
{
    public int Id { get; set; }
    public string UserName { get; set; }
    [MaxLength(50)]
    public string Email { get; set; }
}
And now we need to create a new migration. Always try to give it a meaningful name; that always helps.
dotnet ef migrations add AddEmailtoUserThis command will generate the new migration file with its corresponding Up and Down.
public partial class AddEmailtoUser : Migration
{
    /// <inheritdoc />
    protected override void Up(MigrationBuilder migrationBuilder)
    {
        migrationBuilder.AddColumn<string>(
            name: "Email",
            table: "Users",
            type: "varchar(50)",
            maxLength: 50,
            nullable: false,
            defaultValue: "");
    }

    /// <inheritdoc />
    protected override void Down(MigrationBuilder migrationBuilder)
    {
        migrationBuilder.DropColumn(
            name: "Email",
            table: "Users");
    }
}
As well as the automatic update of the Snapshot.
Now, when you run the code, Entity Framework handles updating everything needed so that your database matches the model in your code.
In this case, it simply adds the new column and records a new entry in the migrations table. Here’s the result after running the application:

As you can see, it works as expected.
4 - Reverting a migration in Entity Framework Core
What happens if, during the migration, something goes wrong or the app wasn’t properly tested and you have to go back to a previous version, but the database is left in an in-between state? That’s when you need to undo the migration.
Note: For this scenario you have to run it from the command line or from the package manager console. The commands are:
1 - Command line:
dotnet ef database update <PreviousVersionName>2 - Package manager:
Update-Database <PreviousVersionName>
Basically, for PreviousVersionName you should put the name of the migration. In our case, we’re going to undo the last migration by running this command
dotnet ef database update MigracionInicialand you can see how it gives you a message saying the previous migration was reverted

And in the database, of course, there’s no trace, so you can safely redeploy the previous version of the code.
- NOTE: If for some reason you remove the code from the
Downpart of the migration, reverting it will have no effect.
4.1 - Deleting a migration
If you created a migration by mistake, it’s not enough just to delete it from the code, because the snapshot file was modified.
What you need to do is delete it using the command dotnet ef migrations remove, which removes the last migration and resets the snapshot to how it was before.
Conclusion.
In summary, migrations are a very useful tool to keep your database in sync with your application’s model.
With Entity Framework Core, you can generate migrations automatically and easily apply them to the database using code first.
