Although they have existed for years, .http files have made their way into the world of C# developers thanks to the latest version of Visual Studio, as now, VS will create these files by default.
Today we're going to see what they are and how they work.
Index
1 - What are HTTP files?
.http files are simply a way to make HTTP calls to API endpoints directly from your IDE.
The idea is that you can make all your calls from the IDE itself without needing extra applications like Postman or similar tools.
Note: Postman is much more powerful than a simple .http file.
HTTP files are supported in Visual Studio, Rider, and even Visual Studio Code, so you're covered. As I mention, they are common in many other languages; I first saw them during my time with Ruby.
But you can edit them with any editor because they're plain text files.
1.1 - Why use HTTP files?
It's a very good practice to keep these files constantly updated and use them in our local development. Being plain text files, they are usually quite simple to read and understand.
Personally, I use them on the API level for testing; you might say that's what Postman is for, and yes and no. The good thing about .http files is you have them right in the code, and when you write a request, you write something executable. If you make changes, you are forced to update this file as well.
With Postman or other third-party tools it's not quite the same since, in the beginning, it's a separate app, its configuration isn’t in the same folder as your code, and if someone changes a contract, yours won't work until updated. Sharing configurations or contracts then means exporting, saving them somewhere common, etc, a lot more work than a simple HTTP file.
2 - HTTP Files in .NET
With the latest versions of .NET 8, the .http file is included when you create a new project. In fact, this is the default example:
@WebApplication1_HostAddress = http://localhost:5204

GET {{WebApplication1_HostAddress}}/weatherforecast/
Accept: application/json
If we analyze the code, it’s very easy to understand. The first line defines a variable with the URL where our app runs, and then the endpoint we’re going to call, in this case a GET method, as shown.
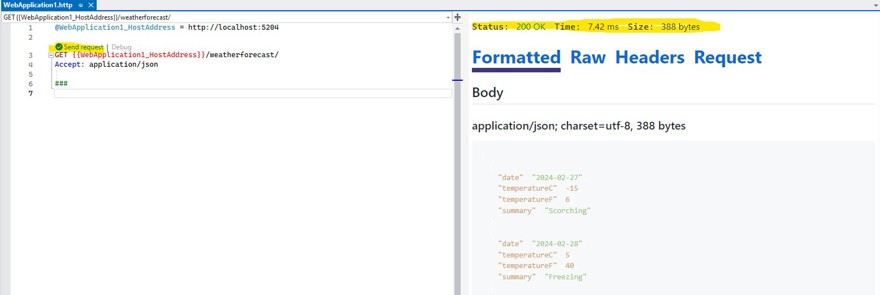
This is how that file looks in Visual Studio, once the request is made:
Note: it supports the most popular HTTP methods: options, get, post, put, patch, etc.
In this image, there are several things to note. On the left, we have the HTTP file, and above the endpoint, there are “send request” and “debug” options. If you select debug, it’s like pressing F5 to run the code and then the request is made.
The result of the request appears on the right: the response, status code, execution time, and other details like headers, etc., if you need them.
Of course, this is just the sample, but you can create as many HTTP files as you need, there’s no limitation on file names or content.
3 - Exploring HTTP files
Now let's leave the .NET environment aside and focus on HTTP files themselves. For this example, I'll use my personal website project, which is on github. There, we have several endpoints, and since the project was created years ago, it does NOT include a file.
So we simply create a new one.
3.1 - Variables in HTTP files
Just like in the default file, we're going to store the variable for the app's url in a variable:
@endpoint = https://localhost:5001In our case, it runs on port 5001.
3.2 - Body requests in HTTP files
In many cases, we’ll want to send a body with the request, whether it’s a post or put, etc. That’s pretty common. In this case, my database is empty, so I’ll send the creation of a profile:
POST {{endpoint}}/api/PerfilPersonal
Content-Type: application/json

{
  "UserId": null,
  "Id": null,
  "UserName": "ab0ce3e2-8333-422c-9205-a90b398f1df3",
  "FirstName": "firstName",
  "LastName": "last name",
  "Description": "Description",
  "Phone": "telefono",
  "Email": "email",
  "Website": "web",
  "GitHub": "github",
  "Interests": [],
  "Skills": []
}
There, you can see how we're specifying the HTTP method (POST, in this case), the content-type header, and then the body.
Two quick notes:
First, the header. All headers go right after the request line.
To include the body, you must leave a blank line between the headers and the content of the body.
3.3 - Storing information from HTTP responses
When we make a request, it will return a value. In some scenarios, we may want to store the returned value; for example, in the previous case, to read a profile, we need the username. So, we're going to read it from the API’s response:
POST {{endpoint}}/api/PerfilPersonal
Content-Type: application/json

{
  "UserId": null,
  "Id": null,
  "UserName": "user1",
  "FirstName": "firstName",
  "LastName": "last name",
  "Description": "Description",
  "Phone": "telefono",
  "Email": "email",
  "Website": "web",
  "GitHub": "github",
  "Interests": [],
  "Skills": []
}

> {% client.global.set("userName", response.body.valor.userName) %}


### get user
GET {{endpoint}}/api/PerfilPersonal/{{userName}}
As you see in the last line of the POST, we store the username variable and use it later.
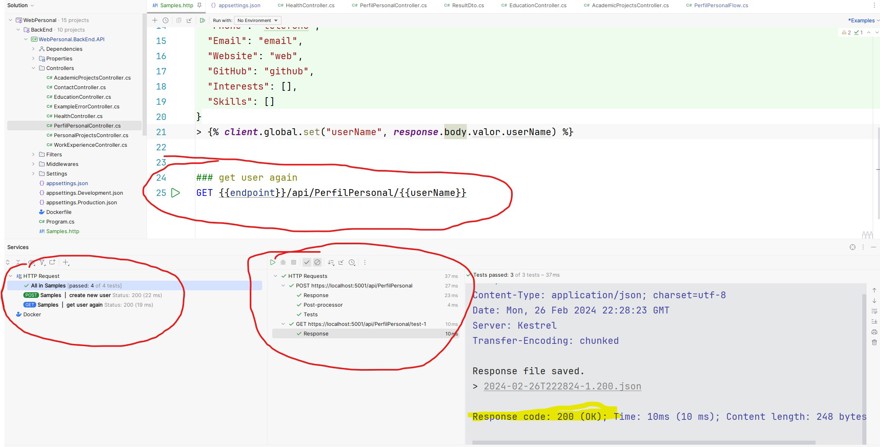
And this is how it looks in JetBrains Rider, which is the IDE I usually use:
3.4 - Security and authentication in HTTP files
If we combine what we've seen about responses and headers, we can even make calls to an authentication service to receive the JWT and then use the response in the call header. In this particular app I don't need it because I don't use authentication, but it would look something like this:
POST https://identityservice.com/auth
Content-Type: application/json

{
  "username": "user",
  "password": "pass"
}

> {% client.global.set("token", response.body.$.token) %}

GET {{endpoint}}/api/PerfilPersonal
Authorization: Bearer {{jwtToken}}