In this post, we are going to see how to use fluent validations within our code and how it can help us build our applications.
I am not going to focus on the specific case of ASP.NET Core 8, where some of the functionalities we're going to cover today can be done directly with attributes in the DTO and possibly with each new version, we'll see more and more of this.
### index
1 - What is fluent validations?
Fluent validation is a library that allows us to define a set of rules in a way that's clearer and more expressive than what we'd normally do with plain C#.
One of the main features of fluent validations is that when you read a validation, you are effectively reading what it does in English. It's similar to how fluent assertions works in test assertions.
2 - Implementing fluent validations in C#
To implement fluent validations, the first thing we need to do is install the corresponding library: `FluentValidation`.
2.1 - Creating rules in Fluent Validations
Once we have the library, we need to create a validator; for that, we create a class that inherits from AbstractValidator<T> where T is the type we want to validate.
In our case, we're going to validate the User type:
public record User(string Name, string Email, int Age);

public class UserValidator : AbstractValidator<User>
{
}
To do this, in the constructor, we will specify the rules we want, in our case, that the user is an adult, the name is not empty, and the email is a valid email address:
public record User(string Name, string Email, int Age, int? AgeOfRetirement);

public class UserValidator : AbstractValidator<User>
{
    public UserValidator()
    {
        RuleFor(a => a.Age).GreaterThanOrEqualTo(18);
        RuleFor(a => a.Name).NotEmpty();
        RuleFor(a => a.Email).EmailAddress();
    }
}
2.2 - Combining rules in Fluent Validations
Fluent validation also allows us to combine rules. For example, imagine you only want gmail emails, you can modify the rule so that it requires that type of email:
RuleFor(a => a.Email).EmailAddress()
    .Must(e=>e.EndsWith("@gmail.com"));
In this case, both rules are mandatory: a valid email, and that it ends with @gmail.com.
2.3 - Customizing errors in fluent validations
When we run our validations, we will check the rules and get messages, error codes, etc. This can be configured. For example, let's be more specific with the email error and indicate that the user needs to use a gmail address:
RuleFor(a => a.Email).EmailAddress()
	.Must(e=>e.EndsWith("@gmail.com"))
    .WithMessage("Debes utilizar un correo de gmail.");
2.4 - Fluent Validations for conditional validations
One of the most common cases is to condition certain validation: if an attribute is X, validate Y, otherwise ignore it or validate Z. That's what we're doing here; we will check the year of retirement for everyone over 65, and we'll also check that if the user is under 65, that value must be null.
When(a => a.Age >= 65, () =>
        RuleFor(user => user.AgeOfRetirement).NotNull().GreaterThanOrEqualTo(65)
    )
    .Otherwise(() => RuleFor(user => user.AgeOfRetirement).Null());
I know that in real life it isn't that simple, but this serves to give us an idea.
3 - Integrating Fluent Validations in ASP.NET Core
Now that we've seen several use cases, let's see how to integrate it into our applications.
The first thing we should do is add our validation to the dependency container.
builder.Services.AddScoped<IValidator<User>, UserValidator>();Now we have two ways to use it.
3.1 - Manual validations with fluent assertions
The first is to inject the IValidator<User> interface and use it wherever we need, directly invoking the `validate` or `ValidateAsync` method when possible:
app.MapPost("/user", async (User user, IValidator<User> validator) =>
{
var validationResult = await validator.ValidateAsync(user);
if (!validationResult.IsValid)
{
return string.Join(',', validationResult.Errors.Select(a => a.ErrorMessage));
}
return $"User created (simulated) {user.Name}";
})
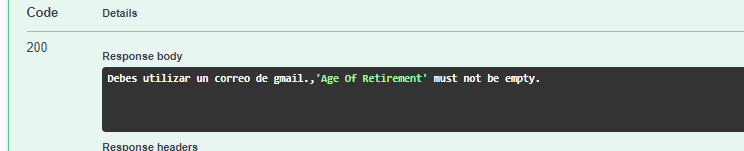
.WithOpenApi();If we send the following payload, we'll see that both the email and the age/retirement age do not match what we need, so we should get several errors:
{
  "name": "netmentor",
  "email": "[email protected]",
  "age": 65,
  "ageOfRetirement": null
}
Result:
3.2 - Automatic validations with fluent assertions
This part is a bit legacy, and in fact, it is no longer recommended by the official application. So instead of demonstrating an example, I'll simply mention that there is a package called fluentvalidation.aspnetcore that includes validations in the request pipeline.
There is a library called SharpGrip.FluentValidation.AutoValidation that provides a similar functionality as the aforementioned request pipeline integration.
Personally, I am not a big fan of magic, so keeping the validation as a step in the code is my preferred option. (See point 3.1).
