In the real world, when it comes to creating or deploying applications, once we leave our computer, we don't use an IDE like Visual Studio or Rider; instead, we carry out all actions through the command line.
For example, in most companies, when you need to create a new project, you don't do it on your PC. You have an internal platform where you create the project, and in doing so, not only is the .NET project created, but also the git repository. Then, depending on how many additional elements your company uses, such as code analyzers, vulnerability scanners, and so on, a space is created for all of them.
But behind the scenes, we always use commands. Using the CLI in .NET is not very popular, and one of the main reasons, I believe, is that the terminal in Windows is terrible, at least the default one. That's where the sponsor of this post, Warp comes in, a new terminal available for Windows that's very powerful, and for the first time (in my honest opinion) there is a quality terminal in our wonderful environment.
Table of Contents
Warp referral link: https://app.warp.dev/referral/9D4X54
1 - Create a .NET Project Using the Terminal
The first step we'll see today is how to create a .NET project using the terminal.
To create a project in .NET, we need to use the dotnet new command and specify the template type. Of course, there are more options, but perhaps we don't know them all. That means we can run dotnet new -h to see the help or dotnet new list, which will show us the template types available.
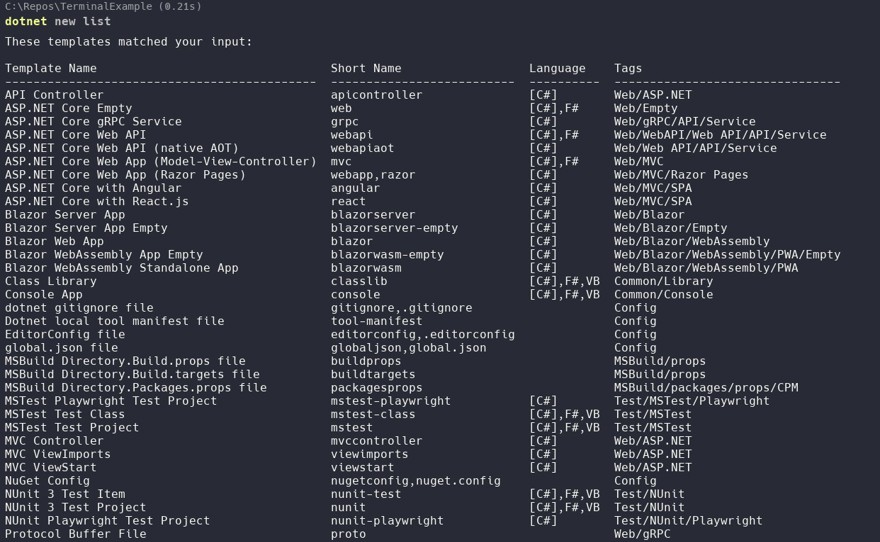
In our case, we'll select a standard API project in C#, so we run the following command
dotnet new webapi --output src --name TerminalExampleThis will create the API in a folder called src, which is standard in the .NET environment. With this, you could already run the API itself, but to be able to open the project properly with the IDE, we need a solution file, so we create one with the following command:
dotnet new slnNow, we need to add the web API project we created earlier to this solution file.
Inside Warp, we can edit the actual files by clicking directly in the terminal. But we can also use the .NET CLI to add the project to the solution with a command (Yes, this is also done in your company when you create projects).
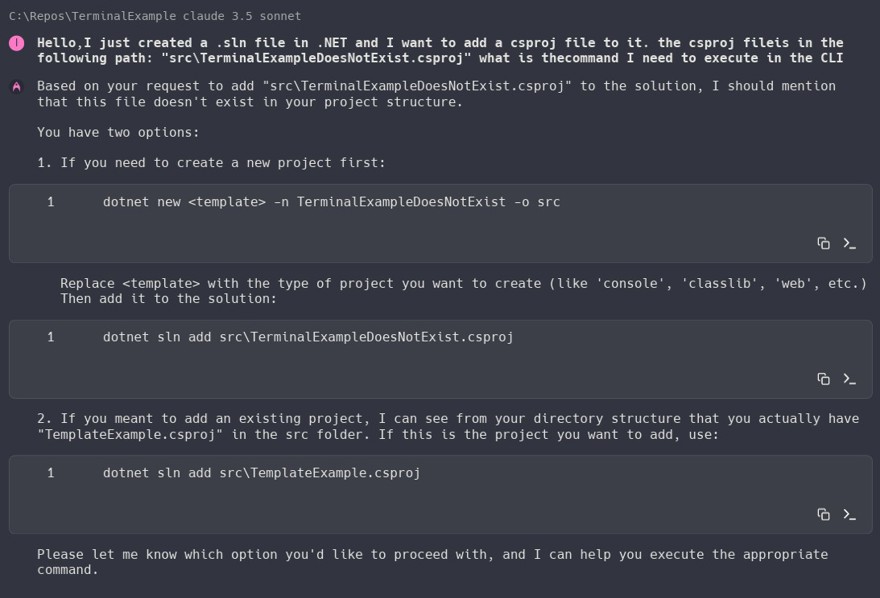
Most likely, if you've never done it, you won't remember the command. That's not a problem; Warp has integrated AI (Ctrl+i), where you can choose between Claude, GPT, Gemini, or Deepseek to ask things. In this case, I'm going to ask it to create a command to add the project to the solution.

The AI will give us the correct answer, and not only that, but we can also configure the AI agent to execute the commands automatically.
If, for example, the command fails, the agent itself helps us debug the problem.
In this case, I intentionally put the csproj file name wrong, so the agent itself searches in the file system and finds one or more possible solutions:
In our case, we run the following command
dotnet sln add src/TemplateExample.csproj

//Output: Project `src\TerminalExample.csproj` added to the solution.
2 - Add a Test Project in .NET Using the Terminal
A process similar to the previous one; you simply run the following command to add an xunit project, although you can use nunit or mstest:
dotnet new xunit -n TerminalExample.UnitTest -o Test
And then add the project to the solution:
dotnet sln add Test/TerminalExample.UnitTest.csproj
Now I'll simply add a small use case and a test to check the functionality:
public class ExampleUseCase
{
    public int Sum(int a, int b)
    {
        return a + b;
    }
}

[Fact]
public void TestSumIsCorrect()
{
    ExampleUseCase exampleUseCase = new ExampleUseCase();
    int result = exampleUseCase.Sum(1, 2);
    Assert.Equal(3, result);
}
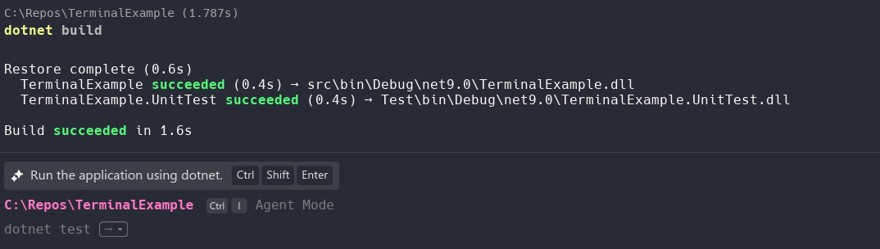
As we see, after doing build, Warp predicts what we're going to do, and just by pressing shift and the right arrow, we can save typing (this can be configured to use the tab key, for example).
3 - Why It Is Important to Be Familiar with Terminal Commands
In C#, we usually don't use the Terminal, but in any other language or environment, the terminal or command line is another crucial part of development. All of you doing front-end know this: absolutely everything on the front end is done from the command line, there isn't an IDE like there is for C# that does everything for you. The same happens in languages like Ruby or DevOps environments, where absolutely everything is done through the terminal.
Generally, once you're familiar, it's much faster and simpler to perform actions in the terminal than in the interface. More importantly, it's more reliable, since commands rarely change, but program interfaces are constantly being updated.
If you're a .NET developer and ever want to move out of this environment, I highly recommend getting comfortable with the terminal.
3.1 - Connecting to a Database with the Terminal
A very simple example: if you have an app deployed on some system and you need to connect to the database because something is going wrong, you aren't sure what, and you need to check the database. For security reasons, you can only connect from the machine itself, so you have to use ssh to access that machine and then run SQL commands manually. Just to verify information.
We connect using the following command. In my case, this database is running in docker:
docker exec -it mysql-flagx0 mysql -u root -p
From there, we can directly query the database.
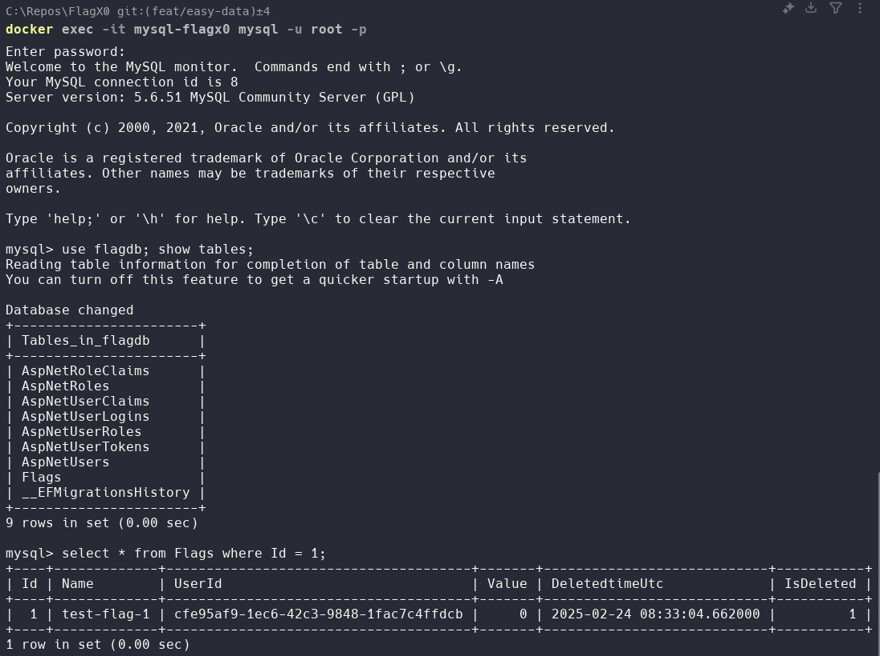
We see that the client who called us because their flag wasn't working actually had their record deleted, so we manually reactivate it with the following query, also in the terminal:
mysql> UPDATE flagdb.Flags t
    -> SET t.DeletedtimeUtc = null,
    ->     t.IsDeleted      = 0
    -> WHERE t.Id = 1;
Query OK, 1 row affected (0.01 sec)
Rows matched: 1  Changed: 1  Warnings: 0
4 - Other Important .NET Commands in the Terminal
Within .NET, there are many commands to run, but some are more important, and of course, more common, than others.
We've seen the project and solution creation commands, but there are also others, such as:
dotnet build to build a project, where you can pass the --configuration Release option to build in release mode.
dotnet run to run a project. You need to specify --project projectpath.csproj if you have more than one.
There are several NuGet commands. I usually use the interface for NuGet, except when I do a dotnet nuget locals all --clear, which clears the NuGet cache. In new versions, this isn't often needed, but if you work with .NET Framework, I'm sure you've had to run it several times.
dotnet test to run tests within the solution. You can add filters or store test results by using the --logger parameter.
In .NET, there are tools that we can execute from the command line, such as the whole help package for Entity Framework , although there are many more.
Finally, for deploying applications, you can use dontnet publish -c Release -o ./destinationFolder to publish an app in release mode, and that will be the code you are going to deploy.
If you enjoyed the content and plan on using Warp, don't forget to use my referral link! https://app.warp.dev/referral/9D4X54
Cheers!
