In this post, we will see how the lifecycle of Blazor components works and the methods we can use to interact with the component lifecycle.
Index
1 - Dependency Injection with Blazor
For this post, it's important that you have a clear understanding of the concept of dependency injection. The logic is the same as in C#.
Here are the links you need to understand before continuing with this post
There is only one thing that differs between Blazor and "regular" C#, and that's that in C# we usually inject dependencies in the constructor of our class.
But in Blazor, as we saw in the post about Blazor components, we do not have a constructor, so we must inject it using @inject within our .razor file or [Inject] in our partial class.
In our case we inject IHttpClientFactory and it would look like one of the following forms:
//PerfilPersonal.razor
@inject IHttpClientFactory ClientFactory

//PerfilPersonal.razor.cs
[Inject]
private IHttpClientFactory ClientFactory { get; set; }
2 - HTTP Calls with Blazor
To make HTTP calls with Blazor, we'll follow the same logic as in C#. For this purpose, we use IHttpClientFactory. If you're not familiar with HTTP calls, I recommend you read the following post:
The only difference you might encounter is that if you are using .NET5 you can import the package using System.Net.Http.Json and automatically deserialize your response.
var client = ClientFactory.CreateClient("BackendApi");
return await client.GetFromJsonAsync<ResultDto<PersonalProfileDto>>($"api/perfilpersonal/{profileCode}");
3 - Component Lifecycle
When we talk about Blazor, we're talking about components, small pieces of code.
Before moving on, note that these methods can be either synchronous or asynchronous. In this case, since we are calling an external service, they will be asynchronous.
For this example we will query our personal profile in the back-end, which will be part of the URL. To access it, simply use https://localhost:44363/perfil/{nombre}
But how do we receive these values?
First of all, remember from the previous post that with the @page directive, we can pass a parameter from the URL.
We need to capture this parameter and send it to our component where we display the information, as it is in the component where we will make the HTTP call.
@page "/perfil/{Name}"
@using WebPersonal.FrontEnd.WebApp.Componentes

<PerfilPersonal Profile="@Name"></PerfilPersonal>

@code{
    [Parameter]
    public string Name { get; set; }
}
Now we need to know how to handle this parameter to ensure our page works as expected
3.1 - SetParameterAsync
The SetParameterAsync method is the first to run when a component is created. All parameters sent to the component are stored in the ParameterView type, so if we want to perform any action before the parameters are assigned, we can do it here.
public override Task SetParametersAsync(ParameterView parameters)
{
    return base.SetParametersAsync(parameters);
}
3.2 - OnInitialized and OnInitializedAsync
These methods are executed right when the component is initialized.
protected override void OnInitialized()
{
    base.OnInitialized();
}
protected override Task OnInitializedAsync()
{
    return base.OnInitializedAsync();
}
It is important to note that these methods only execute once per component.
3.3. - OnParameterSet and OnParameterSetAsync
These methods execute when, after receiving parameters, the values are assigned to properties, and they execute each time the parameters are updated.
protected override void OnParametersSet()
{
    base.OnParametersSet();
}
protected override Task OnParametersSetAsync()
{
    return base.OnParametersSetAsync();
}
3.4 - OnAfterRender and OnAfterRenderAsync
When the component finishes rendering, these methods are executed.
protected override void OnAfterRender(bool firstRender)
{
    base.OnAfterRender(firstRender);
}
protected override Task OnAfterRenderAsync(bool firstRender)
{
    return base.OnAfterRenderAsync(firstRender);
}
3.5 - StateHasChanged
This is the method you should call when you change something in your component so it re-renders. For example, if you want to show or hide a modal, you have to re-render the component.
3.6 - ShouldRender
With this method, you can block the user interface from refreshing since it is called every time the component renders. That said, even if you return `false`, if it is the first render, the component will still render.
3.7 - Dispose
As an additional note, you can implement IDisposable in your class, and therefore you must implement the Dispose method.
If you don't know how to implement dispose, check the following link:
4 - Example of a Component Lifecycle in Blazor
For this example, let's look at something very common: reading from one profile to another. It would be similar to switching blog posts.
For this example, we'll use the project we've been using so far, which is available in the GitHub link in this same post.
Therefore, we will make a call to https://localhost:44363/perfil/{nombre}
The first thing we need to make clear is that the component will start assigning values and rendering when `SetParameterAsync` finishes. This means that if we need to make external service calls (for example, to read the complete profile), we can't access it until that call is finished.
Speaking in code, if we have something like the following:
<div>
    <div class="row">
        <div class="col-sm-12 text-center">@PersonalProfile.FirstName @PersonalProfile.LastName</div>
    </div>
</div>
We assume it will print the first and last name, but this is not the case because PersonalProfile is null, which will therefore throw an exception.
We must wait until PersonalProfile has a value to display the information.
@if (PersonalProfile != null)
{
    <div>
        <div class="row">
            <div class="col-sm-12 text-center">@PersonalProfile.FirstName @PersonalProfile.LastName</div>
        </div>
    </div>
}
Note: you can also use the "coalesce value" @(PersonalProfile?.FirstName ?? "").
4.1 - Where to Call an External Service from Blazor
It is now clear that before displaying anything, you need to assign a value to the PersonalProfile property. Where should you do it?
The first thing to come to mind is to do it within OnInitializedAsync since it is the method that runs when we initialize the component.
protected override async Task OnInitializedAsync()
{
    var result = await GetPersonalProfile(Profile);
    if (!result.Errors.Any())
        PersonalProfile = result.Value;
    else
        Erros = result.Errors;
}

private async Task<ResultDto<PersonalProfileDto>> GetPersonalProfile(string profileCode)
{
    var client = ClientFactory.CreateClient("BackendApi");
    return await client.GetFromJsonAsync<ResultDto<PersonalProfileDto>>($"api/perfilpersonal/{profileCode}", new JsonSerializerOptions
    {
        PropertyNameCaseInsensitive = true
    });
}
And technically, it works – or so it seems.
Let's check how this is not the right solution.
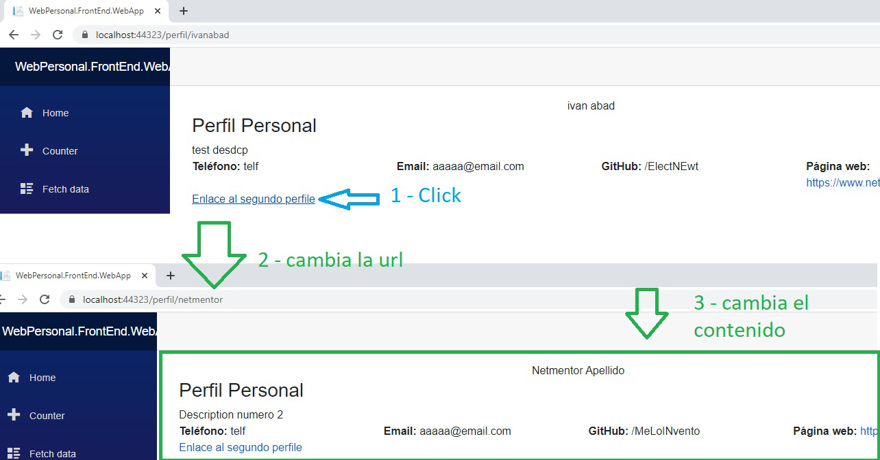
If we add a second profile, put it as a link at the end of the page, and click this very link, we'll notice that the URL changes but the content remains the same.
<a href="/perfil/netmentor"> Link to the second profile</a>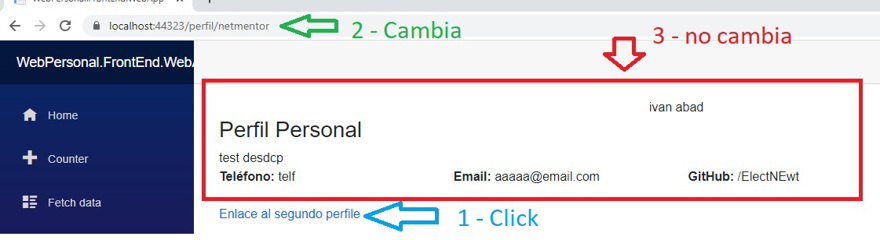
This occurs because OnInitializedAsync only executes once per component and, for our routing, both /perfil/ivanabad and /perfil/netmentor are the same component since both match /perfil/{Nombre}.
For the information to update, we must make the call to our `Back-End` within OnParameterSet or OnParameterSetAsync. This is because, as mentioned, the component does not change, only the parameter changes.
To implement the lifecycle correctly, what we are going to do is create a private property which will contain the value of our Profile parameter, but we won't receive it directly. Instead, we will assign it from the received parameter. We do this to check if the parameter has changed or is the same, and if it has changed, reload it.
See the implementation in the following code snippet:
public partial class PerfilPersonal
{
    [Inject]
    private IHttpClientFactory ClientFactory { get; set; }
    [Parameter]
    public string Profile { get; set; }
    private string _profileValue { get; set; } //Private property to store current value
    public PersonalProfileDto PersonalProfile { get; set; }
    public List<ErrorDto> Erros { get; set; }

    protected override async Task OnParametersSetAsync()
    {
        if (_profileValue != Profile) //Compare the value, and if it is different, fetch new info
        {
            await CalculateProfile();
        }

        await base.OnParametersSetAsync();
    }

    private async Task CalculateProfile()
    {
        _profileValue = Profile; //Assign value
        var result = await GetPersonalProfile(Profile);
        if (!result.Errors.Any())
            PersonalProfile = result.Value;
        else
            Erros = result.Errors;
    }

    private async Task<ResultDto<PersonalProfileDto>> GetPersonalProfile(string profileCode)
    {
        var client = ClientFactory.CreateClient("BackendApi");
        return await client.GetFromJsonAsync<ResultDto<PersonalProfileDto>>($"api/perfilpersonal/{profileCode}", new JsonSerializerOptions
        {
            PropertyNameCaseInsensitive = true
        });
    }
}
You should use the same implementation in all components that have a parameter that can change.
Conclusion
- In this post, we have seen that dependency injection in Blazor is a bit different than dependency injection in our C# classes.
- We have seen that HttpClient works the same in Blazor as it does in C#.
- We have seen how the component lifecycle in Blazor works and an example of how to implement a component's lifecycle.
