In today’s post we’re going to talk about routing in Blazor.
We’ll see what it is and how to use it, as well as some of its characteristics or more advanced features that aren’t always clear to users.
Index
1 - What is routing
First and foremost, we need to understand what routing is and what it’s used for.
Routing is the mechanism that makes HTTP requests go to the correct place, in our case, the correct page.
1.1 - Routing in Blazor
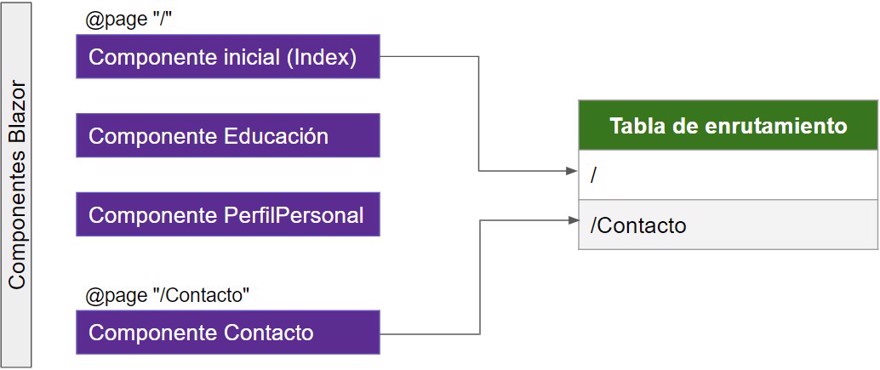
To determine if a component is routable in Blazor, we do this at compile time.
The compiler detects all components that contain the @page directive in their code and adds them to the routing table. When a request arrives, the routing component scans the table to check if it exists or not.

If we do not use the @page directive, this component can only be used as an embedded component within another.
2 - Routing component
The routing component is the piece of code that we can find in the app.razor file
<Router AppAssembly="@typeof(Program).Assembly">
    <Found Context="routeData">
        <RouteView RouteData="@routeData" DefaultLayout="@typeof(MainLayout)" />
    </Found>
    <NotFound>
        <LayoutView Layout="@typeof(MainLayout)">
            <p>Sorry, there's nothing at this address.</p>
        </LayoutView>
    </NotFound>
</Router>
When we define a request such as `localhost\fetchdata`, the first thing .NET does is check if there’s a controller that defines that route.
If there is, the request is sent to that endpoint through the <Found.. > component.
If there isn’t, the request goes to the <NotFound…> component, where we typically display an error.
If it exists, it will render the view. If it doesn’t, the default error page will be shown.
3 - Additional features of routing in Blazor
In addition to the basic routing we’ve just seen, there are other features that help us achieve a more complete functionality.
3.1 - Receiving parameters in the URL with Blazor
Using the page directive, we can receive parameters in the URL. We just need to specify it as we saw with API routing in API in C# by including the variable name in curly braces:
@page "/nombre/{id}"
<div>El nombre enviado como parámetro es @id</div>
@code {
    [Parameter]
    public string id { get; set; }
}
Of course, we must indicate that we’re going to receive the parameter within our code.
Finally, you just need to visit the URL https://localhost:44323/Nombre/NetMentor.
3.2 - Conditional parameter type
Similar to the generics feature, where you can restrict the type of T. In Blazor, we have the same functionality, since we can enforce the type of the variable we’re going to receive.
To do this, we specify the type with :type in the directive, along with the variable we’ll receive.
@page "/codigo/{id:int}"

<div>El código enviado es @id</div>

@code {
    [Parameter]
    public int id { get; set; }
}
You can see in the example we’ve limited the type to int.
This kind of constraint is very useful to prevent receiving incorrect data types from the URL.
If we send an incorrect type in the URL, the <NotFound… > component will be triggered with the error.
3.3 - Loading additional assemblies
When we looked at our routing component, it looked like this on its first line:
<Router AppAssembly="@typeof(Program).Assembly" >This line indicates it’s going to search for routing in our program.cs. But what happens if we import another DLL that also contains components with routing?
For this, we can extend the component using the AdditionalAssemblies directive, which lets us specify an array with different assemblies.
<Router AppAssembly="@typeof(Program).Assembly"
        AdditionalAssemblies="new[] { typeof(dllExterno).Assembly }">
        ....
</Router>
3.4 - Match in the Blazor menu
For this point, I’m not referring directly to routing, but rather to the user experience.
It’s very common for a website to have a menu, whether it’s on the side or on top. It’s also common for the menu to have the current section “highlighted” where the user is.
In Blazor, for the menu, we use the NavLink component, and one reason is because it allows us to use the Match attribute, which applies CSS “active” styling if the URL matches the component’s URL.
<NavLink class="nav-link" href="" Match="NavLinkMatch.All">
    <span class="oi oi-home" aria-hidden="true"></span> Home
</NavLink>
For this, we can use the full URL with Match="NavLinkMatch.All" or just the prefixes with Match="NavLinkMatch.Prefix".
Conclusion
In this post, we’ve seen what routing in Blazor is. Of course, you need to be very clear on how it works and have a notion of what happens behind the scenes.
We’ve also seen several additional features of routing in Blazor.


