With the arrival of .NET 8, Microsoft brought us a library, or rather a framework, that is very powerful and using it can save us plenty of headaches in certain environments where it drastically improves the development experience. Before continuing, keep in mind that we're on preview 1, and I expect lots of improvements not only throughout 2024 but also in upcoming .NET versions.
Table of Contents
Today we're going to look at what .NET Aspire is and, of course, how to use it to our advantage with the Distribt project. As usual, the code will be available on GitHub, but this time only in one branch, since it's not fully compatible "out of the box" with the rest of the project.
1 - What is .NET Aspire?
.NET Aspire is a framework/service/call it what you will that Microsoft set up for us with the idea of making it easier to develop distributed applications.
Aspire brings us a series of components that are essential when building distributed systems, including service discovery, telemetry, resilience and health checks, all of this by default, but of course, you can extend it.
Note: Projects need to be on NET8 for everything to work properly.
1.1 - When to use net aspire
Bear in mind that it is just for local development, technically you can deploy it to production but you shouldn't, at least for now. I don't know if there are future plans to allow production usage or if it will be part of Azure.
According to what was mentioned during the NetConf 2023, the inception of this project was driven by companies often complaining about the complexity of creating distributed applications. Honestly, I don't think that's normal, if developers don't care about having a healthy ecosystem. In short, if you had followed the Distribt course ;) you'd know what to do and how, so you wouldn't spend days or even weeks onboarding users.
In our specific case, you'll know that to set up all the Distribt infrastructure and run local tests, there's a script that sets everything up, backed by Docker Compose.
This simulates the infrastructure you'd have in production.
- Link to the script.
- Link to the docker compose.
2 - Getting Started with .NET Aspire
Now we're going to implement .NET Aspire in our code. We'll not only see the "tutorial" but implement it in an existing project.
The first thing we need to do is update the .NET workloads. To do that, run the following command in your terminal:
dotnet workload updateThen install the aspire workload:
dotnet workload install aspireWith these commands, we've simply installed the project templates that will appear when creating a new .NET project. Here's an example of what you see when creating one of these projects:
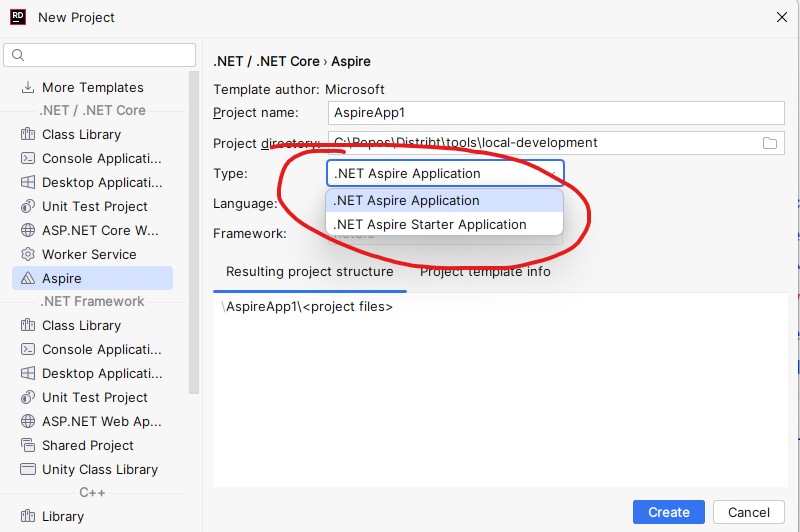
As we can see, we have two options. What does each one do?
.NET Aspire Application: Installs theAppHostandServiceDefaultspackages. These packages include configuration for health checks, service discovery, telemetry, etc. Anything common you want to add, the place to put it is here..NET Aspire Starter Application: In addition to the previous two, it includes a backend (minimal API) and a frontend (Blazor) so that you can test the functionalities.
2.1 - Explaining .NET Aspire Projects
First, let's go over the backend and frontend, since they're the simplest. In both cases, everything looks like any other normal project, except for two exceptions.
The first, common to both, is that once we create the builder for our web application, we call AddServiceDefaults(), which we'll explain in a moment:
var builder = WebApplication.CreateBuilder(args);

// Add service defaults & Aspire components.
builder.AddServiceDefaults();
And then, in the case of the frontend (actually, this is the same for the backend, but in this case it has no dependencies), when specifying the backend URL, instead of specifying a URL or IP, which would be normal, we use an application name:
builder.Services.AddHttpClient<WeatherApiClient>(client => client.BaseAddress = new("http://apiservice"));
Now let's move on to the first of the two "pure" .NET Aspire projects, which is ServiceDefaults. As I mentioned, this is where you specify telemetry, health checks, etc, and this is done through the extension method AddServiceDefaults.
public static IHostApplicationBuilder AddServiceDefaults(this IHostApplicationBuilder builder)
    {
        builder.ConfigureOpenTelemetry();

        builder.AddDefaultHealthChecks();

        builder.Services.AddServiceDiscovery();

        builder.Services.ConfigureHttpClientDefaults(http =>
        {
            // Turn on resilience by default
            http.AddStandardResilienceHandler();

            // Turn on service discovery by default
            http.UseServiceDiscovery();
        });

        return builder;
    }
Both this method and the ones it uses come by default with the template.
If you followed the Distribt course, this is a copycat of my setup class. It's not exactly the same, obviously, but the idea is the same.
If you keep looking, you'll notice how the .csproj file has a new property specifying it's an aspire shared project: "IsAspireSharedProject".
Finally, the project that makes all this make sense: the AppHost project. Here is where we reference the projects we want to run, and not only that, it's also where we define the application name we specified earlier, such as "apiservice".
For the example project, this is the code:
var builder = DistributedApplication.CreateBuilder(args);

var apiService = builder.AddProject<Projects.AspireApp1_ApiService>("apiservice");

builder.AddProject<Projects.AspireApp1_Web>("webfrontend")
    .WithReference(apiService);

builder.Build().Run();
Notice that the apphost is referencing the projects it will use, and then in the frontend, it also specifies that we use the api as a reference.
And when you run this project, two things will happen:
- First, all referenced apps will start
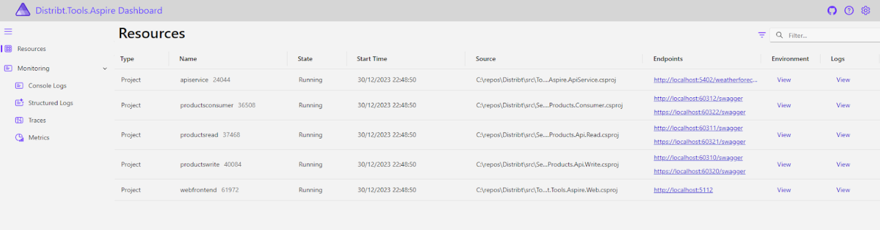
- Second, the apphost itself contains an awesome dashboard

In this image, you can see which projects are in use and their respective URLs to access them, but also, if you take a look at the menu on the left, you’ll see a monitoring section where you have logs, traces, and metrics for each one.
As an important note, you can use projects in other languages within Aspire, or so I’ve read; I haven’t tested it myself.
Finally, I’m sure you’ve noticed the main “problem” we’re going to run into with .NET Aspire: in order for everything to work optimally, all the projects to be used must be in the same repository, or technically, in the same solution, but who really has solutions spread across multiple repos?
3 - Implementing Aspire in an Existing Project
First of all, let me stress what I said before, using aspire forces you, at least for now, to have a monorepo, which doesn’t really go hand in hand with distributed systems. Let’s ignore that because as it happens, the Distribt project has everything in a single repository.
Since the project is quite large, I’m not going to change the whole infrastructure because that would probably take hours. What I'll do is try to hook Aspire into what I already have. Remember that in this particular case, I have plenty of services (vault, consul, rabbitmq, mysql, mongodb, telemetry, etc), so for now, the goal is to make the dashboard show the projects themselves, which represent microservices.
For this example, I’ll configure only Producs.Api.Read, Products.Api.Write, Products.Consumer. For those who haven’t followed the Distribt project, it’s very simple: the reading and writing projects are separated, each with their own database, and through eventual consistency with the consumer, the information is synchronized.
Now what we should do is create a new .NET Aspire project. I’m going to reuse the Apphost we've seen in section 2, obviously changing the projects:
using Projects;

var builder = DistributedApplication.CreateBuilder(args);

builder.AddProject<Distribt_Services_Products_Api_Read>("productsread");
builder.AddProject<Distribt_Services_Products_Api_Write>("productswrite");
builder.AddProject<Distribt_Services_Products_Consumer>("productsconsumer");


builder.Build().Run();
But obviously, we haven't included the new package called ServiceDefaults, which I’ll add in the setup I mentioned before.
public static WebApplication Create(string[] args, Action<WebApplicationBuilder>? webappBuilder = null)
{
    WebApplicationBuilder builder = WebApplication.CreateBuilder(args);
    builder.AddServiceDefaults();
    ...rest of the code...
    return builder.Build();
}
Since AddServiceDefaults already contains telemetry, I took the opportunity to remove all previously existing setup package code.
- Note: AddServiceDefaults in this specific project can be included in each project individually or in the shared setup that affects them all, result is the same.
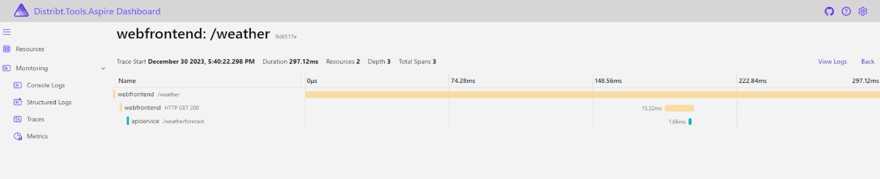
Now, if we run our AppHost and create a product, we can see both the dashboard:
And the waterfall of API calls:

As a simple example, this already works for us and, for now, it's enough, the post is already quite long. Also, the only extra thing we could add is the service discovery for other services like MySQL, RabbitMQ, etc, which would require changing connections and so on.
If your project doesn’t have anything "shared" at this point, it might be worth it, but with the setup I have, it doesn’t make sense.
Conclusion
I haven’t added conclusions for a while, but I think this post deserves one.
Personally, I like Aspire and need to investigate more since this was my first contact. The fact that you have to keep everything in the same repo will keep me from using it at work, and until that's changed, I doubt the situation will be any different. I hope they invent something.
The dashboard is, to me, the best improvement, including logs, metrics, etc, since they can really help with local development. On the other hand, AddServiceDefaults is something I would expect all companies to have implemented already (though, to be honest, I know they haven’t; I’ve worked at many and there’s a lot of copy & paste). Also, I understand that in my project, the setup could be converted into an AspireSharedProject.
The service discovery thing is nice, but I’m not clear if it’s compatible with other service discoveries once deployed to production. From what I can tell, when you configure other services you have to set the URL in appsettings, which destroys the service discovery concept and forces you to deploy those variables (env files, Octopus, etc) instead of resolving them (service discovery) per environment.
Deploying the variables isn’t better or worse than resolving them on the fly; it's just another way, both have pros and cons.
This is the first version, so I’m not expecting perfection. In fact, more compatibility packages with libraries are gradually being released, many of them community-driven, not directly from Microsoft.
But for the next version, or maybe NET 10 (which is LTS), I expect a lot more, and I see it as essential to be able to invoke projects outside the solution. At first, I was expecting something more magical; in the end it’s a wrapper with a project that runs everything in a solution at once, something you can already do easily in Visual Studio or Rider. The log and telemetry centralization is nice, but it's something any serious company needs by default, and telemetry in local doesn't make much sense.
Ideally, it should be possible to use the URL/GIT of a project and have Aspire download, run, etc, similar to what’s done with Docker. That’s what I hope for.
Also, for local development, you need to have the infrastructure element you need accessible on your machine/Docker/server, so personally, I don’t see as much use as I did the day of NetConf.
