As developers, we love building things, even more now with artificial intelligence, but sometimes deployment or maintenance costs slow us down. Today we are going to break that barrier. I am going to show you how to bring to life those amazing projects you have half abandoned on GitHub, simply by using a VPS from Hostinger, where for the price of two coffees a month you can run not just one, but all your applications 24/7.
Table of contents
NOTE: 10% discount code with the coupon NETMENTOR.
1 - Why do you need a VPS?
A VPS is basically a machine on a server that is fully yours. You install whatever you want, configure it however you want, and the best part is that you pay very little compared to platforms that manage everything for you.
Even though it takes a bit more work at the beginning, it is absolutely worth it in the long run because it is much cheaper and you can scale to machines with more resources when your system needs it.
2 - Choosing a VPS provider. Why Hostinger?
I am not going to lie, this is a collaboration, but there is a reason why I agreed to work with them and not with other providers.
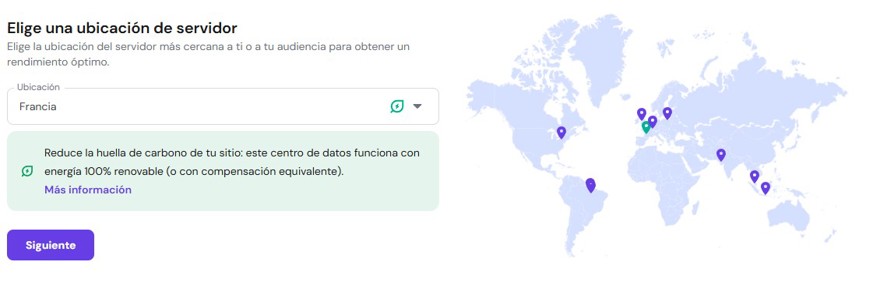
2.1 - Geolocation
Hostinger has servers in Brazil, which is key if you or your clients are located in Latin America. Latency matters a lot, and having a server in Sao Paulo makes a huge difference compared to hosting it in the United States or Europe.
Of course, if your audience is in Europe, there are also servers there. But for me, having servers in South America mattered a lot.
2.2 - Price to performance ratio
There would be no point in doing a collaboration if I did not think the product was worth it.
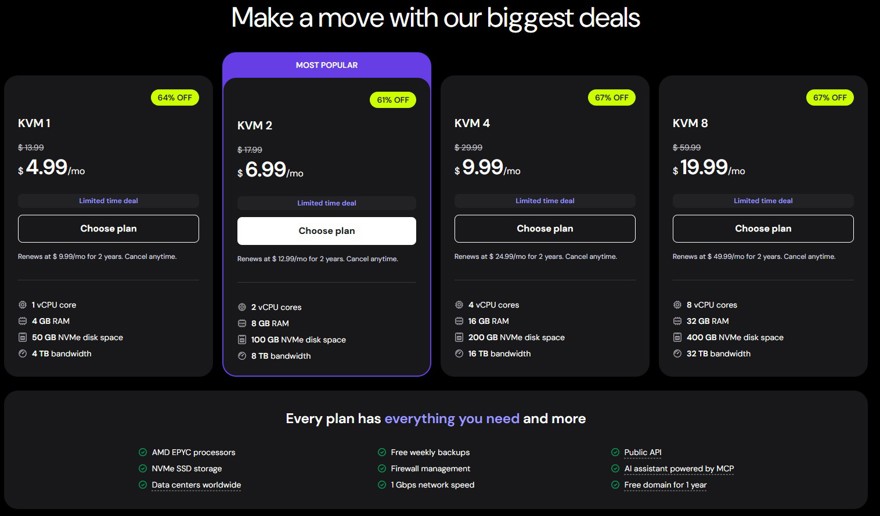
Hostinger has several plans, and as developers, even for hobby projects we push things hard. I recommend the KVM 2 plan, which includes 2 vCPUs, 8 GB of RAM and 100 GB of disk. With this setup you can run a monitoring stack (Grafana and Prometheus), Nginx, three Node.js apps and a database without the server even breaking a sweat.
And once you grow into a product with hundreds of concurrent recurring users, you can scale up to a bigger machine.
This is where the collaboration comes in. If you use the NETMENTOR code you get an extra discount. You support the channel and you get a powerful machine for a very low price for your side projects.
2.3 - VPS types
As mentioned before, a VPS is just a machine that becomes yours, where you can do almost whatever you want.
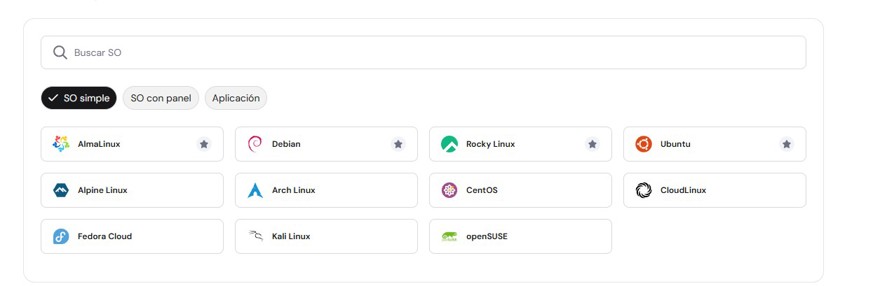
One thing I really like about Hostinger VPS configuration is that it lets you choose modes depending on your skill level.
- Plain OS: As the name suggests, a completely clean operating system. You can choose among the most popular Linux distributions.
- OS with Panel: Usually an operating system with a default configuration and some software already installed, mainly the interface.
- Applications: This option is literally one click app installs. For example, n8n is very popular right now for automating AI workflows, and with one click you can run your own n8n.
In our case we will go with Plain OS, installing Ubuntu from scratch. I chose Ubuntu because it is by far the most popular and best documented distro for general purpose use, but any one would work.
And in this post we will cover a basic use case.
2.4 - Choosing a domain
Having a VPS is great, but you are not going to give a client an IP address to access it. You need a name. Hostinger gives you the first year of the domain for free, and the best part is that the integration is native. You just go to the DNS management of the domain and create an A record pointing to your VPS IP. It is a two click process and in a few minutes your code has a proper name.
3 - Connecting to the VPS
Once everything is set up, we can connect to it. Initially you can use the web terminal, but the recommended approach is to connect from your own machine using ssh root@serverIP and the password you set during VPS setup.
There are a few things we should do first. Create a non root user. This user will not have admin privileges and we will use sudo only when strictly necessary.
We could debate whether for this scenario we should install Tailscale and create a tunnel between your machine and your VPS for SSH, but for now it is not necessary.
adduser netmentor

usermod -aG sudo netmentor

ssh netmentor@serverIP
From this point on we will use sudo only when needed to install or configure services.
And of course, do not forget to enable daily backups from the Hostinger panel. They are useful to restore things when you break something badly, which happens to all of us at some point, or especially if you have recurring users.
4 - Your Landing Page Online: Server and Domain
Now that we have secure access, it is time to turn an empty server into something useful.
First, I recommend running a few commands to update the system and install some basics.
sudo apt update && sudo apt upgrade -y

sudo apt install -y curl git ufw

sudo ufw allow OpenSSH
sudo ufw allow 80
sudo ufw allow 443
sudo ufw enable
For this example we will just show a landing page to understand the flow. Still, to do it properly like a real application, we are going to install NGINX.
4.1 - Install NGINX
To make our landing page accessible from any browser, we need a web server. In this case we will use Nginx because it is one of the most popular technologies in the industry. It will also be useful later as a reverse proxy to manage multiple applications.
sudo apt install nginx -y
sudo systemctl status nginx
sudo ufw allow 'Nginx Full'
And then we update the DNS A record so it points to our website instead of the default one.

4.2 - Deploy our landing
For this specific case it is just a plain HTML file, so we can simply copy it or even write it by hand using vi.
This file must be located at var/www/html. By running sudo vi index.html, Nginx will automatically pick it up.
Now we just access the domain that Hostinger gives us for one year when contracting the VPS using my NETMENTOR code.
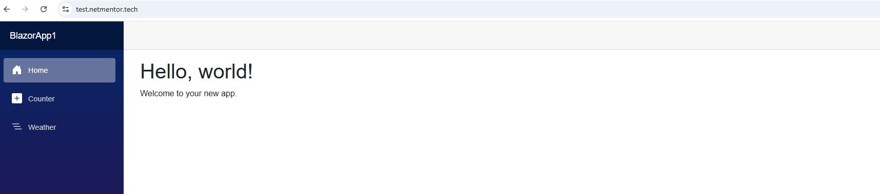
And that is it. Here is the result.
5 - Deploying a real .NET app on Linux
I was not going to stop there, so in this example I will show you how to deploy a .NET Blazor app on a Linux server.
Obviously this example uses .NET because this channel and blog are about .NET, but any programming language works. We could also install Docker and run everything in containers, or even use Dockploy directly from the Hostinger settings and have your VPS with Dockploy installed out of the box.
We will also run this Blazor app on a subdomain, not on the main domain.
5.1 - Configure a subdomain in Hostinger
Go back to the Hostinger panel and create another A record with your custom subdomain pointing to the same VPS IP.
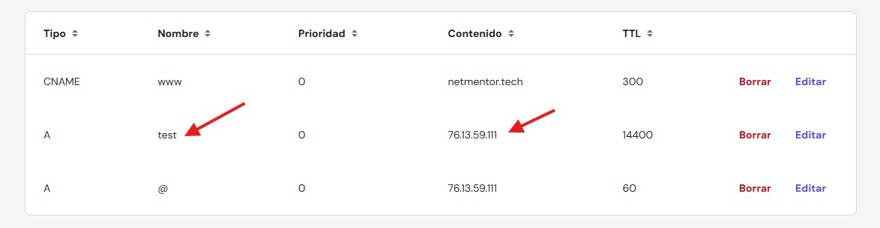
If you notice, this also means that we can have as many domains as we want pointing to a single VPS.
5.2 - Install .NET on the server
Back to the VPS to deploy the system.
In our case we need to install Git and .NET, specifically version 10.
wget https://packages.microsoft.com/config/ubuntu/22.04/packages-microsoft-prod.deb -O packages-microsoft-prod.deb
sudo dpkg -i packages-microsoft-prod.deb
rm packages-microsoft-prod.deb
sudo apt update
sudo apt install -y dotnet-sdk-10.0
5.3 - Clone the repository from GitHub
Once installed, we clone the repository.
mkdir /home/netmentor/testapp/test-vps
cd /home/netmentor/testapp/test-vps
sudo git clone https://github.com/ElectNewt/test-vps
NOTE: If your repository is private, you will need to authenticate. You can use a Personal Access Token or configure SSH keys.
5.4 - Build the application
Now we build the application. In this post we will both run and build the app on the server. This is not a good practice in the real world because you should use a CI/CD pipeline, but for a quick example it works. If you are just experimenting, it is fine. When things get serious, not so much, but let us get to it.
cd /home/netmentor/testapp/test-vps
mkdir /var/www/test-vps

sudo dotnet publish -c Release -o /var/www/test-vps
This process will generate all compiled files inside the folder.

At this point we have the binaries, but the VPS does not know what to do with them.
5.5 - Create the service that keeps the app running
Now we create a service so the app runs automatically and stays up.
cd /etc/systemd/system
sudo vi test-vps.service
And now we create the service content.
[Unit]
Description=test-vps .NET app
After=network.target

[Service]
WorkingDirectory=/var/www/test-vps/
ExecStart=/usr/bin/dotnet /var/www/test-vps/BlazorApp1.dll
Restart=always
RestartSec=10
KillSignal=SIGINT
SyslogIdentifier=test-vps
User=ubuntu
Environment=ASPNETCORE_URLS=http://127.0.0.1:5000
Environment=DOTNET_PRINT_TELEMETRY_MESSAGE=false

[Install]
WantedBy=multi-user.target
Then we reload and enable the service.
sudo systemctl daemon-reload
sudo systemctl enable --now test-vps
5.6 - Configure Nginx as a reverse proxy
Now we configure the web server we installed earlier as a reverse proxy. This means incoming web requests are forwarded to a specific endpoint.
In this case we create a file that listens on port 80 for our subdomain and forwards traffic.
This is the file you need to create in /etc/nginx/sites-available.
server {
 listen 80;
 listen [::]:80;

 server_name test.netmentor.tech;

 # If you need larger uploads:
 # client_max_body_size 50m;

 location / {
 proxy_pass http://127.0.0.1:5000;
 proxy_http_version 1.1;

 proxy_set_header Host $host;
 proxy_set_header X-Real-IP $remote_addr;
 proxy_set_header X-Forwarded-For $proxy_add_x_forwarded_for;
 proxy_set_header X-Forwarded-Proto $scheme;

 proxy_set_header Upgrade $http_upgrade;
 proxy_set_header Connection "upgrade";
 }
}
Now we link available sites to enabled sites and we are good to go.
sudo ln -s /etc/nginx/sites-available/test.netmentor.tech /etc/nginx/sites-enabled/test.netmentor.tech
sudo systemctl restart nginx
Here is the result.
5.7 - HTTPS
Finally we just need to enable HTTPS. We can do this easily with Certbot. With the following three commands we install Certbot and automatically add HTTPS to our subdomain for free.
sudo apt update
sudo apt install -y certbot python3-certbot-nginx
sudo certbot --nginx -d test.netmentor.tech
NOTE: remember that you have a 10% discount code with the coupon NETMENTOR.
If there is any problem you can add a comment bellow or contact me in the website's contact form